Vegan Chocolate Chip Cookies (Gluten Free, Egg Free, and Dairy Free)

Nancy's cookies

By: Nancy Haggerty

Hello everyone! I am so thrilled to be a guest blogger for Safe Eats.  What a great organization to be a part of and I am honored to be able to share some of my recipes with you all.

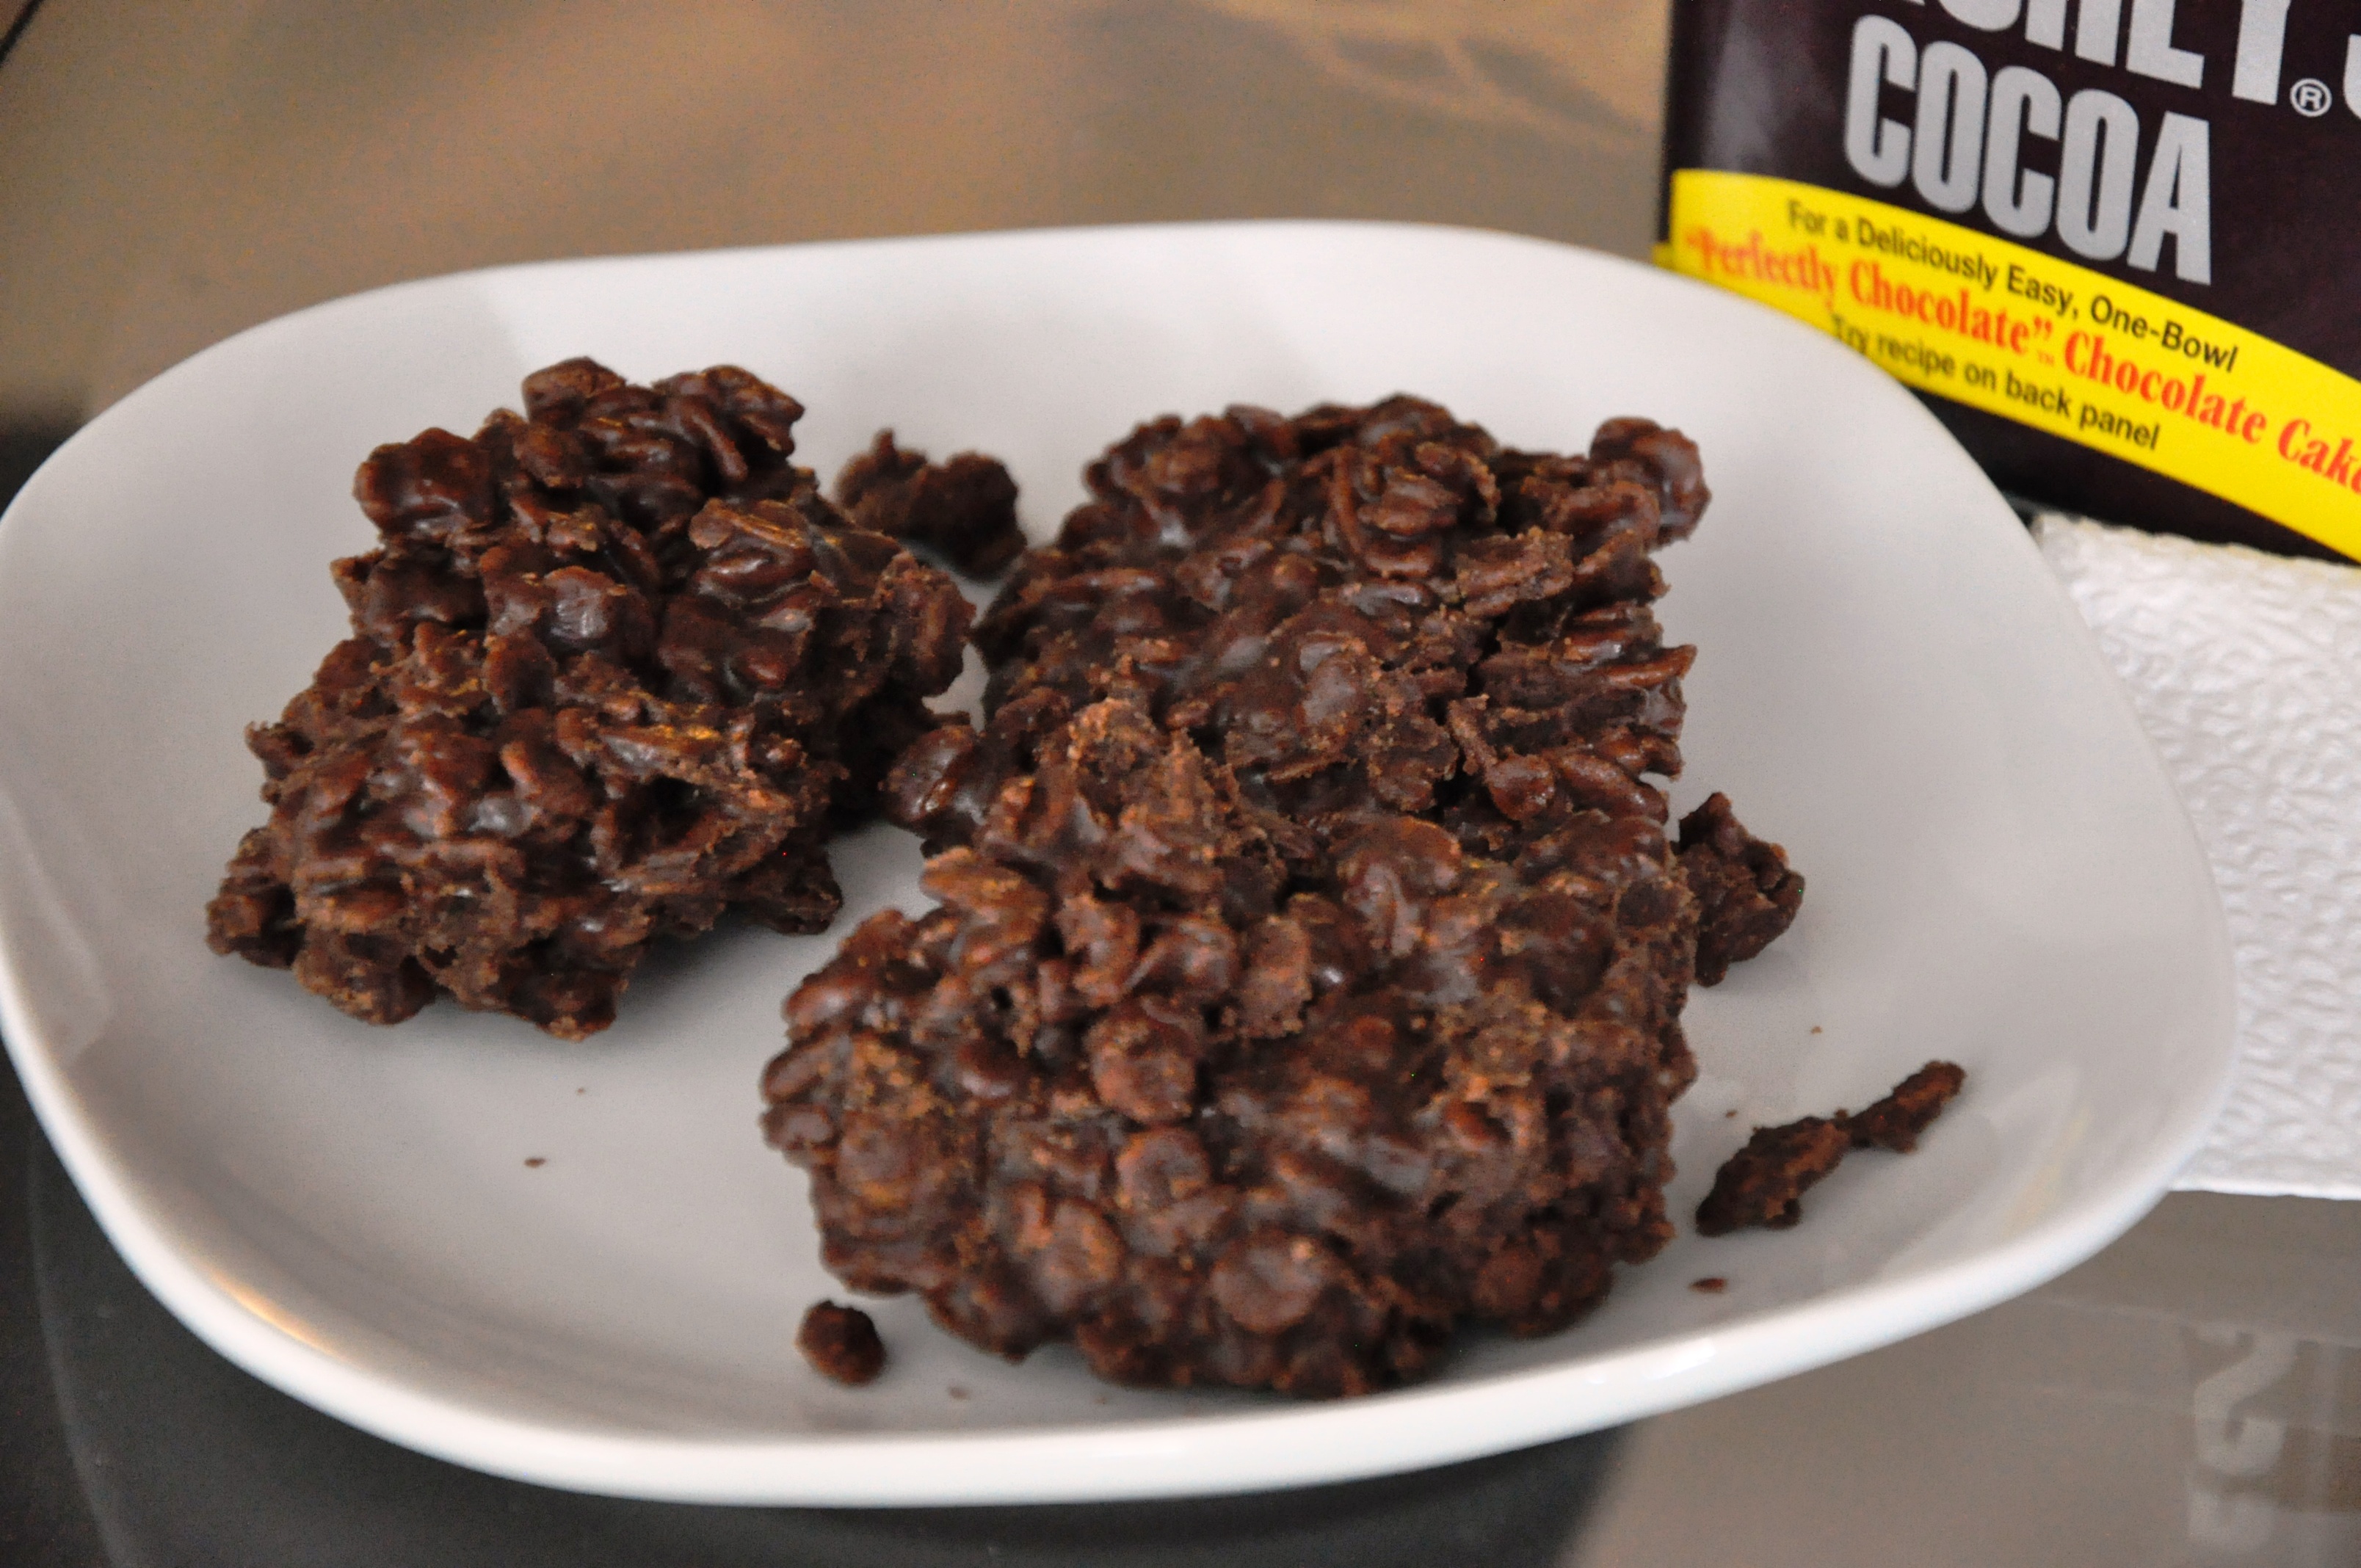
This cookie recipe is one of my all time favorites and it’s gone through an evolution as I’ve perfected my craft over the years. Yet it still reminds me of my very first venture into the art of baking gluten free.

Chocolate Chip Cookies:

1/2 Tablespoon flax meal

2 Tablespoons water

6 Tablespoons (84g) vegetable shortening (I use Earth Balance brand)

1 cup (150g) light brown sugar

1/2 cup tapioca flour

2/3 cup (81g) brown rice flour (I use Authentic Foods brand)*

1/3 cup + 1 1/2 Tablespoons (60g) white rice flour (I use Authentic Foods brand)*

1/4 teaspoon salt

1 teaspoon baking soda

1/2 teaspoon xanthan gum

1 Tablespoon coconut milk (I use Native Forest brand)*

1/2 cup chocolate chips (I use Enjoy Life brand)

Directions:

1. Preheat the oven to 375 degrees. Line one standard size cookie sheet with parchment paper.

2. Combine the flax meal with the water in a small bowl and set aside.

3. In a mixing bowl cream together the vegetable shortening with the light brown sugar by mixing on low for a few minutes.

4. In a separate bowl combine the tapioca flour, brown rice flour, white rice flour, salt, baking soda, and xanthan gum.  Whisk these dry ingredients together. Set aside.

5. Add the flax meal and water mixture to the creamed vegetable shortening and brown sugar mixture along with the coconut milk. Mix on low until fully combined.

6. Then gradually add the dry ingredients to the wet.  Mix on low until all the ingredients are fully incorporated, scraping down the sides of the bowl with a rubber spatula as needed.  It should look and feel just like cookie dough.

7. Finally, add the chocolate chips and mix on low for about 15 seconds. Use a spoon or scoop to make round balls about 1-1 1/2 inches in size. Space cookie balls about 2 inches apart on the cookie sheet.  Flatten each ball so they are the shape of cookies (they will not flatten much on their own during baking). Bake on the middle rack for 10 minutes or until cookies are easy to remove with a spatula.  If they are still soft bake for another 1-2 minutes. Remove from cookie sheet and cool on a cooling rack.

Makes about 24 cookies.

*A word on substitutions: Many gluten free flours can be substituted for others, such as quinoa, sorghum and millet. However, each flour has its own weight, texture, and viscosity. Therefore, it may alter the end result. Always use a combination of flours for best results. If substituting coconut milk in this recipe with another dairy alternative use ½ Tablespoon as other dairy alternatives are thinner than coconut milk.

Nancy Haggerty is a food blogger at www.aglutenfreedairyfreelife.com and has been perfecting the art of gluten and dairy free since 2007.  She lives in Westchester, NY with her son, Kenyon and husband, Ben. We are so grateful for Nancy’s contribution. Please check out her blog and try out more of her delicious recipes!

Honey Graham Crackers (Free of Gluten, Dairy, Eggs, Nuts, Soy, and Rice)

Crunchy, tasty, and perfect for dunking into your favorite beverage.

DSC_0122

Honey Graham Crackers

2 cups sorghum flour

1/2 cup potato starch

1/2 tsp salt

1/2 tsp baking soda

1/4 cup brown sugar

1/2 teaspoon cinnamon

1/4 cup, non-hydrogenated palm shortening such as Spectrum brand

1/2 cup honey

1/4 cup water

Preheat oven to 350 degrees F.

Mix dry ingredients together. With a pastry cutter or two knives, cut the shortening in until it resembles sand. Add the honey. Then add water a little bit a time until the mixture just sticks together and doesn’t fall apart. If still falling apart, add another Tablespoon or so of water.

Tear out a piece of parchment paper that will fit on your cookie sheet, and then put the parchment paper on a table or counter. Take half of the dough and press it onto the parchment paper to form a rectangle of dough in the middle of it. Top with a sheet of wax paper and roll the dough until it is about 1/8 inch thick.

Remove the wax paper and transfer the parchment paper with the rolled dough to the cookie sheet. Using a knife or bread dough scraper, cut where you want the graham crackers to break. Using a fork, poke three sets of holes for each cracker.

Bake for 10-15 minutes or until graham crackers are lightly browned around the edges.

Remove and let cool for 10-15 minutes. Using a very flat sharp cookie spatula or knife, re-cut into the cracker separations and gently lift them from the parchment.

Repeat with remaining dough.

These will store for 1-2 weeks in an airtight container.

Dreamy Allergen-Free Double Chocolate Cookies

DSC_0359 (3)

With a thin sugar-crisped exterior, a moist interior, and deep milk-chocolate flavor, these cookies are a food allergic’s dream come true.

The story of this cookie: I needed to make a really good double chocolate cookie (I realize that “need” is a strong word, but hey a chocolate cookie craving is a need, am I right?). I was a bit disappointed in the gluten-free double chocolate cookie I had been making. It kinda satisfied the chocolate craving but the taste was still too dark and had a bitter tone. Also, as with most disappointing gluten-free treats, the texture was pretty grainy and dried out within a day. I needed a moist cookie that had a silkier texture, a more milk chocolate flavor, and with a good texture that would last for more than 15 minutes.

After much research and experimentation, I finally hit a winner. The secret to better texture and moisture retention is in a higher ratio of starch than is normally called for in gluten-free baking. A 50% flour and 50% starch mix. Yes! Good results!

I shared some finished cookies with family and friends and took some to networking events. I got a lot of rave reviews on this cookie. Due to such great response, I was tempted to keep this recipe a secret. I’ve been told that I shouldn’t publish this and that it should be the beginning of fantastic cookie sales, and a way to fame and fortune – perhaps a new line of dream cookies for all those who can’t wheat, dairy, eggs, corn, oats, peanuts, treenuts, or rice! (It’s very hard to find gluten-free treats without rice!) I’ve made these with both brown rice flour and sorghum flour, the results were good for both.

I don’t want to have you thinking these are some sort of extremely magical cookie, though. What gets us excited, however, is that this is like having a cookie made from wheat. They’re simply good. For those of us who haven’t had good cookies like that in a long while, it’s pretty magical.

What’s even better – these are pretty economical. Other than the palm oil shortening, the rest of the ingredients are sold for prices that won’t leave you breaking your wallet at $70 in the 7-items or less checkout line.

So, I suppose I could have kept this recipe to myself, but what of all those commercial kitchen start-up costs that I don’t have? And what of all the needs of the dedicated bakers all over the world that need to start their gluten-free baking with a really good cookie?

I’d rather inspire all of you to make these and share them with your friends and family. I’d like to see if your foodie friends who can eat anything even notice that these aren’t anything but fantastic. I’d like to see you delight your co-workers or family members or friends who are usually left out of the food part of celebrations and watch them smile and praise you for your thoughtfulness! It would be great to see these offered in your bake sales, your community events, school functions and fundraisers! The food allergy community will profusely thank you for thinking of them and for making their cookie dreams come true!

Without further adieu:

Dreamy Allergen-Free Double Chocolate Cookies

Set your oven to 350 degrees Fahrenheit,  or 175 degrees Celsius.

In a separate bowl, add these dry ingredients together and mix until thoroughly combined:

1 cup (152 grams) of either brown rice flour or sorghum flour (use sorghum for those that cannot tolerate rice)

1/2 cup (56 grams) cocoa powder

1 cup (152 grams) of cornstarch or arrowroot starch (If allergic to corn, use arrowroot starch. I have tried both. The cornstarch results in a slightly silkier texture on the inside of the cookie, but the arrowroot starch is still very nice).

1 teaspoon of baking soda

1 teaspoon of baking powder

1/2 teaspoon of salt

1/2 teaspoon cinnamon

1/2 teaspoon of cream of tartar

3/4 teaspoon of xanthan or guar gum

Set aside the bowl of dry ingredients.

In your stand mixer, or with hand-held mixer, cream together only these ingredients:

1 cup (180 grams) non-hydrogenated palm oil shortening (Note: do not use butter or coconut oil or any other shortening if making this for general public or school functions. Butter is dairy allergy trigger and coconut oil can trigger treenut allergic reactions, other shortening may contain soybean oil.) Spectrum organic palm-oil shortening can be found here: http://www.spectrumorganics.com/spectrum-naturals/organic-shortening/

1.5 cup (300 grams) light brown sugar (sticky sugar)

4 oz. (105 grams) applesauce (conveniently, this is the equivalent of a snack-sized cup that you can purchase and put in kids’ lunches)

Then add:

1 Tablespoon vanilla extract

Once the shortening, sugar, applesauce, and vanilla extract ingredients are combined, gradually mix in the dry ingredients. The mixture will get very thick. You want this to resemble cookie dough. If appears too dry, add about 1-2 Tablespoons of water.

Once your cookie dough is made, using a large metal spoon, fold in:

1/2 cup (90 grams) Enjoy Life Allergen-Free mini chocolate chips and

1/2 cup (90 grams) Enjoy Life Allergen-Free chocolate chunks. More information on Enjoy Life products can be found here: http://enjoylifefoods.com/

Scoop dough onto cookie sheet lined with parchment paper (or lightly coated with the palm oil shortening), and flatten to 1 inch disks.

Bake for 7-10 minutes or until cookies look puffy and cracked a little.

Remove cooks from oven and let cool for 5-10 minutes on the baking pan before transferring to a plate or wire rack to cool completely. If you try to transfer them too soon, they will fall apart. Alternatively, you can pull the entire parchment sheet of cookies off of the pan and onto the counter to cool so you can quickly reuse the pan. Cookies will rest down and look more cracked as they cool.

Repeat the baking process for remaining dough.

Makes approximately 18-20 cookies.

Enjoy!

Fennel & Apple Salad with Crushed Berry Vinaigrette

DSC_0363

Fennel is available autumn through spring and provides so much nutrition and anti-oxidant qualities that we recommend you give this interesting and unique root veggie a try! It has a bright anise flavor that pairs well with sweet fruits and makes for a perfect winter salad. This is hearty on its own but feel free to serve with roasted chicken or a sweet sausage such as Jones’ All Natural Maple Sausage (product information can be found here: http://www.jonesdairyfarm.com/products/sausage/all-natural-golden-brown-maple-pork-sausage-patties-7-oz).

This meal is Paleo, GAPS, and SCD diet friendly.

Fennel & Apple Salad with Crushed Berry Vinaigrette

1 cup of berries (combination of frozen or fresh berries of choice), crushed with fork

2 Tbsp honey

1 Tbsp apple cider vinegar such as Bragg’s brand for probiotic benefits (regular apple cider will do)

1/4 cup light flavored oil such as canola, safflower, or grapeseed oil.

fresh cracked sea salt and fresh cracked pepper to taste

Whisk together and compose salad of the following:

Spinach

Apples, cut into bite-size pieces

Oranges, cut into bite-size pieces

Fennel (all parts of fennel, including stalks can be eaten) – recommended to cut very thin as it is a strong flavor.

Raisins or Dried Cranberries

Sunflower seeds or pumpkin seeds

Toss the salad with the dressing and serve immediately.

Can also serve with slices of roasted acorn squash, baked sweet potato, quiche, roasted chicken, Lemon infused roasted fish with a Pinot Grigio.

Dude, These Grits are Jalapeno Poppers!

Smoky, savory, “cheesy” grits are indeed quite a delicious filling to go with your jalapeno poppers and appease your Tex-Mex food craving. Excellent served for any kind of gathering, both casual and formal. For the vegan option, omit the bacon and wrap with a sliced leek or scallion. People who don’t have to worry about avoiding dairy said “Wow! These are tasty!” And if anyone has to avoid dairy or flour… well, now they are included in the fun!

DSC_0345

Jalapeno Poppers with “Cheesy” Grits

2 cups grits, prepared, with the following stirred in at the end of cooking:

1/4 cup nutritional yeast

1/4 teaspoon yellow mustard

smoked salt and/or 1 Tablepoon bacon fat (optional, use 1 Tbsp canola oil as substitute)

Dash ground chipotle (optional as this adds heat)

15-20 jalapenos, cut into little boats with seeds and membranes removed (PLEASE USE GLOVES)

1 package of bacon, cut in half down the middle (use one 1/2 slice for each jalapeno)

Directions:

Preheat oven to 375 degrees F.

Using a pastry bag or spoon, fill the jalapenos with the grits, leaving a little room for expansion. Dust with paprika for nice color. Wrap each jalapeno with bacon. Insert a toothpick to hold the bacon in place while cooking.

Bake for 25-35 minutes or until bacon is cooked and jalapenos are tender.

Remove toothpicks, arrange on a platter, and serve.

Tip: Prepare these the day before so that you are not spending a lot of time doing prep work on the day that you are entertaining.

Easy Breakfast Hash

Prep the ingredients the night before and you can have this breakfast ready quickly for any morning where you’d like to break the routine a little bit. A very yummy change of pace and proof positive that today is a new day!

DSC_0354

Easy Breakfast Hash

1 frozen safe sausage patty per person, about 1/4 cup of sausage. (We like Jones All Natural to avoid gluten, dairy, soy, and other fillers. Jimmy Dean Natural and Wegman’s Natural have been digested well, too)

1 cup diced potatoes, diced small (do the night before and cover with water in refrigerator to keep from browning)

1/4 cup each of diced bell peppers and onions (chop in advance to save time)

1 egg per person, whisked (optional – omit if egg allergy and add some mushrooms or zucchini)

1 sun-dried tomato, diced

a handful of fresh cilantro, chopped

2 scallions, chopped

pickled jalapenos (optional)

1/4 cup canola-based Mayo (such as Hellman’s Canola Mayo) mixed with 1 Tablespoon taco sauce and a dash or two of ground chipotle.

Directions

Heat about 3 Tablespoons of canola oil in a large skillet over medium-high heat. When oil is hot, add potatoes.

In another, smaller skillet or pot, add the frozen sausage with water and cook until finished. If the sausage is already cooked, such as the Jones brand, this won’t take very long. If you are cooking raw sausage, begin cooking it about 5 minutes before starting the potatoes.

Back to the large skillet, cook the potatoes for only a minute or two (longer if you cut them into larger pieces). Add the peppers and onions and cook until onions are beginning to turn translucent and potatoes are turning golden brown. Add the sausage.

Scramble the eggs in the pan that had the sausage. When finished, add the scrambled eggs to the hash.

Serve on plates and top with sun-dried tomatoes, scallions, cilantro, and taco mayo sauce. Of course, the kids like it with ketchup. 🙂

I-Can’t-Believe-There’s-No-Butter Chicken Piccata

Lemon-buttery Chicken Piccata is a popular Italian dish that is often breaded, dipped in a milky egg wash, fried in a vegetable soy oil blend, and prepared with a lemon garlic butter sauce. It used to be one of our favorite entrees. Now, the recipe is adjusted and Chicken Piccata is back on the menu! With no breading, milk, or egg, you can bring a smile to a neighbor, friend, or someone special. Our child even loved this and asked for more. It is a beautiful bright dish with the perfect balance of flavors – and includes everyone! Enjoy!

DSC_0319

I-Can’t-Believe-There’s-No-Butter Chicken Piccata

1 16 oz. package of chicken parts (feel free to make chicken cutlets by CLICKING HERE for the gluten-free fried chicken recipe)

2 cups of your favorite safe poultry broth

1/2 large onion, medium diced

1 lemon, halved and then sliced

5 cloves garlic, minced

1 teaspoon bacon butter*

1 oz. capers

In a deep skillet or shallow stock pot, warm about 1/4 cup canola oil over medium high heat until a drop of water sizzles. Lower heat if needed to make sure the oil doesn’t reach burn point. Add the chicken parts and cook on all sides until the skin is deep golden brown.

Add the broth, onion, salt, and pepper and cook until the broth is condensed to about 2 inches at the bottom of the pan (about 30 minutes), turning chicken periodically to make sure it is cooked through. Add the lemon, and cook another 10 minutes or until thermometer inserted into the chicken registers 165 degrees F.

Then add minced garlic and capers. Cook for one more minute and turn off heat.

Melt in the 1 teaspoon of bacon “butter” (*essentially, 1 teaspoon of bacon fat – we get what we need directly from the freezer where we have saved bacon fat from frying bacon on occasion).

If needed, add salt and fresh cracked pepper to taste.

Serve this wonderful chicken over gluten-free pasta, rice, or quinoa – spooning some extra buttery sauce on each dish.

Roasted Ratatouille

DSC_0325

Preheat the oven to 375 degrees F.

In an 8 inch by 8 inch square baking dish add:

1 large eggplant, diced large

1/2 red onion, diced small

5 cloves garlic, sliced

2 medium sized tomatoes, chopped with seeds and juice

1/4 cup extra virgin olive oil

1/4 cup water

1 teaspoon salt

1 teaspoon Italian seasoning

Roast in the oven, uncovered, for 45-60 minutes, (check on it about halfway through baking to make sure there is sufficient liquid at the bottom – it should not be dry and stick to pan. If so, add 1/4 cup water). Roast until eggplant is fork tender and onions are translucent. Then add:

1/4 cup minced dried tomato

2 Tablespoons chopped fresh basil

(If you don’t have fresh tomatoes or basil available, you could add a 14 oz. can of diced tomatoes with basil. It is just as delicious).

fresh cracked pepper to taste

taste and adjust salt if needed

Serve warm as a side dish to your favorite baked fish or baked chicken, as a topping for a baked potato, as a stuffing for grilled zucchini. Delicious served with fried eggs for breakfast. This would also go very well cold as an item on an antipasti tray with olives, partially-steamed cold broccoli, proscuitto or beef-wrapped asparagus, green beans, fresh mozzarella (if dairy is safe for you) and/or grilled zucchini.

Classic Fried Chicken, Gluten-Free, Easy

Take heart, dear Southern friends, you are not alone in your memories of picnics and dinners with family. Whether it was take-out from your favorite place, or something only your grandma seemed to know how to make, we have finally found a way for you to relive those memories and enjoy this classic food fare again.

DSC_0224 (2)

Classic Fried Chicken, Gluten-Free, Easy

8-12 chicken legs (and/or other parts)

1 cup of either basic gluten-free flour mix or rice-free gluten-free flour mix (see home page for these mixes)

1 cup of cornstarch

1 Tablespoon garlic powder

1.5 teaspoons salt

1 teaspoon fresh cracked pepper

1 teaspoon paprika

3 eggs mixed with 1/2 cup water

Directions:

In a large bowl, combine gluten-free flour, cornstarch, and seasonings.

I a medium bowl, combine the eggs and water.

In a heavy-bottom deep skillet, over medium heat, slowly bring about 2 cups (halfway up the sides of skillet) of canola oil or other similar oil that can get up to 350 degrees. Use a thermometer and carefully watch the temperature of your oil throughout the cooking process.

Do not use peanut oil or a vegetable oil that has soy oil in it if you are making this for the allergy crowd. Don’t use corn oil if you have guests with corn allergies. Canola oil seems to be safe for many, but always check.

Wear an apron to protect your clothes.

Do not get distracted with other things, a few minutes of cooking without monitoring can lead to burnt chicken really quickly.

Dredge chicken in egg wash and then in flour and drop into oil.

Cook chicken for 13-15 minutes or until thermometer inserted into cooked chicken registers 180 degrees.

Enjoy!

The Hearty Fish Chowder You’ve Been Craving…

DSC_0811 (2)

This one is especially for those of you who have longingly recalled the days of enjoying a piping hot bowl of cheesy,soothing fish chowder during a harsh cold winter day. Now -without the worry of dairy or flour.

For whatever ingredient has betrayed your system, if you can still have fish, you can now enjoy this again. While there is no perfect substitute for butter and cheese, this version is so tasty that you’ll be going back for seconds (and so will everyone else in the house).

This is free of wheat, dairy, soy, treenuts, eggs, shellfish, and peanuts.

Hearty Fish Chowder, Dairy Free and Gluten Free

4 cups (34 oz) homemade fish stock*

4 medium fish filets such as haddock or cod

5 medium potatoes, small cubed (3 cups or )

2 stalks celery (1 cup), minced

1/2 large or 1 small white onion (1/2 cup), minced

1 large mushrooms (1/2 cup), minced

3-4 med garlic cloves, minced

1 bay leaf

3/4 teaspoon salt

Add at the end:

3/4 cup (6.25 oz) nutritional yeast

1/2 teaspoon yellow mustard

Directions:

In a large saucepot, add all of the ingredients except the nutritional yeast and mustard.

Bring to boil and then simmer for 30 to 40 minutes until potatoes are fork tender.

Add the nutritional yeast and mustard and stir until yeast has melted into the soup.

Add fresh cracked pepper, and/or fresh thyme (optional) to taste.

For an an even creamier taste/texture, add 1/4 – 1/2 cup of your favorite milk creamer substitute. Just make sure it is safe for you and all those you are serving by double checking ingredients and asking about their list of allergies.

*See notes below about fish stock.

DSC_0793

* Only use store-bought fish stock if you are absolutely sure of its purity. Allergic reactions to shellfish can be quite severe. When you make homemade fish stock, you can ensure that no shellfish, soy oil, or additives end up in it.

Fish stock is so easy to make by baking whole fish (eating the most of the fish for lunch or dinner), and boiling the leftover skin and bones, etc. with onions, herbs, salt, and pepper. You can get the plastic containers that are sold in the canning isle and freeze any broth or stock you make from a leftover dinner (always leave head room for expansion). When you’re ready, just run the container under warm water (leaving the lid on). When you can feel the block of broth slide inside of the container, take the lid off and dump into a pot. Set the pot over medium-low heat and watch the broth or stock melt down in minutes, ready for ingredients for your stew or soup.

Cottage Pie Topped with Fresh Herbs

It’s cold outside! Warm up with this comforting classic made safer with just starch (either tapioca or corn starch) and water to thicken the gravy.

20141117-123205-45125089.jpg

Recipe:
3-4 cups (22 oz), leftover or fresh-made dairy-free garlic mashed potatoes. (Cook potatoes and garlic cloves until soft. Drain only half of the cooking water. Mash, adding salt amd garlic powder to taste.)
1/4 cup (2 oz) chopped fresh thyme and parsley or cilantro (set aside).
1 pound (8 oz.) ground beef
1 med onion, minced
2 large garlic cloves, minced
2 cups (16 oz) baby carrots
1 Tablespoon of corn or tapioca starch mixed with 1 cup of water.
1 teaspoon each of onion powder, garlic powder, and italian seasoning
1 Tablespoon of steak sauce (most steak sauces are safe but check ingredients to be sure they are safe for you, if not, replace with either 1 Tbsp of Worcestershire sauce or 1 Tbsp of tomato paste with a dash of cider vinegar)
Salt and pepper to taste

Directions:

Heat oven to 400 degrees F.
Meanwhile, in a large skillet over med-high heat, brown ground beef and onions together.
When beef is browned, add garlic and carrots and sauté for 1 minute. (Carrots will mostly cook in oven).
Add seasonings and the starch mixed with water. If too thick, add more water, 1/2 cup at a time until desired consistency.
Add steak sauce, stir, and pour mixture into an 8×8 baking dish.
Taste to make sure you seasoned it to your liking.
Top with mashed potatoes.
Bake for 20-25 minutes.
Take out of the oven and sprinkle fresh herbs and fresh cracked pepper on top.

Recipe can be doubled for more than 3-4 people.

Green Apple Tacos with Cinnamon-Sugar

We often walk by Annie’s Pretzels and we miss those delightful cinnamon-sugary bites. This works well to fix that craving.

20141116-091318-33198787.jpg

Recipe:

Cut up some green apples, set aside.

Warm corn tortillas (or gluten-free tortillas) in a skillet with coconut oil or canola oil.

Sprinkle generously with cinnamon and sugar and stuff with the apples.

Eat! 🙂

We loved these. My son especially loved these as he prefers crispy fresh apples. If you want to get creative, you could cook your apples down, or add pecans, shredded coconut, dates, rum-soaked raisins, shredded carrots, maple breakfast sausage – or whatever you think would be good!

Have fun!

Pan-Roasted Curry Honey Carrots

20141028-010124-3684882.jpg

A simple side dish to go with your autumn-inspired main dishes.

Curry Honey Carrots

Put about 2 cups of baby carrots in a skillet set to medium high.

Add a little coconut or other high-temp oil to keep carrots from sticking to the pan.

Dust with a little salt and curry powder.

Toss carrots around in the hot pan until they are partially cooked and roasted looking.

Add about 1/4 cup water, and 2 teaspoons of honey (or sugar).

Simmer for about 5-10 minutes longer depending on how soft or firm you like your carrots. (Test with a fork)

Enjoy!

It’s Veggettied Zucchini!

20141028-004636-2796746.jpg

We succumbed to the lure of the As-Seen-on-TV Veggetti. Having worn out corn pasta’s welcome in our house of food allergies, this was a refreshing change of pace.

Don’t cook the zucchini. Spiral it on your plate and let the warm sauce soften it a little. Pretty cool.

Taste was great. Texture was BETTER than the standard gluten-free stuff. And we suffered no starch coma after we ate it.

Here are more pics for reference:
20141028-005340-3220426.jpg

20141028-005447-3287199.jpg

20141028-005530-3330511.jpg

Gingerbread Apple Pancakes with Maple & Rum Raisin Syrup

Finished Pancakes

Perfect for any holiday breakfast or for a special breakfast for your loved ones. Prepare the apples, raisin syrup and gluten-free pancake mix the day before to make your morning prep go more quickly. These are vegan, gluten-free, soy-free, egg-free, dairy-free, oat-free, peanut-free and tree-nut-free. If you use Bob’s Red Mill Pancake mix, it is also rice-free.

Disclosure: As with all recipes, please check your ingredients carefully for safety and let your allergic guests know everything you used; providing the ingredients list when possible.

Recipes below serves 4. Double or triple all recipes below for 4 or more guests.

Maple & Rum Raisin Syrup

Omit the rum for kids. This is more for the grown-ups.

Soak 1/2 cup of golden and/or dark raisins in 2 cups of rum overnight.

** ALLERGY NOTE** Rum is generally a gluten-free alcohol, but always double check the brand’s website to make sure.

If you forget to soak the raisins, you can simmer them in the rum while you make the pancakes until most of the rum is absorbed.

In a small saucepan, warm the raisins with any remaining rum with 1 cup of maple syrup. Transfer to a medium bowl and set aside (after you finish pancakes, you’ll be adding remaining apples and liquid just before serving).

Carmelized Apples

2 apples, peeled and sliced thin

1 1/2 cups water

1/2 cup light or dark brown sugar

1/4 teaspoon salt

a few dashes of cinnamon

Carmelized Apples

In a large skillet over medium high heat, simmer all of the until apples are tender and syrup begins to thicken. Don’t let it all evaporate as you want some of this delicious caramel liquid to stir into your finished syrup.

Apples with Liquid

Remove from heat and transfer to a bowl. Store in refrigerator for the next morning (if making the night before). Otherwise, set aside to be ready to put some slices into the gingerbread pancakes.

Gingerbread Pancakes

Follow the recipe for these Vegan Pancakes by clicking here.  (For day-ahead-prep, make your mix and add wet ingredients in the morning)

Add the following spices to the mix:

1/2 teaspoon ground ginger

1/4 teaspoon ground cloves

1/4 teaspoon ground nutmeg

1 teaspoon cinnamon

2 Tablespoons molasses

OR

If using Bob’s Red Mill Pancake Mix, add the spices above for 1 and 1/2 cup of the mix.

When ready to make the pancakes, add wet ingredients.

Note: One egg can be replaced 1 Tablespoon ground flax or chia seeds mixed with 3 Tablespoons of water

OR 1/4 cup of applesauce

OR 1/4 cup of mashed banana (if you don’t mind some banana flavor)

Directions:

Heat oven to 175 degrees Fahrenheit and set a large plate or dish on the middle oven rack. This is where you’ll keep finished pancakes warm until ready to serve.

Heat large skillet to medium heat and spray lightly with canola or vegetable oil (or a little bit of earth balance if it is safe for your family).

Drop batter by the 1/4-cup-full into the skillet.

Apples in pancakes

Add a few slices of the caramelized apples in each pancake before flipping.

Cooked Pancakes

When pancakes are golden brown on each side and cooked through, transfer to the dish in the oven to keep warm while you prepare the rest of the pancakes.

When all of the pancakes are finished, stir the remaining apples and caramel liquid into the rum raisin syrup and serve over the finished pancakes on individual plates – making sure there are delicious rum raisins in each bite!

Enjoy with a cup of tea, coffee or warm apple cider.

Allergen-Free Vegan Pumpkin Pies – Choose Your Structure

It would feel so wrong to omit pumpkin pie on Thanksgiving but this item remains a challenge for the home baker that wishes to avoid the 8 common allergens. What do you do when you have no idea how to create this illustrious pie without animal products or allergens? You do a lot of research and get extremely creative and go through a very expensive trial and error process. We hope we have saved you at least some time and money by providing some information (and a bit of trial and error to avoid) for you. You see, pumpkin pie needs something to set it up in order for it to be pumpkin pie and not warm pumpkin sauce, but it is extremely challenging to find a solid structure option that does not hit on one of the 8 common allergens.

That said, we offer a list of things that you can use for the custard structure with the appropriate amount to be added to the recipe below. Choose your structure based on your allergy, or one of your guests’ dietary restrictions.

pumpkin pies

It is extremely important that you tell your guests what ingredients you used in your baking.

If you are having anyone over and you do not know if they have a shellfish, nut, soy, or other allergy, and you decided to use silken tofu or cashews or agar flakes, you could send someone into anaphylaxis reaction. Most people know that dairy and eggs are in the pie but a person that is allergic to iodine may not suspect that you used agar flakes for a pumpkin pie. So…

DISCLOSE! DISCLOSE! DISCLOSE!

Follow the recipe below for the pumpkin pie and use the standard 4 eggs that is typically used (2 eggs per pie). If you cannot source your eggs from a humane farm, or you are allergic to eggs, choose one of these 7 structure options to replace the eggs:

1. 8 Tbsp Agar Agar flakes (Vegan but very high in iodine, may not be good for those with shellfish or fish allergy. Sold near the sushi nori at Whole Foods). Dissolve according to package directions before adding to the pie filling.

2. 4 Tbsp of tapioca starch. This is a great vegan option that avoids all of the allergens but it is a somewhat softer and smoother set. Note that this pie will not set until it has had time to cool down and put in the refrigerator overnight. (This is the method we used and depicted in the picture above).

3. Flax seeds: mix 4 Tbsp of ground flax seeds with 3/4 cup of water (equal to 4 eggs). (Vegan and avoids the 8 common allergens)

4. Chia seeds: use the same ratio of 4 Tbsp of ground chia seeds with 3/4 cup of water (equal to 4 eggs). (Vegan and avoids the 8 common allergens)

(Formula is derived via: 1 Tbsp of seeds to 3 Tbsp of water = 1 egg)

5. Two packets of unflavored gelatin (Not vegan. Not for those with a beef, pork or poultry allergy). Dissolve according to package directions.

6. Two 16-ounce packages of silken tofu (not for those with soy allergy). Use a blender to incorporate into the pie filling.

7. 1.5 cups of unsalted cashews blended into the pumpkin pie filling recipe using a food processor or blender (not for those with nut allergy)

Once you have decided on your structure option, and you have made your crust (click here for crust recipe), follow this pie filling recipe (or your favorite pumpkin pie recipe that is enough for two pies):

Pumpkin Pie Filling – Add Your Chosen Structure Option

1 28-ounce can of pureed pumpkin

1.5 cups sugar

1 teaspoon salt

2 teaspoons cinnamon

1 teaspoon ground ginger

1 teaspoon ground cloves

1 teaspoon ground nutmeg

2 teaspoons vanilla extract

2 cups of unsweetened hemp milk (hemp milk is  creamier than rice milk and is allergen-free. If it is safe to do so, you could use coconut milk, soy milk/creamer, or almond milk. If you use these alternatives, make sure they are safe for all of your guests. Rice milk is allergen-free but it is thin like skim milk and I would only recommend it if you have a very strong structure option such as gelatin or eggs.)

Directions:

Make your pie crusts but do not pre-bake. (Click Here for Easy Allergen-Free Pie Crust Recipe)

Preheat oven to 425 degrees Fahrenheit. Spray or lightly coat your pie dishes with vegetable oil and press your crusts into the dishes.

Combine the pie filling ingredients and add one of the 7 structure options (see above). Stir until smooth and well-mixed. Pour the filling into the pie crusts and bake on the middle rack for 10 minutes. Lower the temperature to 350 degrees and bake for an additional 45 minutes or until filling is firm.

Cool to room temperature and then transfer pies to refrigerator until ready to serve.

Extremely Satisfying Vegan Taco Salad

Most of you probably already make this in your own way. If you haven’t made it in a while, let me just remind you that this is great quick meal idea. This hearty vegan taco salad, made with a seasoned mixture of beans and rice instead of meat, had us all walking away from the table feeling very full and satisfied.

We worked with the pot of black beans we made the night before (see Working with Dried Beans). Just season the beans and rice and assemble your favorite taco salad ingredients together.

How to Season the Beans & Rice

In a large skillet, warm up 2 cups of beans and 1 cup of rice with enough liquid to almost cover.

Add 1 Tablespoon of chili powder and 1-2 teaspoons of ground cumin. Add salt to taste. (Always taste it to make sure you like it). If you want a more tomato tone to it, add an 8 oz. can of tomato sauce or tomato paste. If it needs a little acidity, add a bit of lime or taco sauce.

Once the beans and rice are seasoned and warmed up, assemble your plates something like this:

Taco Salad

I use spinach instead of lettuce for almost everything calling for some greens, and this is just one of the applications. It’s easier to work with, has more nutritional value and provides the same crispy texture that lettuce does. (And it’s a prettier green, don’t you think?) It also stores easily if I want to use the spinach for several dinners.

We topped this with 3-Minute Fiesta Dip and ALDI’s prepared guacamole.

Add veggies of choice, some Daiya brand cheddar-flavor shreds if you have them, some taco sauce and it’s an easy dinner. Enjoy!

Highly Addictive 3-Minute Fiesta Dip (Dairy-free version)

Dear beloved readers, this recipe-share is an extension of my gratitude for your loving support over this past year. My Mom makes this for me every time we visit. It’s my favorite.

My only request is that you pass the love forward and serve this at parties and enjoy the almost undeserved kudos you’ll get as this recipe is so quick and easy that it’s almost a sin to take any credit for it.

As long as I can remember, any of us who were in or near the kitchen while this was being made, would sneak a taste while Mom’s back was turned. We usually got caught, and she’d give us the half joking “Mom-smirk.” It’s possible that what was left for actual dinner (as condiment for her wonderful enchiladas), was approximately half of what she actually prepared.

Now, don’t expect anything spectacular. It’s just a dip. But it’s quick, tasty, and most people take quite a chippy shine to it.

Note that the measurements are estimated. Adjust the ingredients to your liking.

Addictive Fiesta Dip

3-Minute Fiesta Dip

1 cups of Tofutti cream cheese or Tofutti Sour Cream (use the sour cream for thinner texture)

For soy-free version, use soy-free Veganaise

1/3 cup Ortega medium taco sauce*

1/4 to 1/3 cup regular salsa

Stir all of the ingredients in a bowl. If you are using the Tofutti cream cheese, you may want to use your small food processor or put your muscles into it and blend it with a fork.

Sprinkle a bit of ground cumin and freshly cracked pepper on the top (optional).

There, you’re done. Make sure you do not forget the chips!

Here are a few things this dip/sauce is good for:

Dressing for taco salad

Sauce for enchiladas

Sauce for empanadas

Potato chips

Tortilla chips

Veggies – (if you must be healthy) 🙂

* The taco sauce is the most important ingredient. Do not skimp on this. If you don’t have enough, your dip will be bland and boring. Add more until you’ve reached addictive stage and begin eating this by the spoonful. (shhhh… no one needs to know!)

Here is a picture of the ingredients I used:

Ingredients

Working with Dried Beans. Tip: Think “All Day” (not Overnight) to Soak*

We’ve had a great first week in eating according to our allergies and our new goal to omit meat for humane and environmental reasons. We are already in the practice of eating a lot of beans so our bodies are already used to them. I was fairly adamant that my son eat beans early on. It took the standard 8-10 separate “tries” before he decided he liked them. Now he eats them with gusto! You have no idea how happy this makes me that he eats beans.

Beans are so good for the body. So high in fiber, protein, vitamins, antioxidants and low in calories and zero cholesterol. Click here for a great article from WebMD on the wonderful nutritive value of beans.

Not only do they have all of those nutritional and health benefits, but they are immensely economical. For $1, a bag of beans will yield the equivalent of about 8 cans of the 14oz cans of beans. Even though dried beans are more economical, I get both dried beans and canned beans (without EDTA added in the cans). The dried beans take some time to work with but with a little planning, which we’ll talk about in this article, the process can easily be worked into a busy schedule. If I’ve been too busy with college coursework, blogging, job searching, mothering and volunteer activities, and I have forgotten to start a dried bean cooking process, the canned beans are great to have on hand. Canned beans are super fast – even faster than meat. Open a can, saute’ the beans in some vegetable broth with veggies and leftover cooked rice or gluten-free pasta (or even shredded potatoes) and you have a good, filling, hot meal.

So here’s the tip about the soaking that I put in the title, (it’s pretty straightforward):

Start soaking the dried beans in the morning.  By the time you get home in the evening, they will be ready to cook. That’s it.

*You can do an overnight soak, but if you do, put the beans in a crock pot in the morning. Do not soak the beans more than 8-10 hours.

Either way, if you plan soak and cook into your schedule, it’s not such the arduous process that people think. Here’s a nifty pic of my black beans. Notice how they double in size (they expand even more during cooking).

If you do the daytime soak and cook the beans when you get home, don’t think that they will be ready for dinner. So eat sandwiches and do your bean cooking. Since they simmer for two hours, there isn’t much to it but checking in on them from time to time to see if they need more liquid. But if you use enough liquid, you won’t have to. Think of it this way: these beans are going to make your life EASY for the next 3-4 days of dinners. I do my college homework while cooking beans.

So, back to how to do it: once soaking is finished, cook them in a pot, with plenty of water (about 3-4 inches above the beans), and drop in two cubes of gluten-free vegan vegetable bouillon cubes. If you have vegetable broth, that’s great! Use that! But I’m looking to be extremely economical and the picture above is a package of bouillon cubes that I got for $2.69 at Kroger. (Sweet!) That equates to about .33 cents for each 16 ounces of liquid broth that I make with the cubes.

So, bring the beans to a boil (with the 2 bouillon cubes), cover and simmer for two hours. Turn off the heat. Put the whole pot in the refrigerator to cool and to use for the following three days for all kinds of things! Bean salads, bean burgers, enchiladas, nachos, tacos, beans n’ rice… to name a few.

I like to make a lot of rice on the same nights that I’m doing all of this bean cooking. I do the same thing to the rice when it’s done, I just put the whole pot with lid in the refrigerator and get what I need for the next few meals.

By doing all of this, you have PLENTY of beans on hand for various meals that will feed you and your family for roughly around $5 for each meal depending on what other ingredients you use along with those two ingredients. That’s less than what it would cost to get a really crappy fast food burger. And WAY BETTER for you and your world!

If you don’t think you’re going to use all of the whole pot of beans anytime soon, ladle into jars (with 2 inches of head room) and freeze. You can recycle jars and lids from salsas, pasta sauces and the like for this purpose (no need to buy plastic containers).

When you want to use the frozen beans, simply transfer them from freezer to refrigerator about two days before.

Here’s a handy recipe for you to get started (I’ll add more recipes as we use up our first batch):

Black Beans and Rice with Kale and Red Onions

DSC_0251

2 cups black beans

2 cups cooked rice

1 red onion, large dice

1/2 bunch of kale, torn and washed

1 tsp Italian seasoning

salt and pepper to taste

drizzle extra virgin cold-pressed olive oil

Directions:

Coat a large nonstick skillet with vegetable oil, just a thin layer. 

Ladle about 2 cups of your black beans (with veg broth liquid) and red onion. Cook until red onions are tender and most of the liquid has evaporated.

Add cooked rice and a little more liquid from the bean pot.

Add Italian seasoning, salt and pepper.

At the end, stir in kale until just wilted but still bright green and turn off of the heat.

Drizzle about 1/4 cup of the olive oil and stir.

Serve. Enjoy!

Easy Allergen-Free Weeknight Dinner Series: “Cheesy” Chicken and Rice

Cheesy Chicken and Rice

This is reminiscent of the broccoli, cheese and rice casserole that is popular in Oklahoma and which was usually present at nearly every potluck I attended as a child. I looked forward to potlucks for this very dish. I loved the creamy combination of rice and cheese. If I could compare it to another delicious dish, I would say that this is a Southwest version of a delicious risotto. The version I made here does not have broccoli because I didn’t have any on hand, so I subbed red bell pepper and celery and it was a hit. You may decide on different veggies as the base of this is pretty versatile.

I made this in the skillet, but you could certainly bake this in a casserole dish after browning the meat and onions, and keep it warm until guests come over. Add some gluten-free breadcrumbs and put it under the broiler for a bit for browning. My family went back for seconds AND thirds, so I don’t think they missed the real cheese. 🙂

Make ahead notes for quicker weeknight dinner prep: Make large batches of rice on the weekend and freeze in 2 cup portions. You can also do the same for mashed or grated potatoes. For your protein, keep three packages of meat thawing in the refrigerator at all times. When you use one, get another package out to thaw and keep rotating. Use the one that has been thawing the longest. Fish usually thaws in one day, so you may want to plan differently for fish. Having rice handy and meat thawed out will make your dinner prep quicker and easier. Use canned beans for meatless nights (try to get the canned beans that do not have EDTA as a preservative. Ingredients should just be beans, water, salt.)

Ingredients:

1 lb. of ground chicken

1 small yellow onion or 1/2 of large white onion, chopped

2 cups cooked med or long grain rice

1-2 cups of water

1 teaspoon onion powder

1 teaspoon, dried sage

1/2 teaspoon, dried thyme

2 ribs, celery, chopped large

1 red bell pepper, chopped medium

1-2 cups daiya vegan cheese

2 Tablespoons earth balance vegan margarine (optional)

salt and pepper to taste

Optional: 2 slices of allergen-free bread, toasted dark golden brown, crumbled

or 1/2 cup Mary’s Gone Crackers’ Herb Flavored Gluten-Free crackers, crumbled

Directions:

1. Brown ground chicken and onions in a large skillet over medium heat.

2. Put your frozen rice in the middle (if you made it in advance) and add some water. Cover and let boil and steam, stirring occasionally to break up the rice, add more water if needed.

3. When rice is hot and incorporated, remove lid and add spices and veggies. Let simmer until water is mostly evaporated.

4. Turn heat to low and add the vegan cheese. Taste and adjust seasoning and amount of cheese to your liking. If you do not have vegan cheese, try using a combination of vegan margarine and nutritional yeast.

5. (Optional) For a crunchy breadcrumb topping, process some Mary’s Gone Crackers Herb-Flavored gluten-free crackers in a small food processor and sprinkle over top. Or, you could toast a slice or two of gluten-free bread, process in a food processor or crumble over top.

Garnish with fresh parsley, basil or rosemary or add hot sauce if you like.

Easy Allergen-Free Weeknight Dinner Series: Chicken and Gluten-Free Pasta with Parsley Pesto and Sun-Dried Tomatoes

Chicken and Gluten-Free Pasta with Parsley Pesto and Sundried Tomatoes

Homemade pesto is as versatile as it is easy to make. This allergen-free recipe uses sunflower seeds in place of the pignola nuts (a.k.a. pine nuts) that is commonly used in pesto. The sunflower seeds add the depth that a bold pesto requires, while garlic, salt and oil bring out the brightness and aromatic flavors of the fresh herbs.

Parsley is often more readily available and is also a great economical choice at about one dollar per bunch. I will say, however, that it is quite peppery when prepared this way, so you’ll need a bit of sweet basil (or dried basil) to offset that peppery bite of the parsley. Or… you could mix in 1-2 of your reconstituted dried tomatoes.

The sundried tomatoes were well worth the extra 10 minutes in the store to find and acquire. They add the acidic tang to round out the flavors of this classic Italian-American dish. My son does not like fresh tomatoes but loves these dried tomatoes.

And while mushrooms are depicted in the image (they *are* pretty aren’t they?), my fiance and I both agreed that a more spring flavored roasted veggie, such as asparagus would go a little better with the parsley pesto. The mushrooms weren’t bad – it’s just that they weren’t the optimal choice. So, instead, roast some asparagus, green beans or broccoli in lieu of the mushrooms. (Once I make this again with asparagus, I’ll update the picture).

Ultimately, this was very flavorful and satisfying. All family members devoured it and leftovers barely made it to the next day.

Chicken and Gluten-Free Pasta with Parsley Pesto and Sun-Dried Tomatoes

1-2 pounds of chicken tenders or breast, cut into cubes or sliced in strips

1 medium yellow or white onion, chopped medium dice

1 Tablespoon fresh cracked pepper, salt and dried Italian Seasoning or Dried Basil

1 16-ounce package of gluten-free pasta

1 8-ounce package of sun-dried tomatoes (either in dry package or in oil, either will work)

4 cups (32 ounces) of parsley, packed (set aside some for garnish)

2 cups (16 ounces) of fresh basil, packed

3 cloves of fresh garlic, minced

1/4 cup of olive oil

1/3 cup of sunflower seeds (check for allergens), or 2 Tablespoons of sunflower seed butter

1 peck of mushrooms, roasted at 350 degrees for 10 minutes (optional)

1 bunch of asparagus, roasted at 400 degrees for 10-15 minutes (optional)

2 Tablespoons of Earth Balance or your favorite dairy-free margarine (make sure that it is totally free of whey, casein, and all milk proteins)

2 Tablespoons of Nutritional Yeast

Directions:

1. Wash and chop all of your veggies and herbs.

2. In a large skillet, cook the chicken and onion in some water with and seasoning such as salt, pepper, dried Italian seasoning or dried basil. While the chicken is cooking (put a lid on it to keep warm once finished cooking), reconstitute the dried tomatoes and prepare the pasta according to package directions. Also, roast your mushrooms and/or asparagus if you like.

While all of that is cooking, prepare the parsley pesto:

Add the parsley and basil to the food processor with the oil, garlic and sunflower seeds or sunflower seed butter. Add more oil or water if needed. Process until smooth.

Drain the soaked dried tomatoes and chop. (Note: they are large chop in the picture but we liked them better when we diced them smaller and had more bites with dried tomato flavor.)

Drain pasta, chop chicken and add to the pasta. Stir in the parsley pesto, dried tomatoes, earth balance and nutritional yeast. Taste and add salt as needed.

Serves 6-8


The Best Allergen-Free Chocolate Pudding

Chocolate PuddingWhen your guy says “oh my” and gets lost in the first bite,  you know you’ve got a winning recipe. My two neighbors also gave this a big thumbs up… with jokes about licking the bowl.

*Ahem* One of us (who shall remain nameless) might have done such a thing.

Tapioca starch is recommended for this recipe. We tried making this with arrowroot starch but it didn’t turn out so well. Tapioca starch is perfect for this and as an aside, is also a versatile substitute for cornstarch in gravies, and a substitute for eggs in custard-style pies (see the pumpkin pie recipe for an example).

This chocolate pudding is quick and easy to  make and it’s also good enough to eat when it’s still warm. It tastes a lot like that delicious gooey chocolate filling of a chocolate lava cake. YUM!

If you’d like to add an allergen-free whipped cream, I recommend Cybele Pascale’s Whipped Topping from her book The Allergen-Free Baker’s Handbook. If you are not allergic to eggs, you could use marshmallow fluff whipped to a softer consistency with a little water to make a whipped topping. In the meantime, enjoy this delicious chocolate pudding!

P.S. Hint: Freezer Molds! Make chocolate pudding pops out of this, too! 🙂

The Best Allergen-Free Chocolate Pudding

4 cups water (Note: You can replace water with a safe milk-substitute for a slightly creamier consistency. If you do this, please ask whoever you serve it to if the milk-substitute is safe for them. Many people are allergic to rice, almond, and soy milk. We are pretty happy using water, and it’s less expensive that way).

1/2 cup tapioca starch

1/2 cup unsweetened cocoa powder

3/4 cup granulated sugar

1/2 teaspoon salt

2/3 cup of dairy-free chocolate chips such as Enjoy Life brand (check for other allergens if needed). Add less or omit chocolate chips if you want a more mild chocolate flavor. If you do omit the chocolate chips, add 1/2 cup of palm oil shortening or else the mixture will be very gel-like.

1 teaspoon of vanilla

In a large saucepan, stir 1 cup of the water tapioca flour and cocoa until blended and smooth. This step helps get rid of lumps before you begin cooking.

Set the heat to medium and stir in the remaining 3 cups of water. Then add sugar and salt. Cook and stir constantly until mixture thickens to pudding consistency. Remove from heat and stir in the chocolate chips and vanilla. Keep stirring until chocolate melts.

Chill in refrigerator or pour into popsicle molds for pudding pops later.

Vegan Peanut-Free Oat-Free No Bake Cookies (Super Quick and Easy!)

No Bakes 2By virtue of the powers that be: Earth Balance, Sunbutter, and Gluten Free Rice Krispies,  I bring you this classic no-bake cookie recipe. Now you can have your childhood back and enjoy this fun and easy-to-make classic treat. It’s so easy and so quick. Just melt, stir and drop onto waxed paper. It truly tastes like those old fashioned peanut butter, oat and butter laced no bakes you used to have.

The reason I substituted the oats with the  gluten-free rice krispie cereal is due to the fact that many people who cannot tolerate gluten, also cannot tolerate oats. As for flavor, I recommend that you go to the trouble of getting the plain gluten-free rice krispie cereal instead of using a sweetened Mom’s Best cocoa krispie cereal (I tried that and it came out too sweet).

If you have a Soy allergy, you will need to use the Soy-Free Earth Balance and find a different seed butter product (like pumpkin seed butter) as Sunbutter is processed in a facility that also processes soy.  Remember that avoiding peanuts and nuts saves lives, so if you can make a switch to a seed butter, you’ll be making the world a better place.

~As with any recipe, always double check your ingredients to make sure everything is safe and nothing has changed. ~

Vegan Peanut-Free Oat-Free No Bakes

2 cups of sugar

1/2 cup of cocoa such as Hershey’s Cocoa Powder

1/2 cup of Earth Balance non-dairy margarine

1/2 cup of rice milk

1/2 cup of sunflower seed butter (or soy-free pumpkin seed butter)

1 teaspoon of gluten-free vanilla extract

3 cups of GLUTEN-FREE rice krispie treat cereal

In a large saucepan, combine the sugar, cocoa powder, earth balance margarine and rice milk . On medium high heat, bring to a boil and boil for one full minute.

Remove the pan from heat and stir in the sunflower seed butter and vanilla extract. Make sure the seed butter is fully melted and incorporated into the mixture.

Stir in the rice krispies and coat all of the cereal. As you stir, the mixture will cool down. You may want to wait about 5 minute for additional cooling and thickening.

Then, drop mixture by spoonfuls onto waxed paper. Cookies will set in about 10-15 minutes. Let the cookies fully cool down before transferring to an airtight container. Store in an airtight container in the refrigerator for up to 5 days. Makes about 20 small cookies.

Easy Allergen-Free Weeknight Dinner Series: Savory Beef n’ Quinoa

Savory Beef QuinoaThis warm, filling, savory dish of beef, onions, and fresh string beans is simple, quick and takes advantage of standard pantry items. And so begins this series of easy allergen-free weeknight dinners to help those needing some ideas of what to whip together in a hurry.

Quinoa (pronounced: Keen-wah), is really quite an easy side dish to prepare. The ratio is the same as rice, and so is the cooking technique: 1 cup of quinoa to 2 cups of liquid. Bring to boil, cover and simmer for 15 minutes, or until grains have absorbed the liquid.  Drain any excess liquid (do not overcook or it will be mushy). And there you have it.

The most essential tool needed for quinoa is a fine mesh strainer as you will need to rinse before cooking. The purpose for this is that there is a coating on the quinoa seeds that will taste bitter if not rinsed off.

Savory Beef n’ Quinoa

Prepare quinoa according to package directions using beef, chicken or vegetable broth. Add a little salt if desired. While the quinoa is cooking, in a large deep skillet:

1. Brown 1 pound of ground beef.

2. Add 1 yellow or white onion, diced

3. Add 3 cloves of garlic, minced

4. Add a little water and season with fresh cracked pepper, salt, Italian seasoning, garlic powder and onion powder.

5. Add a generous amount of string beans (fresh or frozen) and stir fry with a little olive oil and balsamic vinegar until beans are crisp tender.

Plate with sliced fresh cherry or grape tomatoes.

That’s it! You may also want to consider adding mushrooms, leeks, green onions or other favorite vegetables that pair well with beef.  I recommend adding a dash or two of gluten-free Worcestershire sauce if you have it. If not, this dish is good on its own.

The Easy No-Bake Allergen-Free Cheesecake that You’ve Been Looking For. Almost Perfect. Accepting Challenges.

Foodie Challengers: Can you bring this allergen-free cheesecake to perfection? I developed this today but the filling needs refinement. It needs a creamier texture and stronger “real cheesecake” flavor. For some reason, the flavor weakened significantly during the chill and set process. It tastes like a mild vanilla jello. It’s good on it’s own (maybe for flan?), but otherwise, the crust overpowers it.

As for the crust, it is absolutely perfect and should remain unchanged. It has a really great graham cracker flavor and texture. When I ate a slice of this, the combination of the crust with the strawberries made me feel like I was having a cheesecake experience. It is the closest thing to cheesecake that I’ve had in years.

The filling really needs the most help, it needs a richer texture and deeper flavor. Ready to take on the challenge? Here are the requirements of the challenge:

1. it must use products that you can get from a store (not special ordered online)

2. it must be no-bake. And it must be free of dairy, eggs, soy, corn, peanuts and tree nuts.

So, should a solid fat be added such as earth balance or organic non-hydrogenated palm oil shortening? What about more nutritional yeast for the distinct cheesy flavor? Would a homemade condensed unsweetened milk help? Pureed bananas? Corn-starch-free melted marshmallows? Maybe?  What are your thoughts?

Anyway, if you like a milder, lighter, flan-style filling, you might want to stick with this recipe as is. It’s not bad at all. I had two slices of it and feel happy. But it could be better. And I look forward to hearing what you do with this.

Here’s the recipe:
No-Bake Crust

Coat the bottom of a spring form or cake pan with wax paper or a little oil.

In a food processor, process gluten-free chocolate rice crispy cereal until you have 3 cups of very fine crumbs. The finer, the better.

Then add crumbs to a bowl along with 1/2 cup of maple syrup. Mix until crumbs are all coated and it sticks together. Then press into the bottom of the pan. Cover and refrigerate.

The Cheesecake Filling

Boil 1/2 cup of water.

In a bowl, add 2 envelopes of non-flavored gelatin. Stir the boiling water into the gelatin and stir until dissolved.

Then add 1/2 cup sugar and stir until dissolved.

Add 1 Tbsp nutritional yeast, 1 tsp vanilla, the juice of 1/4 of a lemon and stir.

Then add a pinch of salt and 1 15 oz. can of full fat coconut milk.

Pour into the prepared crust, cover and put in refrigerator to chill for at least 4 hours.

That’s it! What do you think would make the filling richer and creamier?

Chickpea Chocolate Chip Cookies

Chickpea Choc Chip Cookies

These cookies are totally free of peanuts, nuts, eggs, gluten, wheat, and dairy.

Why the chickpeas? I ran out of shortening and earth balance but had everything else to make chocolate chip cookies. I really wanted to experiment with an egg-free cookie recipe. But without the fat, I was a little stumped. Could I still do it? Most recipes call for so much of said fat, really, the fat only does two things: add volume and softness. I remembered seeing some posts in my Facebook feed from raw food pages about making chocolate chip cookies using chickpeas. So, I thought I’d try pureed chickpeas and canola oil to replace the fat and 1/4 cup of applesauce to replace the eggs.

After deciding on these replacements, and consulting volume of ingredients from two cookbooks, this is what I came up with: a thick, cake-like chocolate chip cookie that, when paired with a tall glass of non-dairy milk, makes for a very comforting treat. The family raved.

I made these very large because I knew my son would get a kick out it. But you can use this recipe for any size and thickness that you want since these don’t spread out at all like the traditional wheat and butter cookie.

Ultimately, there are five really great things about this recipe: 1. They taste great, just like traditional chocolate chip cookies (my fiance did not know I used chickpeas until I told him). 2. They are totally free of the eight most common food allergens. If there is a legume allergy, use silken tofu instead of chickpeas (do not use tofu if there is a soy allergy) 3. You can eat this raw without worry of salmonella poisoning from eggs. Idea: Stir the dough into your favorite ice cream! (Oh yum) 4. You have the benefit of having total control over the size, shape and thickness of these cookies. 5. You don’t have to buy  expensive fats such as shortening, earth balance or peanut butter, and thus a bit more economical.

So, here is the recipe. Enjoy!

Chickpea Chocolate Chip Cookies

Preheat your oven to 350 degrees Fahrenheit and grease two large cookie sheets.

In a small food processor, add:

1 15-oz can of chickpeas (garbanzo beans), rinsed and drained.

1/4 cup of unsweetened applesauce

1/4 cup of canola oil

2 teaspoons of vanilla

Blend until mixture is very smooth and set aside.

In a large bowl, mix together these dry ingredients:

2 cups of your favorite gluten-free flour blend

1/2 teaspoon xanthan gum (if your flour blend does not have it)

1/2 teaspoon of salt

1 teaspoon of baking soda

1/2 cup of dark brown sugar

1/2 cup of granulated sugar

Stir together the dry ingredients and then add the chickpea puree. Stir and then you may have to use your very clean hands to squeeze and mix the dough until it all comes together.

Add 1 cup of Enjoy Life or other non-dairy chocolate chips and mix.

Shape cookies and flatten to about 1/4 inch thick. Bake on a rack that is closer to the top as these cookies brown quickly on the bottom. Bake for 11-15 minutes depending on the size and thickness of the cookie. They are done when the edges are golden brown. If you want the tops of the cookies a deeper brown color, finish them under the broiler for just one minute.

Serve warm with a tall glass of cold rice, hemp, soy or other favorite non-dairy milk.

Fried Green Tomatoes

Fried Green TomatoesConsidered a Southern dish, it really doesn’t matter where you are from to enjoy this. Pluck some green tomatoes from your garden, fry these and it’s like having mild fried pickles with a fork. Oh, it’s so good. Not everyone likes these, but if you are looking for an allergen-free version, this is it.

Note that these are usually made with cornmeal, but the rice flour in your standard gluten free baking mix will add the sought after grainy texture.

How to make:

In a deep plate or dish, add 1/2 cup GF flour mix, salt, pepper and 1 teaspoon of onion powder.

In a large skillet, fry bacon and set aside the bacon

If necessary, add enough canola oil to the bacon grease to bring the oil up to about 1/4 inch of your slices of tomatoes.

Slice your green tomatoes in 1/2 thick slices and lightly coat each side with the flour mixture.

Gently set into the hot oil and don’t move it. Let it fry on a medium heat for about 5-7 minutes, or until golden brown. Flip and cook the same way on the other side.

Remove from skillet and keep warm in the oven if you like.

If you want to add a sauce, I recommend mixing 1 cup of mayo or veganaise with salt, pepper, onion powder, a little mustard, a dash of apple cider vinegar or louisiana hot sauce (or your favorite hot pepper sauce).

It’s that easy. Enjoy!