Dreamy Allergen-Free Double Chocolate Cookies

DSC_0359 (3)

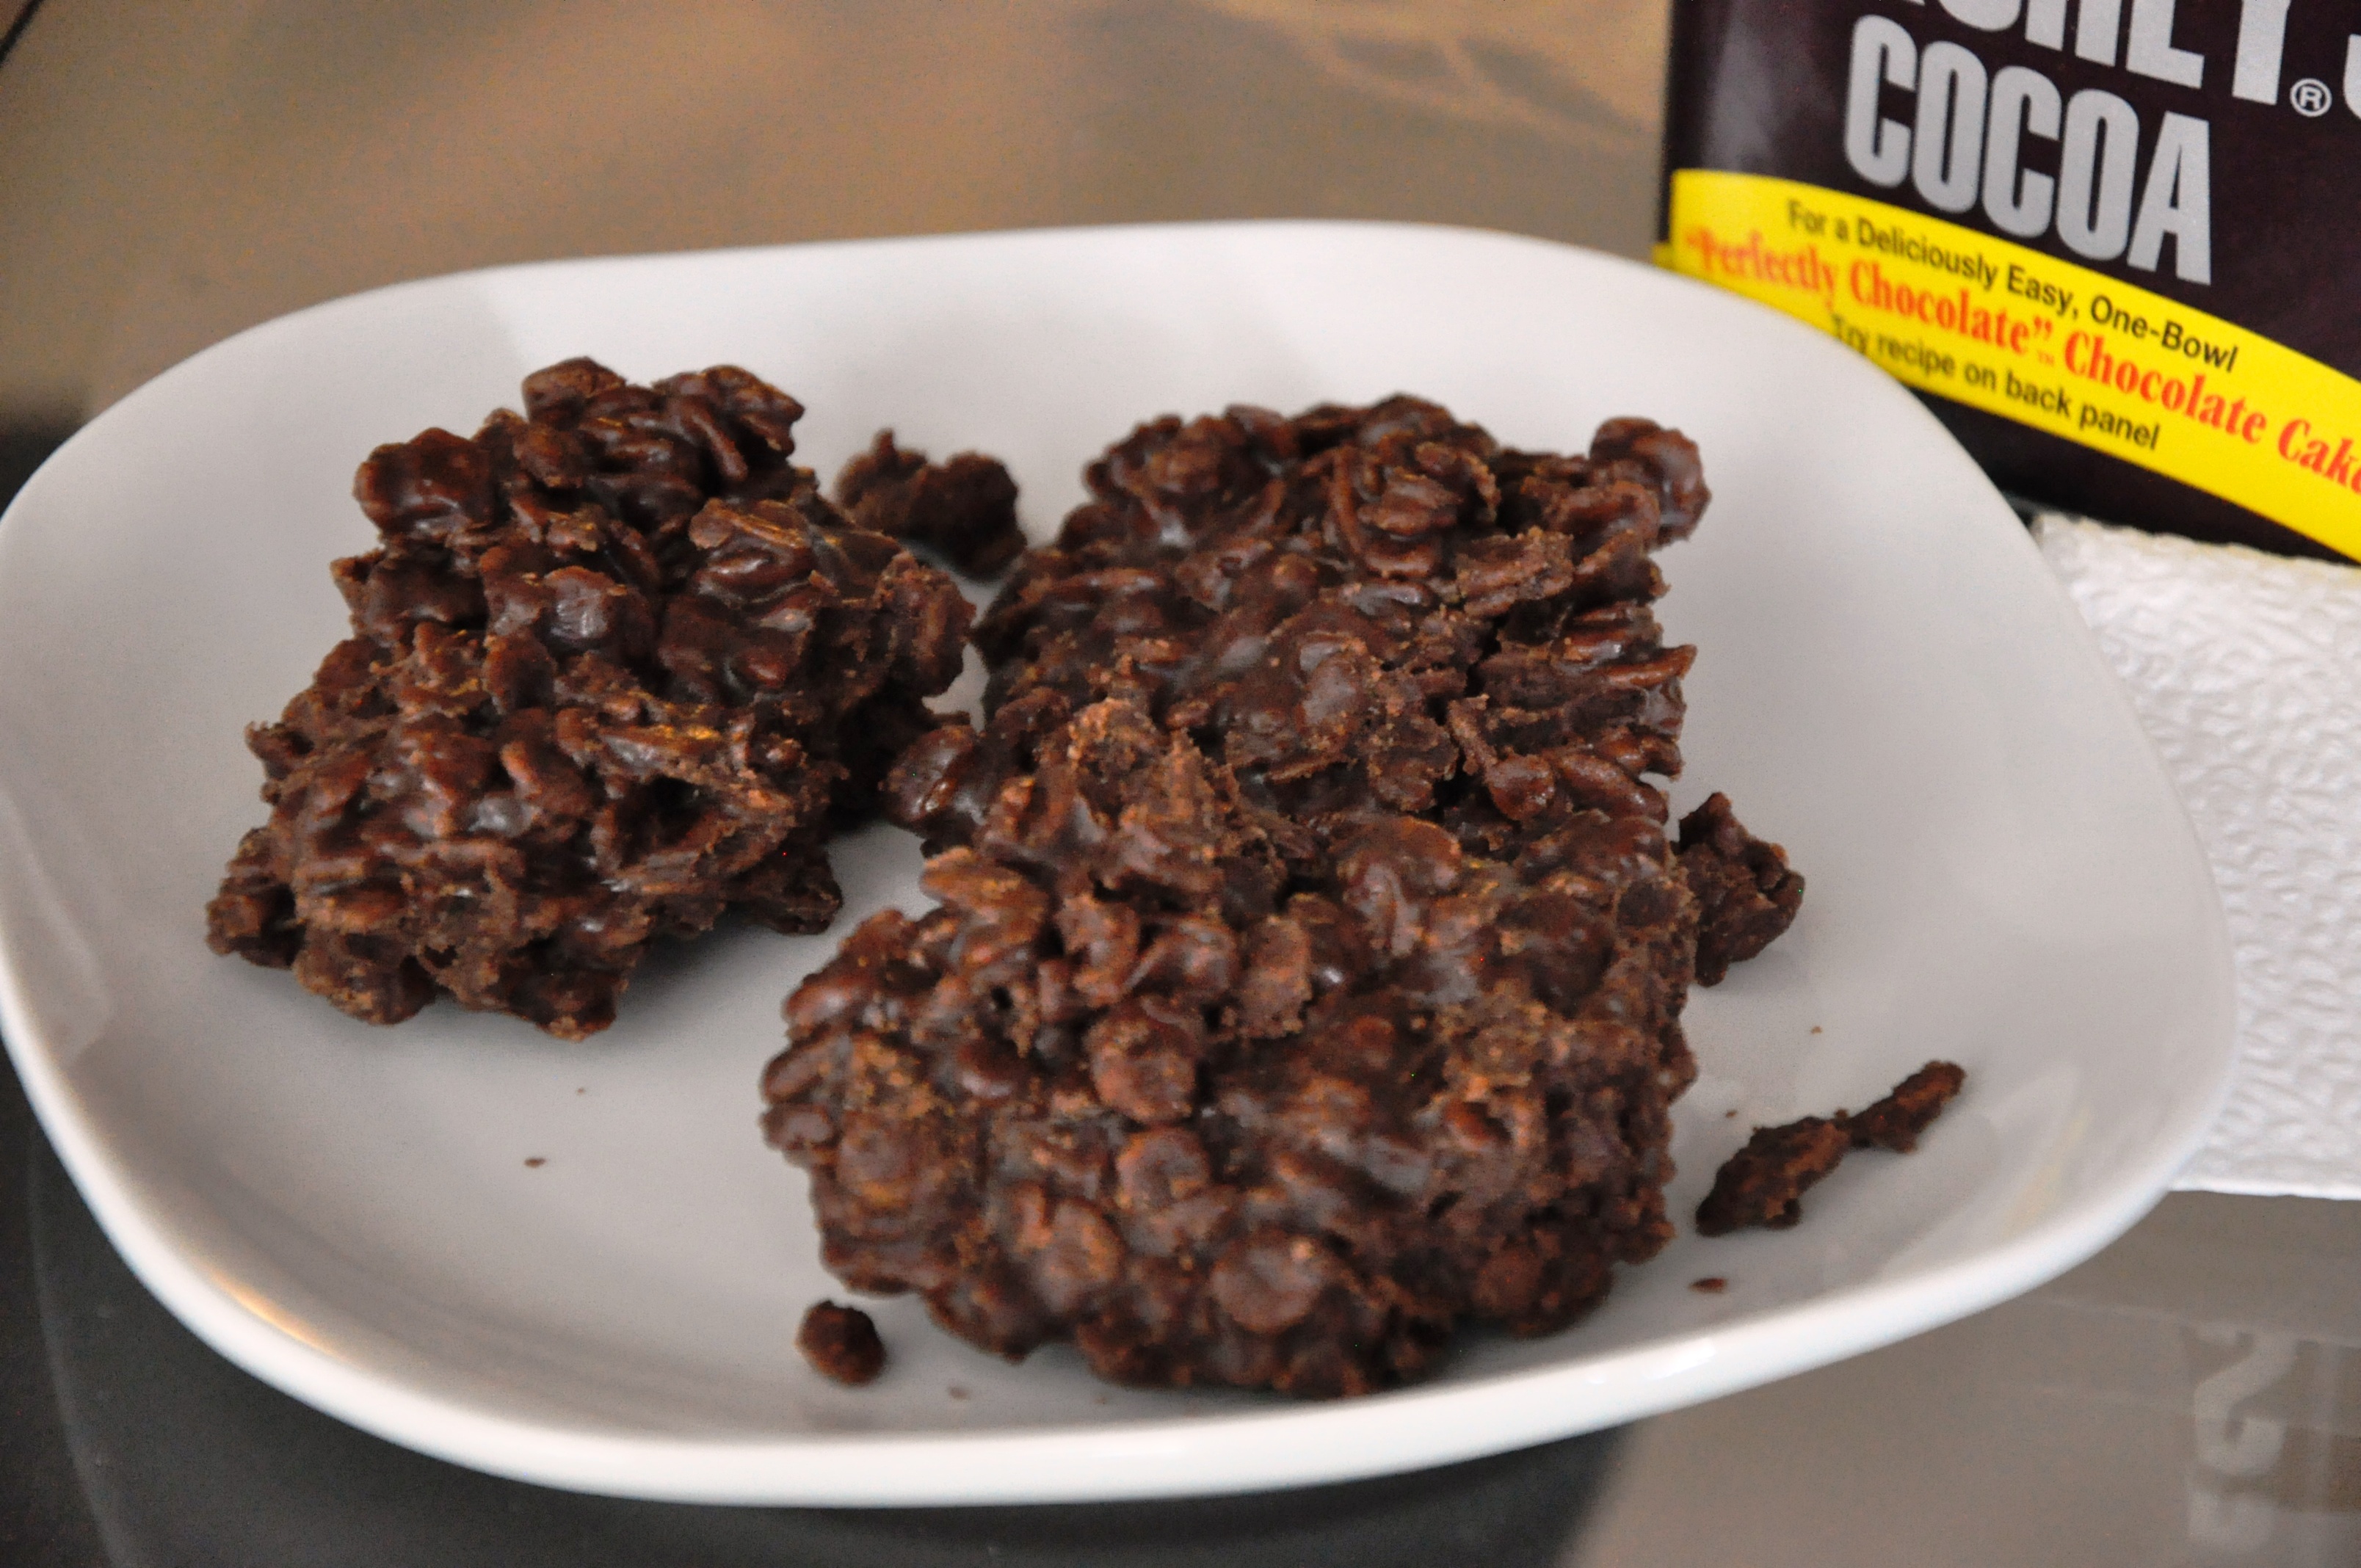
With a thin sugar-crisped exterior, a moist interior, and deep milk-chocolate flavor, these cookies are a food allergic’s dream come true.

The story of this cookie: I needed to make a really good double chocolate cookie (I realize that “need” is a strong word, but hey a chocolate cookie craving is a need, am I right?). I was a bit disappointed in the gluten-free double chocolate cookie I had been making. It kinda satisfied the chocolate craving but the taste was still too dark and had a bitter tone. Also, as with most disappointing gluten-free treats, the texture was pretty grainy and dried out within a day. I needed a moist cookie that had a silkier texture, a more milk chocolate flavor, and with a good texture that would last for more than 15 minutes.

After much research and experimentation, I finally hit a winner. The secret to better texture and moisture retention is in a higher ratio of starch than is normally called for in gluten-free baking. A 50% flour and 50% starch mix. Yes! Good results!

I shared some finished cookies with family and friends and took some to networking events. I got a lot of rave reviews on this cookie. Due to such great response, I was tempted to keep this recipe a secret. I’ve been told that I shouldn’t publish this and that it should be the beginning of fantastic cookie sales, and a way to fame and fortune – perhaps a new line of dream cookies for all those who can’t wheat, dairy, eggs, corn, oats, peanuts, treenuts, or rice! (It’s very hard to find gluten-free treats without rice!) I’ve made these with both brown rice flour and sorghum flour, the results were good for both.

I don’t want to have you thinking these are some sort of extremely magical cookie, though. What gets us excited, however, is that this is like having a cookie made from wheat. They’re simply good. For those of us who haven’t had good cookies like that in a long while, it’s pretty magical.

What’s even better – these are pretty economical. Other than the palm oil shortening, the rest of the ingredients are sold for prices that won’t leave you breaking your wallet at $70 in the 7-items or less checkout line.

So, I suppose I could have kept this recipe to myself, but what of all those commercial kitchen start-up costs that I don’t have? And what of all the needs of the dedicated bakers all over the world that need to start their gluten-free baking with a really good cookie?

I’d rather inspire all of you to make these and share them with your friends and family. I’d like to see if your foodie friends who can eat anything even notice that these aren’t anything but fantastic. I’d like to see you delight your co-workers or family members or friends who are usually left out of the food part of celebrations and watch them smile and praise you for your thoughtfulness! It would be great to see these offered in your bake sales, your community events, school functions and fundraisers! The food allergy community will profusely thank you for thinking of them and for making their cookie dreams come true!

Without further adieu:

Dreamy Allergen-Free Double Chocolate Cookies

Set your oven to 350 degrees Fahrenheit,  or 175 degrees Celsius.

In a separate bowl, add these dry ingredients together and mix until thoroughly combined:

1 cup (152 grams) of either brown rice flour or sorghum flour (use sorghum for those that cannot tolerate rice)

1/2 cup (56 grams) cocoa powder

1 cup (152 grams) of cornstarch or arrowroot starch (If allergic to corn, use arrowroot starch. I have tried both. The cornstarch results in a slightly silkier texture on the inside of the cookie, but the arrowroot starch is still very nice).

1 teaspoon of baking soda

1 teaspoon of baking powder

1/2 teaspoon of salt

1/2 teaspoon cinnamon

1/2 teaspoon of cream of tartar

3/4 teaspoon of xanthan or guar gum

Set aside the bowl of dry ingredients.

In your stand mixer, or with hand-held mixer, cream together only these ingredients:

1 cup (180 grams) non-hydrogenated palm oil shortening (Note: do not use butter or coconut oil or any other shortening if making this for general public or school functions. Butter is dairy allergy trigger and coconut oil can trigger treenut allergic reactions, other shortening may contain soybean oil.) Spectrum organic palm-oil shortening can be found here: http://www.spectrumorganics.com/spectrum-naturals/organic-shortening/

1.5 cup (300 grams) light brown sugar (sticky sugar)

4 oz. (105 grams) applesauce (conveniently, this is the equivalent of a snack-sized cup that you can purchase and put in kids’ lunches)

Then add:

1 Tablespoon vanilla extract

Once the shortening, sugar, applesauce, and vanilla extract ingredients are combined, gradually mix in the dry ingredients. The mixture will get very thick. You want this to resemble cookie dough. If appears too dry, add about 1-2 Tablespoons of water.

Once your cookie dough is made, using a large metal spoon, fold in:

1/2 cup (90 grams) Enjoy Life Allergen-Free mini chocolate chips and

1/2 cup (90 grams) Enjoy Life Allergen-Free chocolate chunks. More information on Enjoy Life products can be found here: http://enjoylifefoods.com/

Scoop dough onto cookie sheet lined with parchment paper (or lightly coated with the palm oil shortening), and flatten to 1 inch disks.

Bake for 7-10 minutes or until cookies look puffy and cracked a little.

Remove cooks from oven and let cool for 5-10 minutes on the baking pan before transferring to a plate or wire rack to cool completely. If you try to transfer them too soon, they will fall apart. Alternatively, you can pull the entire parchment sheet of cookies off of the pan and onto the counter to cool so you can quickly reuse the pan. Cookies will rest down and look more cracked as they cool.

Repeat the baking process for remaining dough.

Makes approximately 18-20 cookies.

Enjoy!

Sweet Treats Complete! Allergen-Free Campfire Chocolate Cake and Strawberry-Vanilla Cake

Campfire CakesI am really excited that these turned out!  I used to do regular baking before I started dealing with my son’s onset of Celiac and dairy allergy (about three years ago). But now I am getting back into baking – with a focus on the fully decorated cakes being free of the 8 common allergens. With these cakes, my client only wanted them to be vegan. But because I cannot work with wheat flour, these are also wheat- and gluten-free. So, in the end, these cakes ended up being without wheat/gluten, dairy, eggs, nuts and peanuts and partially without soy. The marshmallows have soy and the strawberry cake utilizing a gluten-free flour mix that used soy lecithin – I went ahead and used it because  the client was only focused on the cakes being vegan.
I did make myself available by phone, if for any reason, she had anyone with food allergies needing to ask questions. I kept the packaging of ingredients that I used so that they can be readily available for evaluation. I know how I am, and I want to make sure that others are absolutely 100% sure that it is okay.

There is a lot of trust in this business and I will take that trust as seriously as my own death. I will have ways of making sure that my clients know 100% what will be going into their cakes. I will use their requests and their experience as my guidance. My clients are my royalty, they deserve it.

That said, I have a lot of recipe to post here. And I will say that I did use one shortcut: a gluten-free flour mix. Specifically, King Arthur Gluten-Free Chocolate Cake Mix for the chocolate cakes and Betty Crocker Gluten-Free Yellow Cake Mix for the strawberry cakes. Now, the reason I did this is simple: I do not have a kitchen scale. And as I have learned that in gluten-free baking, precise weighing (not volume measuring) is needed, I relied on the companies to do that for me. Secondly, every ingredient in those mixes is exactly what I would have used to prepare my own mix, the only exception being that the King Arthur Flour has some emulsifying agents to help the cakes retain moisture longer.

So, onward with the recipe dispensing!

Campfire Cake

For the Chocolate Cake Layers

2 boxes of King Arthur Gluten-Free Chocolate Cake Mix (note that the box indicates that one mix will make two 8 or 9 inch round cakes. I did not find this to be true – unless I wanted really thin layers).

3 teaspoons of Ener-G Egg Replacer mixed with 6 Tablespoons of warm water

1/2 cup mashed banana (from a small to medium banana)

1/2 cup vegetable oil (instead of the 2/3 cup that the package calls for since the banana provides moisture and binding)

1 cup of water (instead of the 1 and 1/3 that the package calls for due to the extra liquid from using the egg replacer)

Prepare the cake according to package directions except omit the part about the eggs and add the replacer at the end and increase baking time to about 35 to 45 minutes. Use the toothpick test to make sure it is done.

Repeat for the second cake layer. I do not recommend mixing both batters at once as it could change the chemistry of volumes and ratios and affect the outcome of your cake layers.

I recommend making the cakes a day in advance so that they have time to cool properly. Cakes that are not fully cooled will release more crumbs when you are trying to frost it (and you don’t want that).

Chocolate Mock-Buttercream Frosting

I recommend that you make this when you are ready to frost. Although, you can make it in advance and put it in the refrigerator for up to two weeks. But do set out the frosting to bring it to room temperature for about an hour so that it will be soft enough to work with.

1/2 cup organic non-hydrogenated shortening such as Spectrum brand

1/2 cup soy-free earth balance buttery-flavored margarine

1 teaspoon of gluten-free vanilla extract

1/2 cup cocoa

1 32oz bag of powdered sugar (make sure it is fresh and has not been opened as powdered sugar can take on a stale taste very soon after opened. If you have a corn allergy, look for powdered sugar made with tapioca starch instead of corn starch).

*2-4 Tablespoons of hemp milk or rice milk (hemp milk has a creamier texture due to the fat content)

Mix together the fats and vanilla until blended. While the mixer is on, slowly add the cocoa and 1 Tablespoon of hemp milk. Gradually add powdered sugar and hemp milk, alternating so that it does not slow your mixer down.

*BE CAREFUL TO NOT ADD TOO MUCH LIQUID. You want the frosting to be very thick/stiff. If it is too wet, you will have a difficult time frosting your cake.

This should be enough for filling and frosting the outside of it. You may need to make more if you need more frosting for decorating.  Decorating tip: frost the sides first using a 16 inch icing bag and the icer tip. It helps to have a turning cake stand, too. Use a small frosting spatula to even out the sides. Then do the same with the top. Once it is frosted, refrigerate for 10 minutes to set and then use a piece of wax paper to smooth out the surface of the frosting.

Campfire Flames

Heat oven to 350 degrees Fahrenheit.

You will need about 4 large bags of dum-dum lollipops. These are the only hard candies that I could find that are made in a dedicated allergen-free facility and are free of the 8 common allergens.

Separate out the colors (strawberry, cherry, orange, peach-mango and cream soda flavors).

Put each color in its own ziplock bag and smash with a hammer (on a surface that is safe and will not cause any damage).

Arrange the crushed lollipops on a parchment paper with the dark colors being on the bottom and the lighter ones to the top.

Melt in the oven for about 10 minute or until all of the candies have melted and blended.

Take out of the oven and use a toothpick to blend (if you want).

Transfer the parchment to a cool table. Candy will quickly set in about 10-15 minutes.

Once cooled, break into triangles as best you can. Be careful not to hurt yourself and don’t let the kids help with this one. Once the flames have been put into the cake for the event, suggest breaking them back down again for kids to eat.

BE CAREFUL THAT NO ONE GETS HURT BY HARD SHARP CANDY FLAMES. 

For the Logs and Rocks

1 Bob’s Red Mill Shortbread Cookie Mix

1 package of Enjoy Life dairy-free, soy-free, nut-free chocolate chips

Prepare a package of Bob’s Red Mill Shortbread Cookie mix, except replace the egg with 1/4 cup of vegetable or allergen-safe oil.

Try not to eat all of this cookie dough at once because it is delicious!

Form the cookie dough into desired shapes and bake for 12-15 minutes. The color of the cookies will not change significantly.

Once cookies are cooled, brush with melted enjoylife chips.*

*Here is something that I learned the hard way:  if you add a tiny bit of liquid to the chocolate chips (like a bit of food color for the rock shaped cookies), the chips will harden back up into a clay mass while you’re trying to melt them. If this happens, add about 2-4 tablespoons of hemp milk to the chocolate and stir and blend. If you do this, you will have to put the cookies in the refrigerator to set the chocolate.

For the Strawberry Cake with Vanilla Frosting 

Strawberry Cake

Note: the pectin in the strawberries makes the chemistry especially tricky in this application. I have failed at several attempts at strawberry cake and finally found this version that was still a little dense but still cake-like in texture (rather than the ones that came out gummy or hard before) and finally had a balanced strawberry flavor that went well with the frosting. I had to use three mixes as these did not want to rise. Once I finally understand what is weighing this cake down, I will ammend this post with a slightly better version. But this recipe is still quite delicious, but do understand that it is about the same density as a pound cake.

3 packages of Betty Crocker Gluten-Free Yellow Cake Mix (use a different kind if you need to avoid soy such as the King Arthur Gluten-Free Yellow Cake Mix)

For EACH cake layer (which you must prepare separately), you will need to add:

1 cup of sliced fresh strawberries ————- (3 cup total)

2 teaspoons of lemon zest ——————— (6 teaspoons total)

1 teaspoon of gluten-free vanilla extract —————– (3 teaspoons total)

1/2 cup earth balance buttery-flavored margarine (or Spectrum brand shortening if you don’t have EB) ———- (1 and 1/2 cups total)

1/2 cup rice milk ————– (1 and 1/2 cups total)

4 and 1/2 teaspoons of EnerG egg replacer mixed with 8 Tablespoons of warm water ————– (haven’t figured out the total, just have enough to do this three times)

Preheat the oven to 350 degrees and grease pan.

In a mixer, combine all of the ingredients except the strawberries. Once everything is combined, add the strawberries and let the mixer run until the strawberries are all smashed up and the batter is pink.

Bake in one 8 or 9 inch pan until toothpick inserted in center comes out clean (about 35-40 minutes).

Vanilla Mock-Buttercream Frosting

SAME AS CHOCOLATE MOCK-BUTTERCREAM ABOVE, JUST OMIT THE COCOA.

The Best Allergen-Free Chocolate Pudding

Chocolate PuddingWhen your guy says “oh my” and gets lost in the first bite,  you know you’ve got a winning recipe. My two neighbors also gave this a big thumbs up… with jokes about licking the bowl.

*Ahem* One of us (who shall remain nameless) might have done such a thing.

Tapioca starch is recommended for this recipe. We tried making this with arrowroot starch but it didn’t turn out so well. Tapioca starch is perfect for this and as an aside, is also a versatile substitute for cornstarch in gravies, and a substitute for eggs in custard-style pies (see the pumpkin pie recipe for an example).

This chocolate pudding is quick and easy to  make and it’s also good enough to eat when it’s still warm. It tastes a lot like that delicious gooey chocolate filling of a chocolate lava cake. YUM!

If you’d like to add an allergen-free whipped cream, I recommend Cybele Pascale’s Whipped Topping from her book The Allergen-Free Baker’s Handbook. If you are not allergic to eggs, you could use marshmallow fluff whipped to a softer consistency with a little water to make a whipped topping. In the meantime, enjoy this delicious chocolate pudding!

P.S. Hint: Freezer Molds! Make chocolate pudding pops out of this, too! 🙂

The Best Allergen-Free Chocolate Pudding

4 cups water (Note: You can replace water with a safe milk-substitute for a slightly creamier consistency. If you do this, please ask whoever you serve it to if the milk-substitute is safe for them. Many people are allergic to rice, almond, and soy milk. We are pretty happy using water, and it’s less expensive that way).

1/2 cup tapioca starch

1/2 cup unsweetened cocoa powder

3/4 cup granulated sugar

1/2 teaspoon salt

2/3 cup of dairy-free chocolate chips such as Enjoy Life brand (check for other allergens if needed). Add less or omit chocolate chips if you want a more mild chocolate flavor. If you do omit the chocolate chips, add 1/2 cup of palm oil shortening or else the mixture will be very gel-like.

1 teaspoon of vanilla

In a large saucepan, stir 1 cup of the water tapioca flour and cocoa until blended and smooth. This step helps get rid of lumps before you begin cooking.

Set the heat to medium and stir in the remaining 3 cups of water. Then add sugar and salt. Cook and stir constantly until mixture thickens to pudding consistency. Remove from heat and stir in the chocolate chips and vanilla. Keep stirring until chocolate melts.

Chill in refrigerator or pour into popsicle molds for pudding pops later.

Easy Allergen-Free Weeknight Dinner Series: Italian Sausage, Peppers and Rice

Sausage and RiceShort and simple. Filling. Tastes good. This recipe utilizes a product that I know is safe for us to eat. A Simply Nature Mild Italian Chicken Sausage from ALDI that is labeled Gluten-Free and Lactose-Free. Lactose-free does not mean Dairy-Free, so I have to be careful with that indication. After careful examination of the ingredients, it appeared totally dairy-free, so I decided to go ahead and prepare this easy one-skillet dish.

The good news: we’ve enjoyed this sausage in several meals now with no problems.

While we did very well with this sausage, always be careful of your food, always check the ingredients label and check with your dietitian or doctor if needed. Here’s what’s in this:


Italian Sausage, Peppers and Rice

1 package of allergen-free mild italian sausage

1 onion, sliced

3 cloves of garlic, minced

1 green bell pepper, sliced

1 14-0z can of diced tomatoes

1 Tablespoon Italian seasoning

1 Tablespoon garlic powder

2-3 dashes of your favorite allergen-free hot sauce (or a dash of cayenne pepper), optional

Salt and pepper to taste

Prepare rice according to package directions. (Preferably cooked in broth for extra flavor).

While rice is cooking, add the sausage, onion, and green bell pepper to large skillet set to med-high heat with a little allergen-safe oil. Saute until sausage is browned and vegetables are tender.

Add the spices, tomatoes (with juice) and minced garlic to the pan and let simmer until flavors have melded and liquid has thickened.

That’s it. Dinner is finished. Here is a picture of the sausage and the ingredients label:

Simply Nature Chicken Sausage


Simply Nature Chicken Sausage Ingredients

Vegan Peanut-Free Oat-Free No Bake Cookies (Super Quick and Easy!)

No Bakes 2By virtue of the powers that be: Earth Balance, Sunbutter, and Gluten Free Rice Krispies,  I bring you this classic no-bake cookie recipe. Now you can have your childhood back and enjoy this fun and easy-to-make classic treat. It’s so easy and so quick. Just melt, stir and drop onto waxed paper. It truly tastes like those old fashioned peanut butter, oat and butter laced no bakes you used to have.

The reason I substituted the oats with the  gluten-free rice krispie cereal is due to the fact that many people who cannot tolerate gluten, also cannot tolerate oats. As for flavor, I recommend that you go to the trouble of getting the plain gluten-free rice krispie cereal instead of using a sweetened Mom’s Best cocoa krispie cereal (I tried that and it came out too sweet).

If you have a Soy allergy, you will need to use the Soy-Free Earth Balance and find a different seed butter product (like pumpkin seed butter) as Sunbutter is processed in a facility that also processes soy.  Remember that avoiding peanuts and nuts saves lives, so if you can make a switch to a seed butter, you’ll be making the world a better place.

~As with any recipe, always double check your ingredients to make sure everything is safe and nothing has changed. ~

Vegan Peanut-Free Oat-Free No Bakes

2 cups of sugar

1/2 cup of cocoa such as Hershey’s Cocoa Powder

1/2 cup of Earth Balance non-dairy margarine

1/2 cup of rice milk

1/2 cup of sunflower seed butter (or soy-free pumpkin seed butter)

1 teaspoon of gluten-free vanilla extract

3 cups of GLUTEN-FREE rice krispie treat cereal

In a large saucepan, combine the sugar, cocoa powder, earth balance margarine and rice milk . On medium high heat, bring to a boil and boil for one full minute.

Remove the pan from heat and stir in the sunflower seed butter and vanilla extract. Make sure the seed butter is fully melted and incorporated into the mixture.

Stir in the rice krispies and coat all of the cereal. As you stir, the mixture will cool down. You may want to wait about 5 minute for additional cooling and thickening.

Then, drop mixture by spoonfuls onto waxed paper. Cookies will set in about 10-15 minutes. Let the cookies fully cool down before transferring to an airtight container. Store in an airtight container in the refrigerator for up to 5 days. Makes about 20 small cookies.