Hello everyone! I am so thrilled to be a guest blogger for Safe Eats. What a great organization to be a part of and I am honored to be able to share some of my recipes with you all.
This cookie recipe is one of my all time favorites and it’s gone through an evolution as I’ve perfected my craft over the years. Yet it still reminds me of my very first venture into the art of baking gluten free.
Chocolate Chip Cookies:
1/2 Tablespoon flax meal
2 Tablespoons water
6 Tablespoons (84g) vegetable shortening (I use Earth Balance brand)
1 cup (150g) light brown sugar
1/2 cup tapioca flour
2/3 cup (81g) brown rice flour (I use Authentic Foods brand)*
1/3 cup + 1 1/2 Tablespoons (60g) white rice flour (I use Authentic Foods brand)*
1/4 teaspoon salt
1 teaspoon baking soda
1/2 teaspoon xanthan gum
1 Tablespoon coconut milk (I use Native Forest brand)*
1/2 cup chocolate chips (I use Enjoy Life brand)
Directions:
1. Preheat the oven to 375 degrees. Line one standard size cookie sheet with parchment paper.
2. Combine the flax meal with the water in a small bowl and set aside.
3. In a mixing bowl cream together the vegetable shortening with the light brown sugar by mixing on low for a few minutes.
4. In a separate bowl combine the tapioca flour, brown rice flour, white rice flour, salt, baking soda, and xanthan gum. Whisk these dry ingredients together. Set aside.
5. Add the flax meal and water mixture to the creamed vegetable shortening and brown sugar mixture along with the coconut milk. Mix on low until fully combined.
6. Then gradually add the dry ingredients to the wet. Mix on low until all the ingredients are fully incorporated, scraping down the sides of the bowl with a rubber spatula as needed. It should look and feel just like cookie dough.
7. Finally, add the chocolate chips and mix on low for about 15 seconds. Use a spoon or scoop to make round balls about 1-1 1/2 inches in size. Space cookie balls about 2 inches apart on the cookie sheet. Flatten each ball so they are the shape of cookies (they will not flatten much on their own during baking). Bake on the middle rack for 10 minutes or until cookies are easy to remove with a spatula. If they are still soft bake for another 1-2 minutes. Remove from cookie sheet and cool on a cooling rack.
Makes about 24 cookies.
*A word on substitutions: Many gluten free flours can be substituted for others, such as quinoa, sorghum and millet. However, each flour has its own weight, texture, and viscosity. Therefore, it may alter the end result. Always use a combination of flours for best results. If substituting coconut milk in this recipe with another dairy alternative use ½ Tablespoon as other dairy alternatives are thinner than coconut milk.
Nancy Haggerty is a food blogger at www.aglutenfreedairyfreelife.com and has been perfecting the art of gluten and dairy free since 2007. She lives in Westchester, NY with her son, Kenyon and husband, Ben. We are so grateful for Nancy’s contribution. Please check out her blog and try out more of her delicious recipes!
Crunchy, tasty, and perfect for dunking into your favorite beverage.
Honey Graham Crackers
2 cups sorghum flour
1/2 cup potato starch
1/2 tsp salt
1/2 tsp baking soda
1/4 cup brown sugar
1/2 teaspoon cinnamon
1/4 cup, non-hydrogenated palm shortening such as Spectrum brand
1/2 cup honey
1/4 cup water
Preheat oven to 350 degrees F.
Mix dry ingredients together. With a pastry cutter or two knives, cut the shortening in until it resembles sand. Add the honey. Then add water a little bit a time until the mixture just sticks together and doesn’t fall apart. If still falling apart, add another Tablespoon or so of water.
Tear out a piece of parchment paper that will fit on your cookie sheet, and then put the parchment paper on a table or counter. Take half of the dough and press it onto the parchment paper to form a rectangle of dough in the middle of it. Top with a sheet of wax paper and roll the dough until it is about 1/8 inch thick.
Remove the wax paper and transfer the parchment paper with the rolled dough to the cookie sheet. Using a knife or bread dough scraper, cut where you want the graham crackers to break. Using a fork, poke three sets of holes for each cracker.
Bake for 10-15 minutes or until graham crackers are lightly browned around the edges.
Remove and let cool for 10-15 minutes. Using a very flat sharp cookie spatula or knife, re-cut into the cracker separations and gently lift them from the parchment.
Repeat with remaining dough.
These will store for 1-2 weeks in an airtight container.
With a thin sugar-crisped exterior, a moist interior, and deep milk-chocolate flavor, these cookies are a food allergic’s dream come true.
The story of this cookie: I needed to make a really good double chocolate cookie (I realize that “need” is a strong word, but hey a chocolate cookie craving is a need, am I right?). I was a bit disappointed in the gluten-free double chocolate cookie I had been making. It kinda satisfied the chocolate craving but the taste was still too dark and had a bitter tone. Also, as with most disappointing gluten-free treats, the texture was pretty grainy and dried out within a day. I needed a moist cookie that had a silkier texture, a more milk chocolate flavor, and with a good texture that would last for more than 15 minutes.
After much research and experimentation, I finally hit a winner. The secret to better texture and moisture retention is in a higher ratio of starch than is normally called for in gluten-free baking. A 50% flour and 50% starch mix. Yes! Good results!
I shared some finished cookies with family and friends and took some to networking events. I got a lot of rave reviews on this cookie. Due to such great response, I was tempted to keep this recipe a secret. I’ve been told that I shouldn’t publish this and that it should be the beginning of fantastic cookie sales, and a way to fame and fortune – perhaps a new line of dream cookies for all those who can’t wheat, dairy, eggs, corn, oats, peanuts, treenuts, or rice! (It’s very hard to find gluten-free treats without rice!) I’ve made these with both brown rice flour and sorghum flour, the results were good for both.
I don’t want to have you thinking these are some sort of extremely magical cookie, though. What gets us excited, however, is that this is like having a cookie made from wheat. They’re simply good. For those of us who haven’t had good cookies like that in a long while, it’s pretty magical.
What’s even better – these are pretty economical. Other than the palm oil shortening, the rest of the ingredients are sold for prices that won’t leave you breaking your wallet at $70 in the 7-items or less checkout line.
So, I suppose I could have kept this recipe to myself, but what of all those commercial kitchen start-up costs that I don’t have? And what of all the needs of the dedicated bakers all over the world that need to start their gluten-free baking with a really good cookie?
I’d rather inspire all of you to make these and share them with your friends and family. I’d like to see if your foodie friends who can eat anything even notice that these aren’t anything but fantastic. I’d like to see you delight your co-workers or family members or friends who are usually left out of the food part of celebrations and watch them smile and praise you for your thoughtfulness! It would be great to see these offered in your bake sales, your community events, school functions and fundraisers! The food allergy community will profusely thank you for thinking of them and for making their cookie dreams come true!
Without further adieu:
Dreamy Allergen-Free Double Chocolate Cookies
Set your oven to 350 degrees Fahrenheit, or 175 degrees Celsius.
In a separate bowl, add these dry ingredients together and mix until thoroughly combined:
1 cup (152 grams) of either brown rice flour or sorghum flour (use sorghum for those that cannot tolerate rice)
1/2 cup (56 grams) cocoa powder
1 cup (152 grams) of cornstarch or arrowroot starch (If allergic to corn, use arrowroot starch. I have tried both. The cornstarch results in a slightly silkier texture on the inside of the cookie, but the arrowroot starch is still very nice).
1 teaspoon of baking soda
1 teaspoon of baking powder
1/2 teaspoon of salt
1/2 teaspoon cinnamon
1/2 teaspoon of cream of tartar
3/4 teaspoon of xanthan or guar gum
Set aside the bowl of dry ingredients.
In your stand mixer, or with hand-held mixer, cream together only these ingredients:
1 cup (180 grams) non-hydrogenated palm oil shortening (Note: do not use butter or coconut oil or any other shortening if making this for general public or school functions. Butter is dairy allergy trigger and coconut oil can trigger treenut allergic reactions, other shortening may contain soybean oil.) Spectrum organic palm-oil shortening can be found here: http://www.spectrumorganics.com/spectrum-naturals/organic-shortening/
1.5 cup (300 grams) light brown sugar (sticky sugar)
4 oz. (105 grams) applesauce (conveniently, this is the equivalent of a snack-sized cup that you can purchase and put in kids’ lunches)
Then add:
1 Tablespoon vanilla extract
Once the shortening, sugar, applesauce, and vanilla extract ingredients are combined, gradually mix in the dry ingredients. The mixture will get very thick. You want this to resemble cookie dough. If appears too dry, add about 1-2 Tablespoons of water.
Once your cookie dough is made, using a large metal spoon, fold in:
1/2 cup (90 grams) Enjoy Life Allergen-Free mini chocolate chips and
1/2 cup (90 grams) Enjoy Life Allergen-Free chocolate chunks. More information on Enjoy Life products can be found here: http://enjoylifefoods.com/
Scoop dough onto cookie sheet lined with parchment paper (or lightly coated with the palm oil shortening), and flatten to 1 inch disks.
Bake for 7-10 minutes or until cookies look puffy and cracked a little.
Remove cooks from oven and let cool for 5-10 minutes on the baking pan before transferring to a plate or wire rack to cool completely. If you try to transfer them too soon, they will fall apart. Alternatively, you can pull the entire parchment sheet of cookies off of the pan and onto the counter to cool so you can quickly reuse the pan. Cookies will rest down and look more cracked as they cool.
What would someone say to you if you went to Don Pablo’s Mexican Restaurant with a bean, rice, wheat, dairy, and soy digestive allergy? They would say, “Why would go there? There isn’t anything on the menu that you can eat! You’re crazy!”
Well, I would be if we had airborne reactions to those foods. But we don’t. We are also okay if other foods are being prepared in the same kitchen. (Disclaimer: Do not go out to eat at restaurants where airborne or cross-contamination could risk a life-threatening food reaction). Also, most restaurants have meat and veggies and spices, and I like to put one up to the challenge to see if it’s a place we don’t have to put on our mental “nope list” when we are traveling, hungry, and needing sustenance. If we’re lucky, accommodations will be made with a good attitude. If we are extra lucky, we’ll run into a place that has a Restaurant Manager or a Kitchen Manager that understands the seriousness of our son’s condition and is willing to do whatever it takes to make sure he feels included and part of the experience. This is exactly what happened at our recent visit to Don Pablo’s.
You see, it isn’t always about merely consuming a safe food, it’s about being able to sit down in a Tex-Mex or Mexican restaurant and smell the aroma of cumin, listening to a bit of Mariachi music, seeing the colors, decor, and change of scenery, and feeling the vibe of a vibrant and bustling Mexican restaurant. Going out to eat is more than just a meal, it’s a time to bond and relax and experience a meal together.
In our case of going to Don Pablo’s, the Manager pleasantly surprised us with excellent service. Not only did he have the appropriate attitude toward our special order, he made us feel like we were like any other restaurant guest. In fact, probably more like VIPs. He expressed a genuine concern and interest in helping us have a good experience. I explained how it must look for us to bring our son with a dairy, wheat, rice, soy, and bean allergy to a Mexican restaurant. He did admit that he wondered and we both laughed, but then I went on to explain that we know what my son can have and that he loves a good plate of cumin-spiced chicken fajitas and the ambiance of Don Pablo’s. I told him that we usually don’t get to go out to eat because of his allergies, particularly a Mexican restaurant. The Manager really listened to my story, talked with us and developed a relationship with us. He gave our son a high five and also made him feel like a part of the conversation.
To add an even higher level of service, he said he would personally prepare our son’s meal of chicken fajitas to make sure it was safe and that it was tasty. After he headed to the kitchen, I was so happy that I was near (or at) happy-tears. It’s so rare to be a multiple-food-allergy family and be treated this well.
This Manager was careful to cook our son’s fajitas only in animal fat (since one of the hardest things for us to avoid is soy-based cooking oil) and he added spice for flavor and beautiful pan roasted veggies. For a side dish: a fresh cut fruit salad. He even came back and asked if certain fruits were okay. When our entrees were finished, he and the server brought all of the entrees to us at the same time. This particular detail meant a lot. At most other places, they tend to bring out out the regular entrees first while my hungry child waits another 10-15 minutes for his special meal to be prepared, furthering his feeling of exclusion that much more.
Our meal was excellent, but more importantly, my son’s fajitas tasted just like they are supposed to! As we finished up, paid our ticket and headed out, he gave us his business card and told us we could always call and ask any questions or for any help with future meals. We were truly Wow’ed by his service and grateful to walk out happy rather than frustrated. If our experience at that particular Don Pablo’s is a testament to their customer service philosophy at all of their chain restaurants, then I can do nothing but promote them. That kind of customer service philosophy and attitude really makes a difference in people’s lives.
When it seems like years and years since we were able to just order off the menu and get great service, we really appreciated having an experience like that. For a brief moment in our food-allergic lives, we felt like we were in the same category as all of the normal restaurant patrons who can order anything off of the menu. And while we’ll always have to do a special order anytime we decide to go out to eat, we know where we can get a great safe meal and be treated like we are just as important as every other guest.
My recommendation to other food-allergic families is is to stay positive and develop relationships with your local Restaurant Owners, Managers, and Kitchen Managers. Obviously, avoid going out to eat if there is potential for a life-threatening to highly sensitive exposures. Otherwise, bring a list (or have cards printed) with what the allergens are and another list of things that are safe to eat. Then, provide brief instruction on how to cook those foods safely such as “please use clean skillet, do not grill.” The information is positive and provides a solution for both you and the Restaurant or Kitchen Manager. Additionally, you can also go in and talk to a Manager (or call) when they are not in the middle of a lunch or dinner rush and ask him/her if they can help you have a safe eating experience for future meals.
So, you see, it is possible to get out and be welcomed, treated well, and be included in the overall conversation of what it means to go out to eat and enjoy a meal together. We are lucky and grateful for the Don Pablo’s Manager, and others like him, as our life experience has been made all the better because he chose to listen and make a little boy’s dining out experience an excellent one!
Sincere thanks to the Manager and to John Scharpf for allowing me to publish our experience at our local Don Pablo’s as an example of excellent service to the needs of our community.
Ever since I discovered that my son was having food reactions to food and medicines as a toddler, I was determined to learn all that I could about food allergies so that I could help him feel better and help other families who are trying to help their children feel better, too.
There have been so many challenges that we’ve had to overcome, and many that we continue to work through. Diagnosis has taken several years. Eventually, our doctor told us that our son very likely has FPIES (Food Protein Induced Enterocolitis Syndrome), a very rare form of food allergy where the digestive system reacts, and for which no test is available to detect it before reaction occurs. He reacts to wheat, diary, rice, oats, beans, peanuts, and soy. Eventually, you learn be strong, survive, and then thrive in spite of it. And that’s the key word: thrive.
For the past few years, my goal has been to help children with food allergies participate and be included in all the events and moments of life that make up the memory and experiences of what it is to be human: to have a meal together.
We all have memories of something special that a caregiver made for us, we remember having cake and ice cream with our friends at birthday parties, having pizza after a baseball game, and then those lovely dates with some sort of interesting delicious dinner and a movie. As our kids grow taller, stronger, smarter, and of course, grow up faster than we’d like, they’ll want to keep participating in all the food events of life.
While we wait and pray for a cure for food allergies, we’ll cure exclusion by making what we can have even better, and by achieving public compassion and peer support that will last a lifetime. With this book, peer support is the goal. Fellow classmates are often the best support system a kid can have. This book encourages the development of that support system by teaching kids how to help and understand their classmates who have food allergies. Kids with allergies can share this book with friends and caregivers. It is even a great reference to have on hand in every kitchen!
I am deeply grateful to Bruce Larkin with Wilbooks for believing in this mission and for providing the first opportunity to do more than I could do by myself. I am so appreciative of Angie Scherffel for her constant friendship and dedication – who has been integral to making this happen and for which I am proud to call VP, Board of Directors as we move toward establishing Safe Eats as a nonprofit. I’m ever grateful to friends and family who are constantly encouraging me to write and who are always helping us during our toughest moments. Mama A and Papa, my Aunts, Uncles, and Grandmas, Danny’s Family, and my Mom and Dad – they perhaps taught me the meaning of home meals and memories more than anyone else. Kathy and Kristy – two beloved souls that deserve nothing less than a lifetime of our thanks and payback. And, of course, the two loves of my life: my fiance’, Dan Sanders, who has stepped up to the role of being the love of my life and possibly the most loving, generous, and involved father a little boy could ever hope for.
And my son, who I would never have imagined could turn my life so completely sideways in the most crazy and good way imaginable, inspiring everything I’m doing, who tells me nearly every day “I love you so much that there is no number in the universe that could say how much I love you.” I am so very proud of him. He has been so strong through all of the symptoms and trials. He makes us stronger. He is somehow able to forget all he’s been through with a big happy grin on his face that makes the hearts of tough men melt. ❤
Loving support of book orders will be personally signed by the author and proceeds will go toward education and helping other families with food allergies THRIVE. 🙂
Homemade waffles, with a delicate texture and enticing aroma and flavor, make such a beautiful weekend breakfast. And these waffles contain very few additives that can detract from the flavor and texture. Most store bought gluten-free frozen waffles, especially, tend to contain soy lecithin and a legume-based flour. For those who suffer from soy, peanut or legume allergies, the store-bought gluten-free waffles are not an option.
Homemade waffles are surprisingly easy and budget-friendly. With a $10 dollar Rival waffle iron, we used a standard gluten-free flour mix and adapted a classic wheat recipe to omit several food allergens while retaining all the texture and flavor of a waffle that we agreed is superior to the frozen waffles. This recipe is gluten-free, soy-free, peanut-free, treenut-free and dairy-free.
An egg-free version is still in testing. We attempted to make an egg-free version using applesauce as a replacement but applesauce is not recommended as causes the outer layer to caramelize and stick to the waffle iron (even with extra oiling). This article will be updated when a successful egg-free version is achieved.
These waffles are slightly sweet and perfect with our favorite Log Cabin All Natural syrup – made without caramel color or high fructose corn syrup. If you plan on adding a lot of sweet toppings, omit the sugar in this waffle recipe.
Note: Please be sure to double-check all of your ingredients to ensure you avoid your particular food allergens.
Tender Waffles (Gluten-free, Dairy-free, and Bean/Soy-free)
Following the instructions of your waffle iron manual, heat and prep the surface of your waffle iron. TO AVOID SOY, do not use a spray cooking oil. Instead, use a brush to apply a light coating of canola or grapeseed oil to the iron.
Mix together the ingredients above with a fork until ingredients are well-combined and lumps are removed. You will notice that the mixture will bubble a little and take on a frothy texture. This is good and exactly what you want to make a tender light waffle.
Using a 1/3 measuring cup, ladle waffle mixture onto each waffle section of the iron. You do not have to fill every square entirely or else the mixture will spread and overflow during the baking time.
When your waffle iron light indicates that the cycle of baking is complete, lift the lid and use a fork to pull up a corner. The waffle should then come up very easily.
And just one more picture to show the tender deliciousness. Enjoy!
When you are diagnosed with a food related condition your life changes and you are faced with a lot more cooking than you have ever done before. No longer can you have pizza or stir fry delivered to your door. No longer can you swing through your favorite fast food place on the way home. No longer can you just buy the frozen potato products in the freezer section because of all of the added ingredients, or even frozen dinners for that matter. No longer can you just go out to eat. It’s a bummer but…
You have to have a good attitude about this or you will go nuts.
Think of yourself as a chef and your kitchen as the world’s best restaurant.
Before long, the things you make at home will be far tastier and better than what you can get out to eat.
I know that cooking from scratch all the time really seems overwhelming, but I promise that it gets to be like old hat after a while. This is what chefs have to do to prepare for a busy night of serving clientele, so it’s not a new trick. You’ll get to a point where this becomes standard routine.
This is where a little prep can save your sanity and thus I begin an article series called “Sanity Savers.”
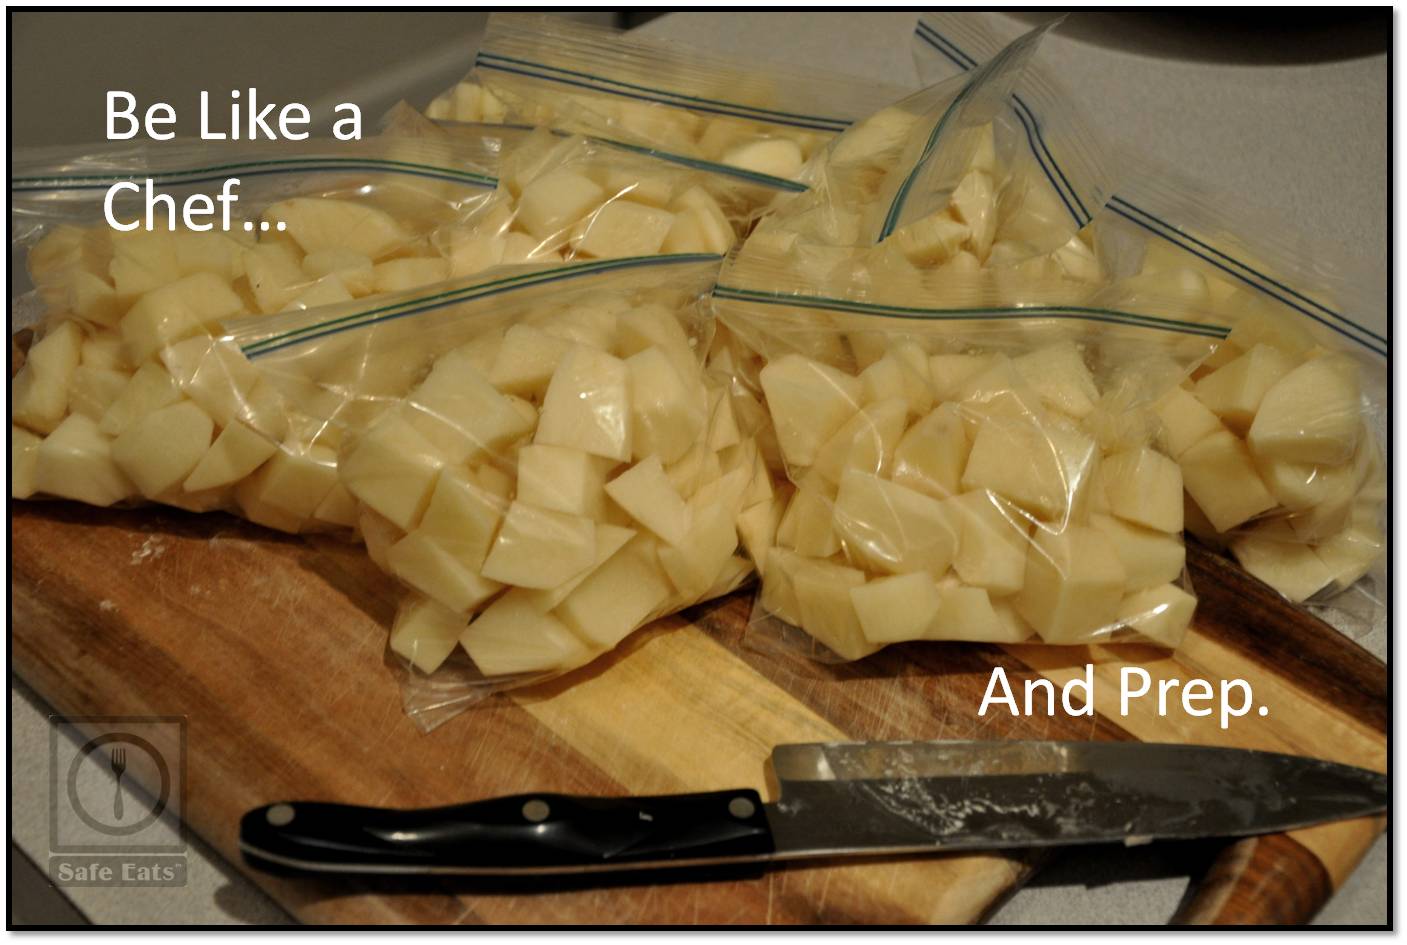
First, I’ll start with potatoes. These are NOT a quick weeknight sort of ingredient. Potatoes are one of the most time-consuming, prep-intensive ingredients ever. But they are one of the most delicious, satisfying and tolerable foods. French fries and mashed potatoes are wildly popular for a reason.
So, here’s the strategy. Pick one night to do your potato prep work. It is what I like to call:
“Potato Night”
When you do your grocery shopping, buy one, two or three 10-lb. bags of potatoes. Russet, baking, red… whatever kind of potatoes are your favorite.
Have gluten-free sandwiches or scrambled eggs for dinner on this prep night to reduce your stress.
Or, do this prep work in the middle of cooking dinner, or after cooking dinner, or just before…however you can fit in this prep work.
Then, cut up a whole bunch of potatoes, any size you want:
Cut some in french fry shape, dice some really small for hash, slice some for scalloped potatoes or casseroles. You can even grate some by hand or in a food processor to be used for hash browns or potato latkes or potato pancakes. However you want to do it and however you think you’ll like cooking the potatoes. Just remember that the smaller the size you cut them, the faster they will cook.
Put them in freezer bags and freeze.
That’s it.
Now you’re ready for having potatoes on your regular weeknight cooking.
Ideas for Meals using Prepped Potatoes
Crock Pot Roast or Stew: Add meat, potatoes, 1 diced onion and baby carrots to your crock pot. Fill with water to almost the top of ingredients. Add salt, pepper and a generous amount of garlic powder and onion powder (about 2 tablespoons each). Cook on low all day.
Casserole: Add potatoes to a casserole dish with beans or chicken, veggies, spices, and a little water. Cover with foil and bake at 375 degrees F for an hour.
Roasted Potatoes: While you’re grilling or sauteing your protein, roast the potatoes in the oven: toss 1-2 bags of frozen potatoes with olive oil, rosemary, sea salt and pepper (and/or add a little dijon mustard) and roast at 475 degrees F for 15 minutes, stir, 15 minutes more. (make sure you have enough oil or they will stick to the pan)
Mashed Potatoes. Boil water, add frozen potatoes and cook until fork tender. Drain most of the water. Mash with a little of the potato water and add salt and onion powder. For a cheesier flavor, add nutritional yeast flakes and a little olive oil or nondairy milk. Perfect topping for a quick shepherd’s pie, too.
French Fries: Add oil to skillet, bring to medium high heat. Add a bag of fry-cut potatoes and cook for 15 minutes or until golden brown. Drain on paper towels and add salt and pepper.
German Potato Salad: Boil water, add 2 bags frozen potatoes and cook until *just* fork tender. Drain and set aside. In a separate skillet, cook 1 diced onion until tender, set aside. Cook 6 slices of bacon. Set aside. In a bowl, mix together 1 cup vegetable or olive oil with 1/4 cup dijon mustard and 1/4 cup of vinegar (you can use cider vinegar, red wine vinegar or white vinegar but DO NOT USE MALT VINEGAR because malt contains gluten). Mix all ingredients together and serve with sandwiches or scrambled eggs or as a side dish to your meal.
Soups: This is probably the easiest way to use these potatoes. Add to your pot of lentils or chicken broth. Or add the potatoes to water with the addition of non-dairy milk, leeks, salt, pepper, onions and garlic for a delicious and simple potato leek soup. Or use mushrooms instead of leeks. Or, if you have neither on hand, just have plain potato soup. Sometimes the most simple dishes are the best dishes.
If you have any more ideas for how to use these prepped potatoes, feel free to add them to the comments. I really hope this time-saver tip works for you!
Perfect for any holiday breakfast or for a special breakfast for your loved ones. Prepare the apples, raisin syrup and gluten-free pancake mix the day before to make your morning prep go more quickly. These are vegan, gluten-free, soy-free, egg-free, dairy-free, oat-free, peanut-free and tree-nut-free. If you use Bob’s Red Mill Pancake mix, it is also rice-free.
Disclosure: As with all recipes, please check your ingredients carefully for safety and let your allergic guests know everything you used; providing the ingredients list when possible.
Recipes below serves 4. Double or triple all recipes below for 4 or more guests.
Maple & Rum Raisin Syrup
Omit the rum for kids. This is more for the grown-ups.
Soak 1/2 cup of golden and/or dark raisins in 2 cups of rum overnight.
** ALLERGY NOTE** Rum is generally a gluten-free alcohol, but always double check the brand’s website to make sure.
If you forget to soak the raisins, you can simmer them in the rum while you make the pancakes until most of the rum is absorbed.
In a small saucepan, warm the raisins with any remaining rum with 1 cup of maple syrup. Transfer to a medium bowl and set aside (after you finish pancakes, you’ll be adding remaining apples and liquid just before serving).
Carmelized Apples
2 apples, peeled and sliced thin
1 1/2 cups water
1/2 cup light or dark brown sugar
1/4 teaspoon salt
a few dashes of cinnamon
In a large skillet over medium high heat, simmer all of the until apples are tender and syrup begins to thicken. Don’t let it all evaporate as you want some of this delicious caramel liquid to stir into your finished syrup.
Remove from heat and transfer to a bowl. Store in refrigerator for the next morning (if making the night before). Otherwise, set aside to be ready to put some slices into the gingerbread pancakes.
Gingerbread Pancakes
Follow the recipe for these Vegan Pancakes by clicking here. (For day-ahead-prep, make your mix and add wet ingredients in the morning)
Add the following spices to the mix:
1/2 teaspoon ground ginger
1/4 teaspoon ground cloves
1/4 teaspoon ground nutmeg
1 teaspoon cinnamon
2 Tablespoons molasses
OR
If using Bob’s Red Mill Pancake Mix, add the spices above for 1 and 1/2 cup of the mix.
When ready to make the pancakes, add wet ingredients.
Note: One egg can be replaced 1 Tablespoon ground flax or chia seeds mixed with 3 Tablespoons of water
OR 1/4 cup of applesauce
OR 1/4 cup of mashed banana (if you don’t mind some banana flavor)
Directions:
Heat oven to 175 degrees Fahrenheit and set a large plate or dish on the middle oven rack. This is where you’ll keep finished pancakes warm until ready to serve.
Heat large skillet to medium heat and spray lightly with canola or vegetable oil (or a little bit of earth balance if it is safe for your family).
Drop batter by the 1/4-cup-full into the skillet.
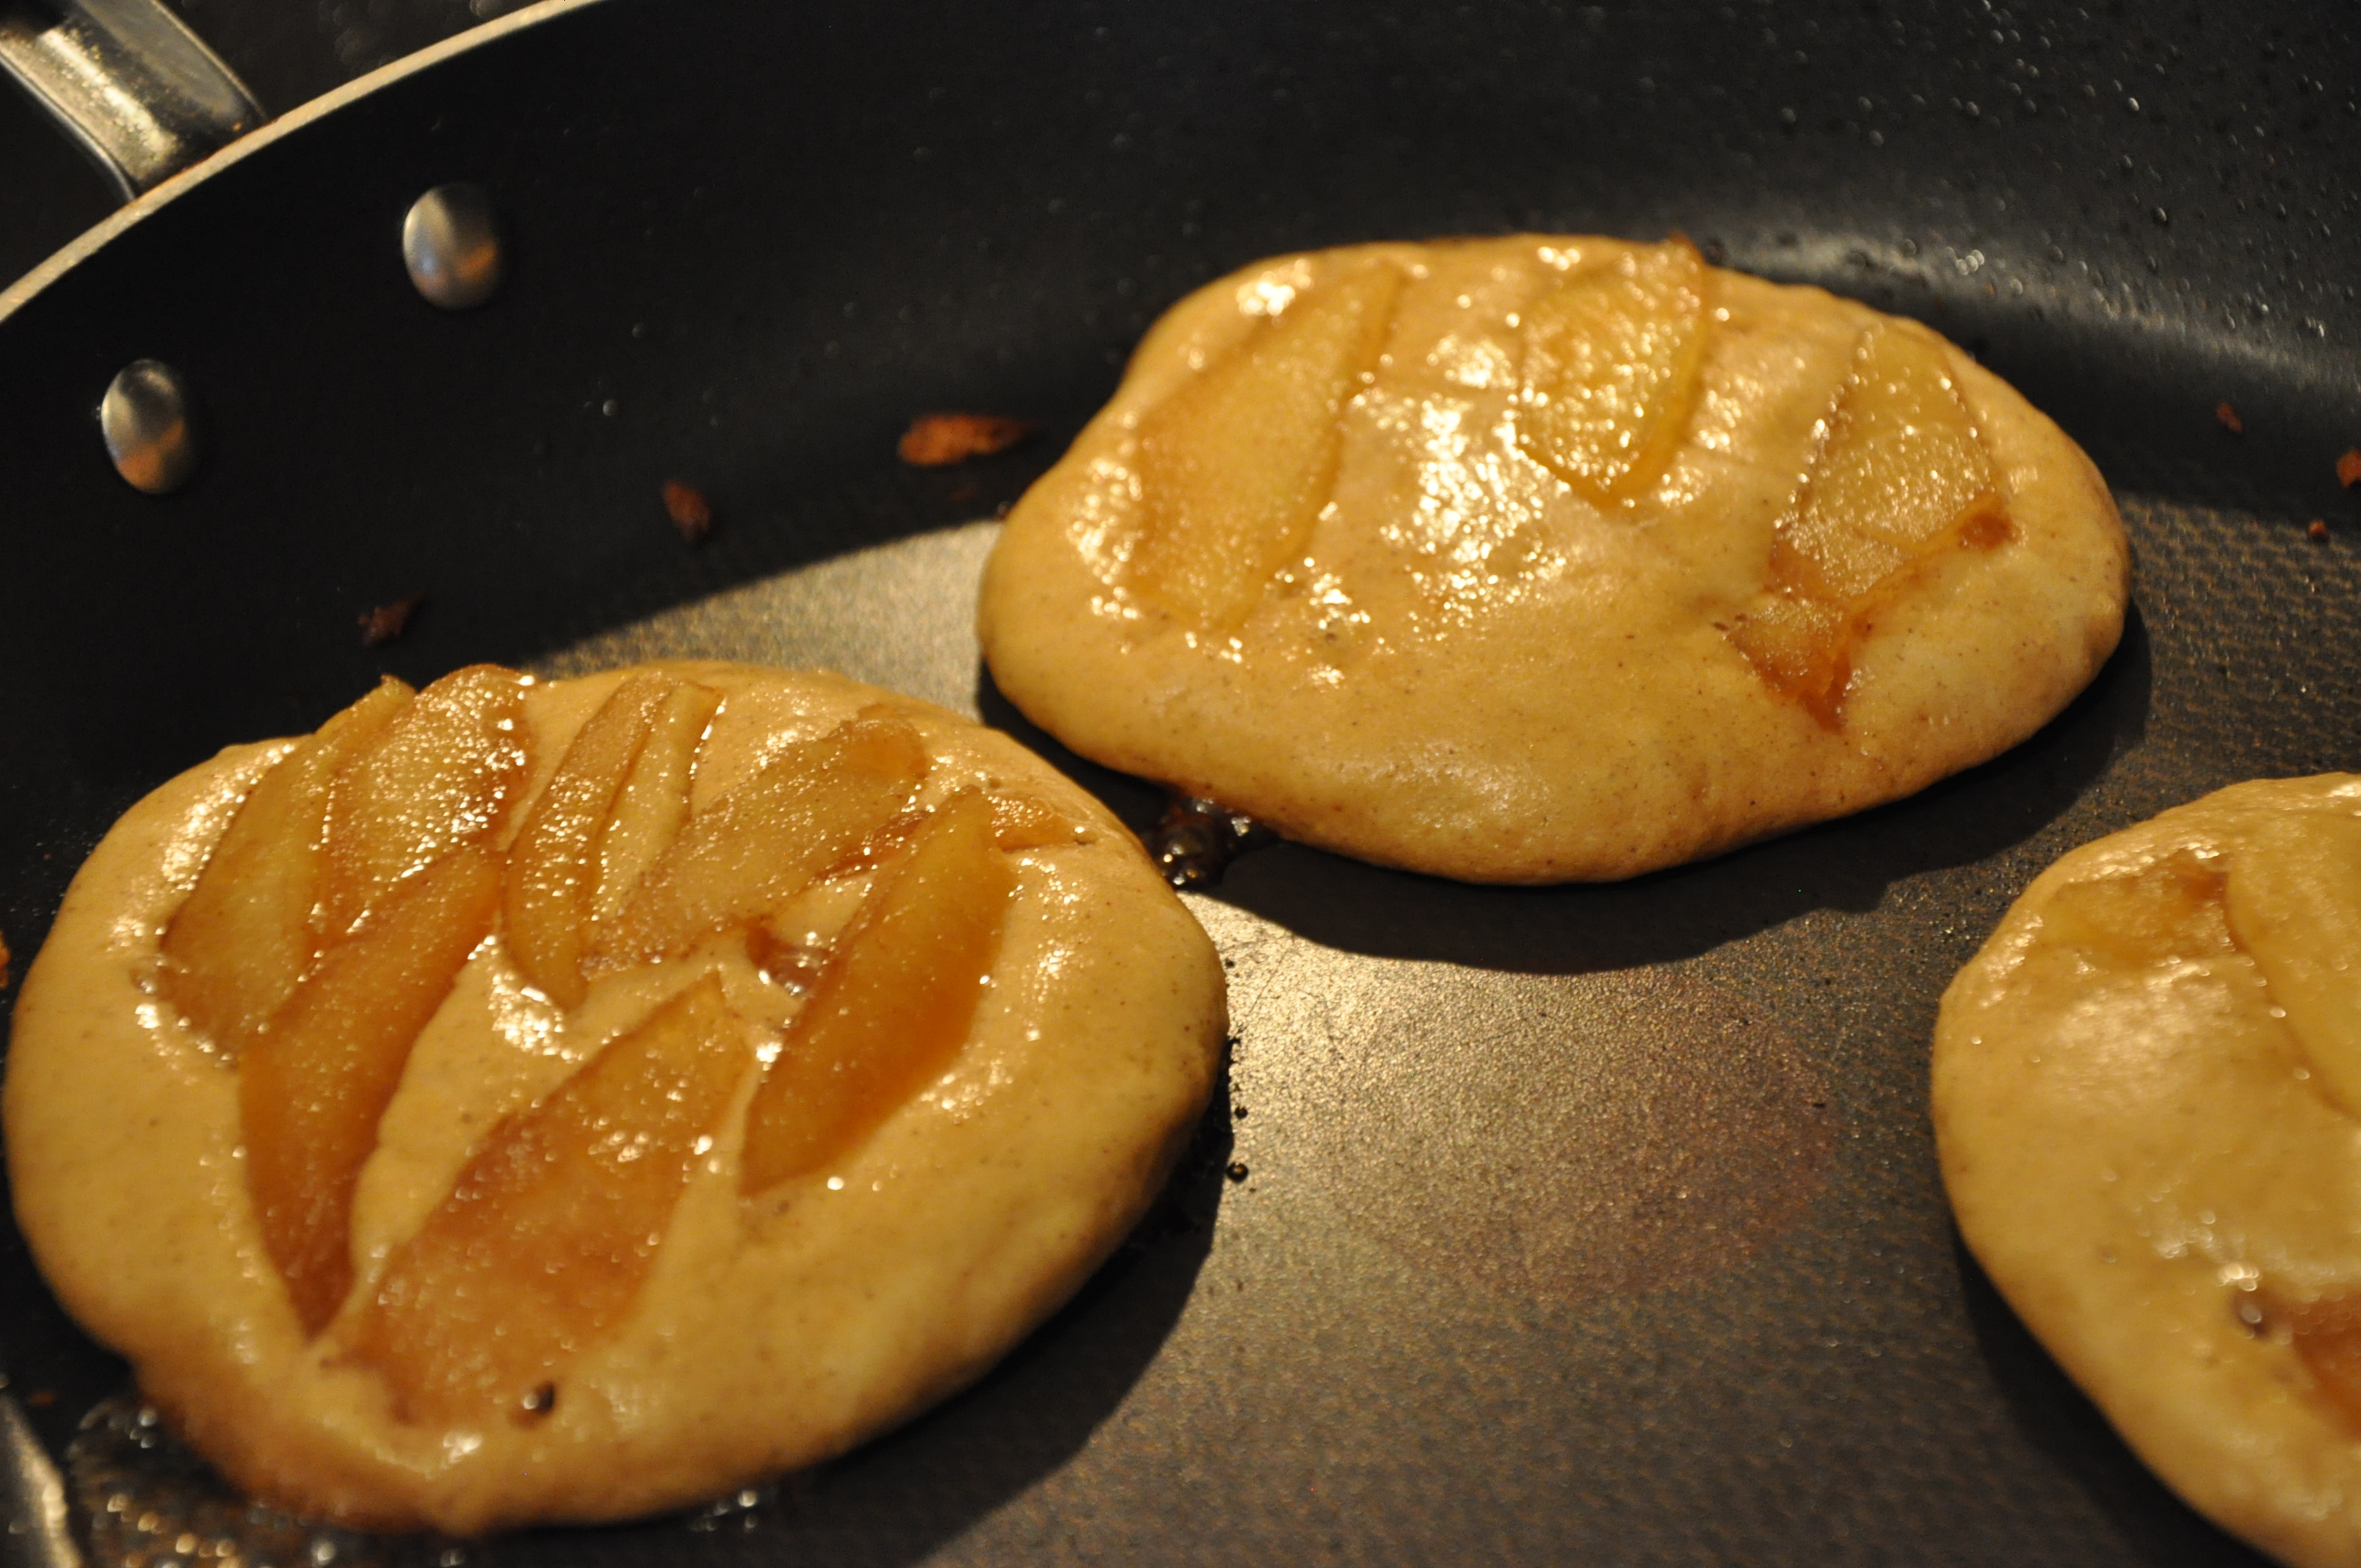
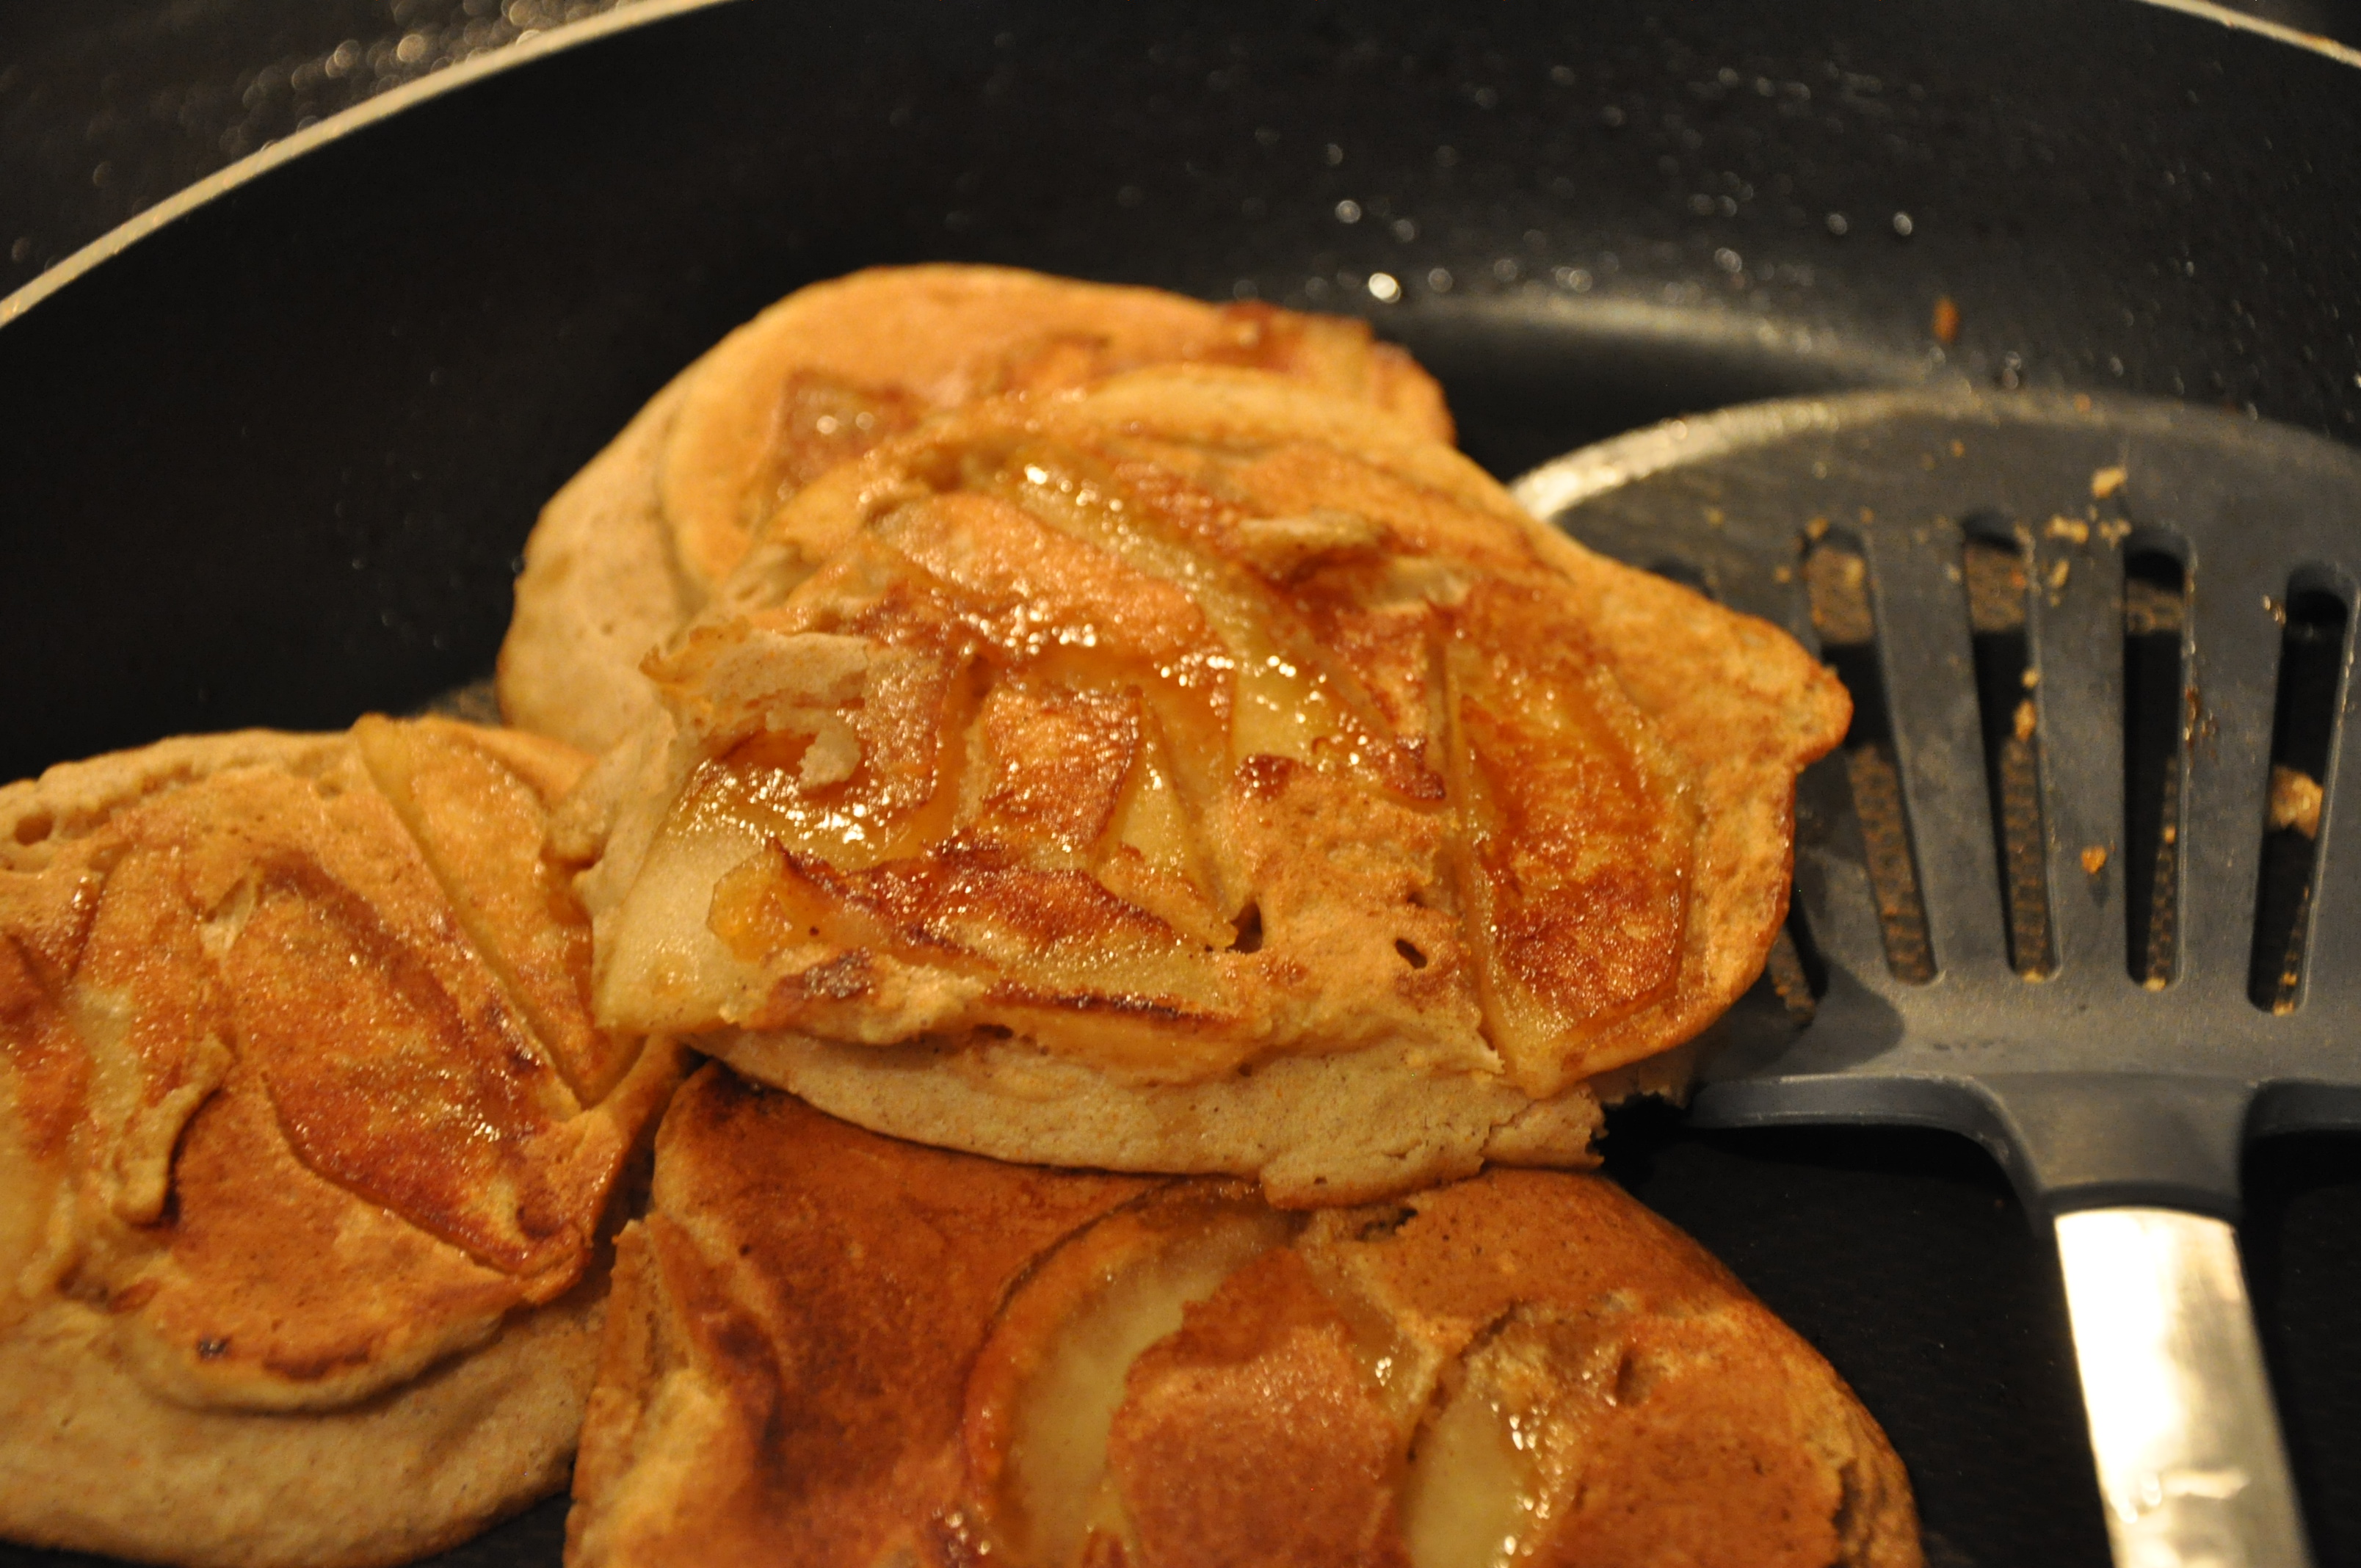
Add a few slices of the caramelized apples in each pancake before flipping.
When pancakes are golden brown on each side and cooked through, transfer to the dish in the oven to keep warm while you prepare the rest of the pancakes.
When all of the pancakes are finished, stir the remaining apples and caramel liquid into the rum raisin syrup and serve over the finished pancakes on individual plates – making sure there are delicious rum raisins in each bite!
Enjoy with a cup of tea, coffee or warm apple cider.
This recipe is for a new online friend. I hope I’m in time for her and her children to enjoy! These Top-8-Allergen-Free Christmas Cookies are gluten-free, dairy-free, egg-free, nut-free, and soy-free. These also happen to be rice-free, oat-free, coconut-free and sesame-free. While I do my best to eliminate these allergies, I am not well versed on all cross reaction ingredients.
Please make sure that all of your ingredients are safe for you and your family.
The goal was to eliminate rice flour and eggs and create a nice sugar “butter” roll-and-cut style cookie. I suggested that she use corn flour (masa) that is labeled gluten-free and I also suggested trying sorghum flour. I really wanted to go beyond just suggesting it and test them both out for myself.
Corn flour is typically used to make tamales and tortillas. If you’ve never used corn flour to do this, I HIGHLY recommend it. It is a lot of fun and you can avoid a lot of preservatives that are typically found in store-bought tortillas. But could corn flour be used in a butter cookie recipe? I turned to my favorite Cook’s Illustrated Baking Book and adapted the very versatile wheat-based Christmas Cookie recipe that I have loved for years and replaced the wheat flour with the corn flour, added xanthan gum, and replaced the cream cheese with 5 Tablespoons of applesauce. The result was quite delicious. There is a distinct tortilla cookie flavor but it is actually quite good, especially prepared with the frosting. The cookies are not too sweet because the frosting is very sweet and you don’t want the cookies to be too sweet. However, if you do not frost the corn flour based cookies, add an addition 1/4 cup sugar to the dough.
The next batch I made was with sorghum flour and potato starch. First of all, I noticed that Bob’s Red Mill Shortbread mix (pictured) is mostly sorghum (pronounced: sore-gum) and potato starch. There is no rice flour in this mix and it is so soft and works beautifully for roll-out cookies. Of course, I am not sure what the secret ratio is of sorghum flour to potato starch, so I tried to come up with it on my own in case my readers can’t find the shortbread mix but can find the sorghum flour and potato starch (so many stores carry such a varied set of flours that one can never tell what will be available).
I will say that we were even more pleased with the sorghum/starch mix. Sorghum flour comes from sorghum cane (the stuff they use to make molasses) and it has a wonderfully soft texture. Sorghum is a bit of a miracle worker with regards to improving gluten-free texture in baking and I highly recommend that gluten-free bakers experiment with it a little more.
That said, we are enjoying the cookies from both batches, though we prefer the corn-flour ones iced (they seem to do well with the extra sweetness) and we are preferring the sorghum ones un-iced with some hot tea. Both are delicious. Enjoy!
Corn (Masa) Flour or Sorghum Flour Christmas Cookies
Preheat oven to 375 degrees and line a baking sheet with parchment paper.
In a large bowl, mix together:
2 1/2 cups of Corn (Masa) Flour – make sure it is not processed with wheat and that it is certified gluten-free.
OR
2 cups of sorghum flour mixed with 1/2 cup potato starch
THEN ADD:
1/4 teaspoon of salt
3/4 cup sugar
3/4 teaspoon of xanthan gum
THEN CUT IN:
1/2 cup allergen-free shortening such as Spectrum non-hydrogenated palm oil shortening OR earth balance
THEN ADD:
2 teaspoons of vanilla extract
5 Tablespoons of applesauce
3 Tablespoons of non-diary milk or water
DIRECTIONS:
Mix together by spoon and then finish mixing with hands.
Form the dough into a ball and split in two halves.
Dust the counter with either corn or sorghum flour.
Roll out the first half of the dough to about 1/4 inch thick and use cookie cutter of choice to cut out enough cookies to fill a cookie sheet. Keep re-rolling dough until you’ve used up as much as you can.
Using a fork, poke some holes in your cookies to eliminate big air bubbles in your finished cookies.
Bake for 10 minute or until edges are just a little golden brown. Your cookies will look very light and that is exactly what you want so that they don’t end up too crunchy. You want a nice firm cookie with a bit of give in the bite.
Repeat the directions with the second half of the cookie dough. If you can do all of the cookies all at once, go for it.
Next (and optional):
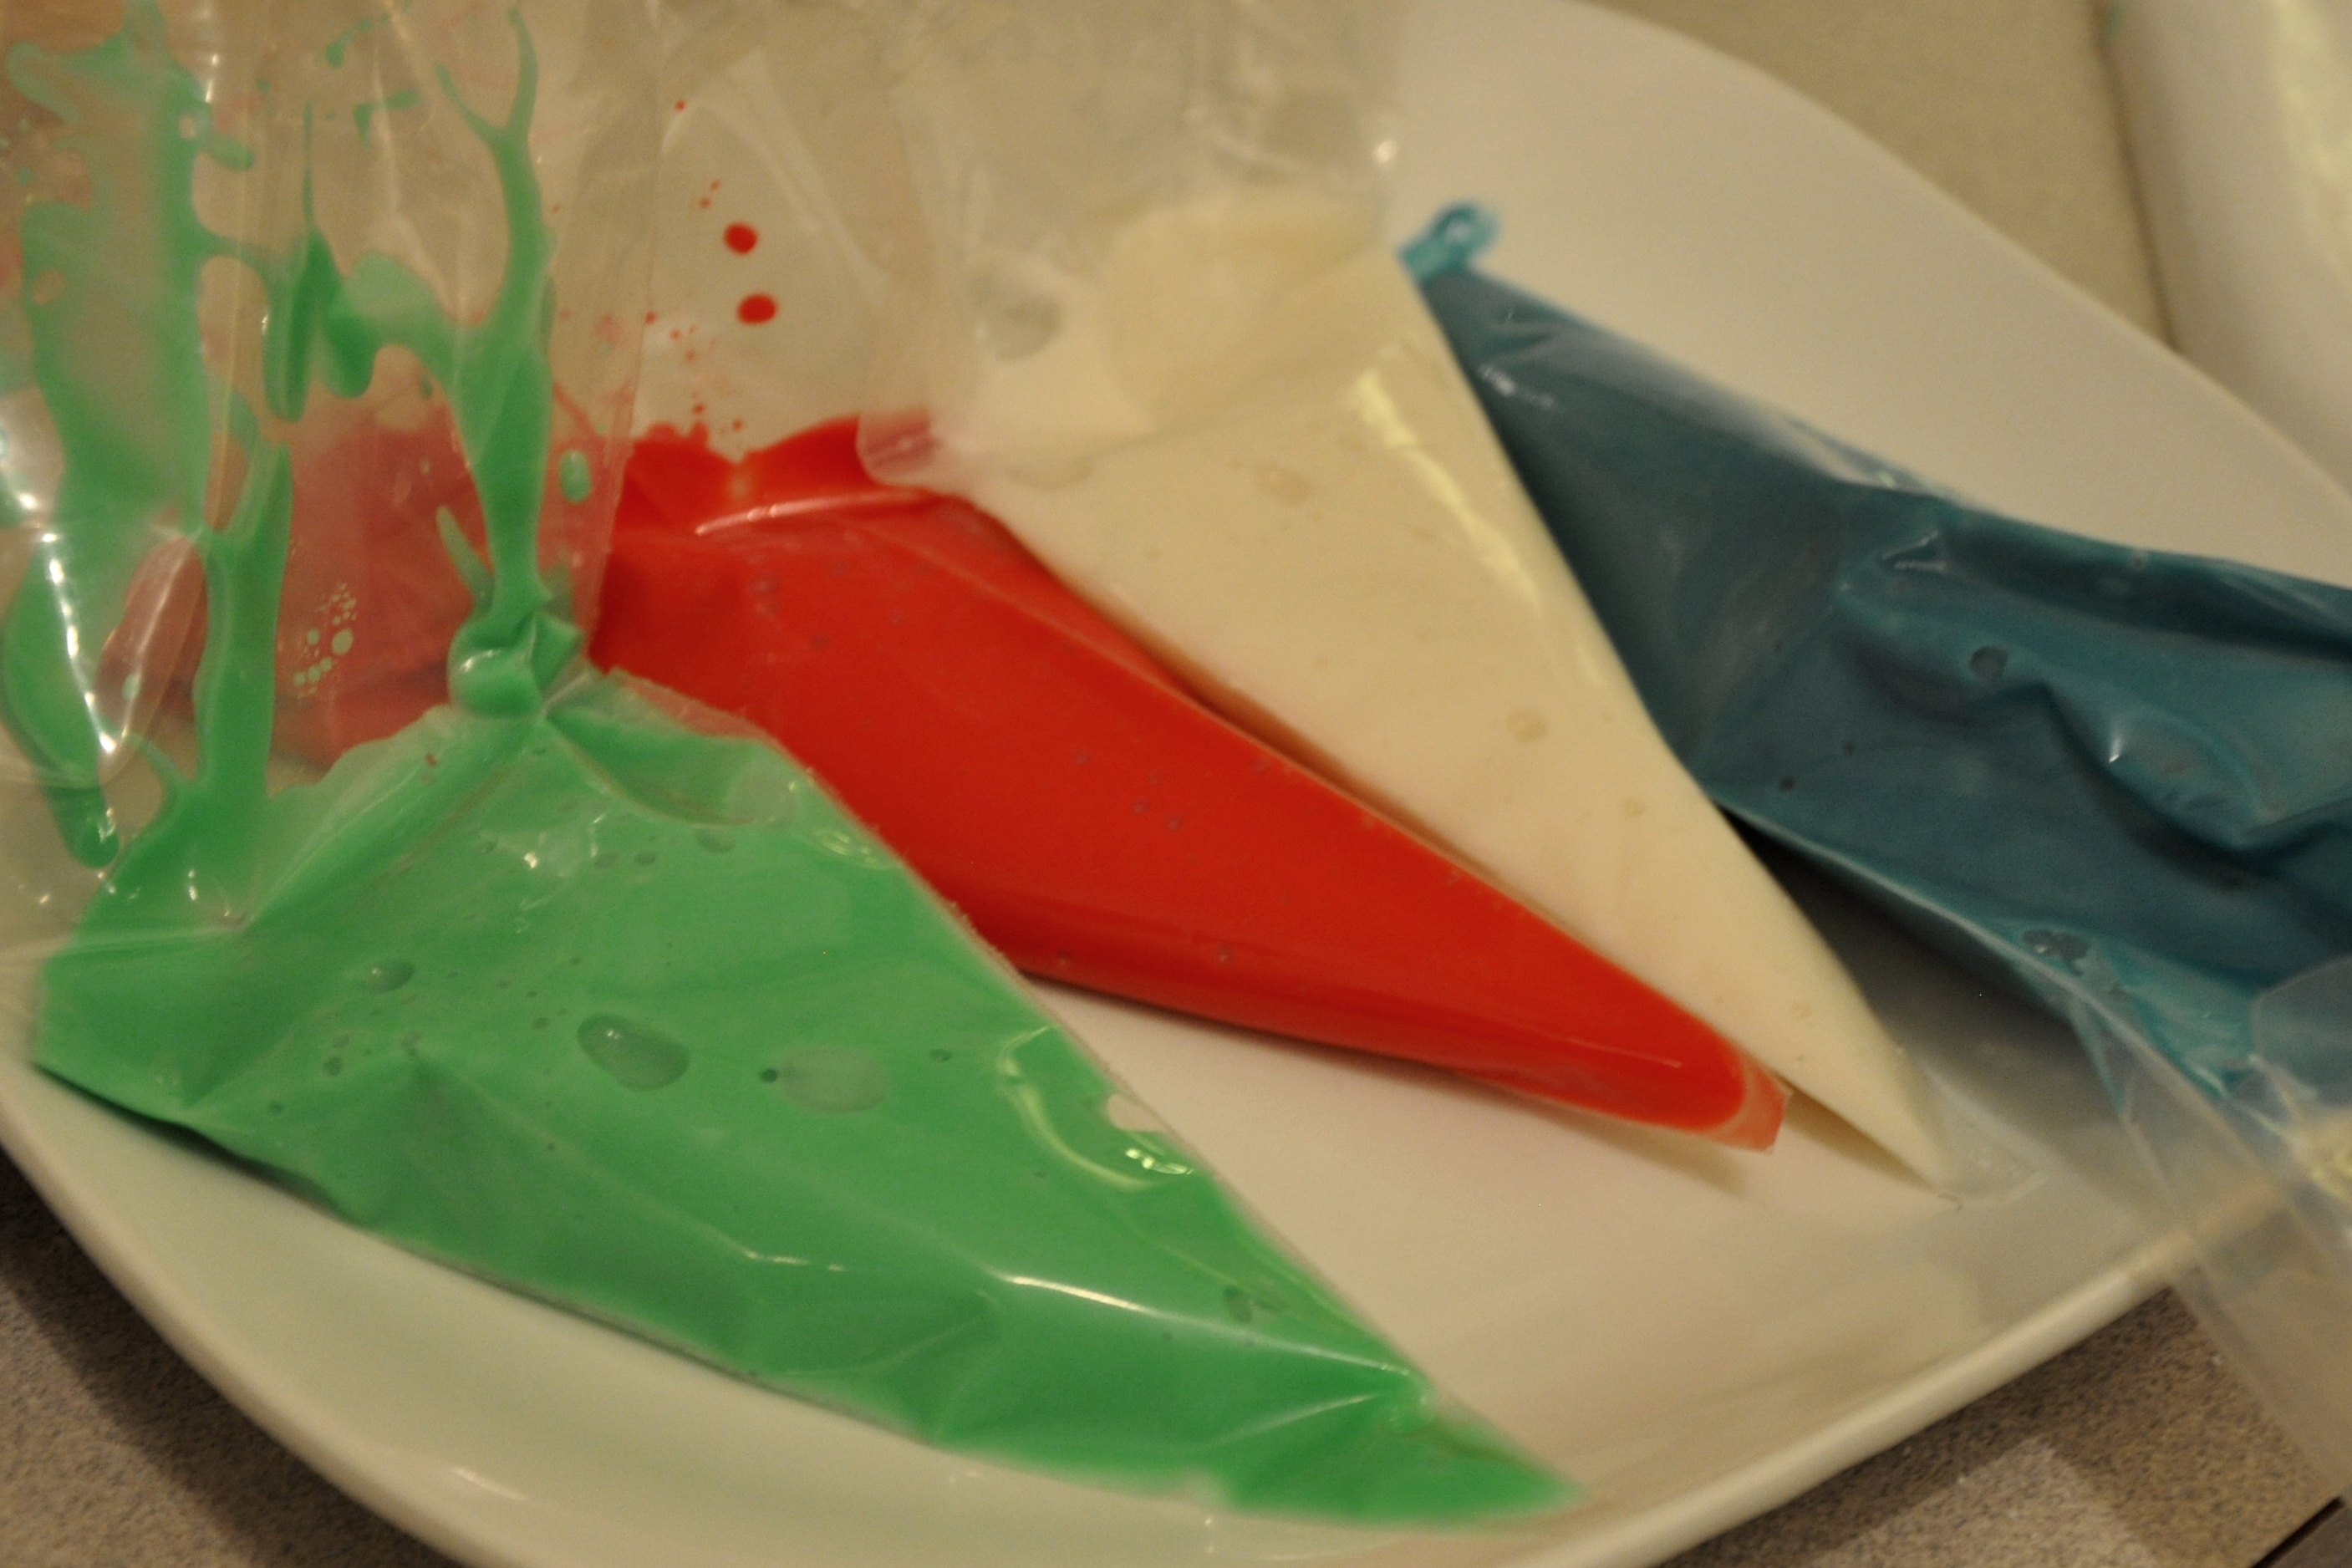
Egg-free, dairy-free royal icing
In a small to medium bowl add:
1 cup powdered sugar
2-3 teaspoons water or non-dairy milk
2 teaspoons of honey or light corn syrup (honey seems to give the icing that cream cheese taste to it, but do not use honey for guests with bee allergy)
a few drops of liquid food coloring (be careful to get only the liquid or another food coloring that is allergy safe, the Wilton paste colors are NOT allergy safe)
Stir to a consistency of VERY thick pancake syrup. You don’t want this icing too runny because it will run off of your cookies if it is. You want it to be workable.
Repeat the above in a separate bowl for each color.
Don’t hesitate to add a little more powdered sugar to get the consistency thicker. It does dry out quickly though, so once mixed, pour into zip-lock or decorator bags (before you cut the tiny opening that you’ll need to pipe on the icing).
It’s easier to pour the icing in the bags instead of using a spoon. Also, pouring the icing into the bags will keep it from drying out and gives you a lot more time to work on decorating your cookies.
When your bags are all filled, set them on a large plate and snip the bottom corner or opening to a tiny hole. Since the icing is of a pour-able consistency, you need the small opening to have better control.
As you ice the cookies, be careful to start with an outline that leaves a little room for spreading so that it doesn’t go to the edge of cookie and fall down the sides. Then, make another line or two inside of it (don’t completely fill the outline). As you can see in the picture, the icing will spread into the outline by itself. Use the tip of the bag to push it over the gaps.
Let the cookie icing dry overnight. Can either dry at room temp or uncovered in refrigerator.
If you prefer, you can serve these sooner (after the icing has just set) if you don’t want to wait. You just won’t be able to stack them on top of each other until they are completely dry.
So warm and savory, this thick and creamless mushroom soup is good for just eating with a slice of your favorite gluten-free bread or using to prepare your green bean casserole for Thanksgiving. Make a double or triple batch if you want to fill up your freezer to have on hand for other recipes that call for cream of mushroom soup. This has all of the flavor that we love and we don’t miss the cream (or the preservatives!). Be sure not to leave out the celery seeds, it really rounds out the flavor and makes it more like what you’re familiar with. If you don’t have celery seed, add 1/2 cup of finely chopped celery and saute’ with the onions and mushrooms.
Creamless Mushroom Soup
3 cups water
2 cups mushrooms, finely chopped
1 large yellow onion, finely chopped
2 Tablespoons of tapioca starch mixed with 1/2 cup of water
2 Tablespoons of onion powder
1 teaspoon of garlic powder
1 teaspoon of salt
dash or two of ground thyme
1/4 teaspoon of celery seed
cracked black pepper to taste
Directions:
In a large saucepan, add a little bit of oil and saute the onions and mushrooms until tender.
Add the remaining ingredients and simmer until thick and bubbly.
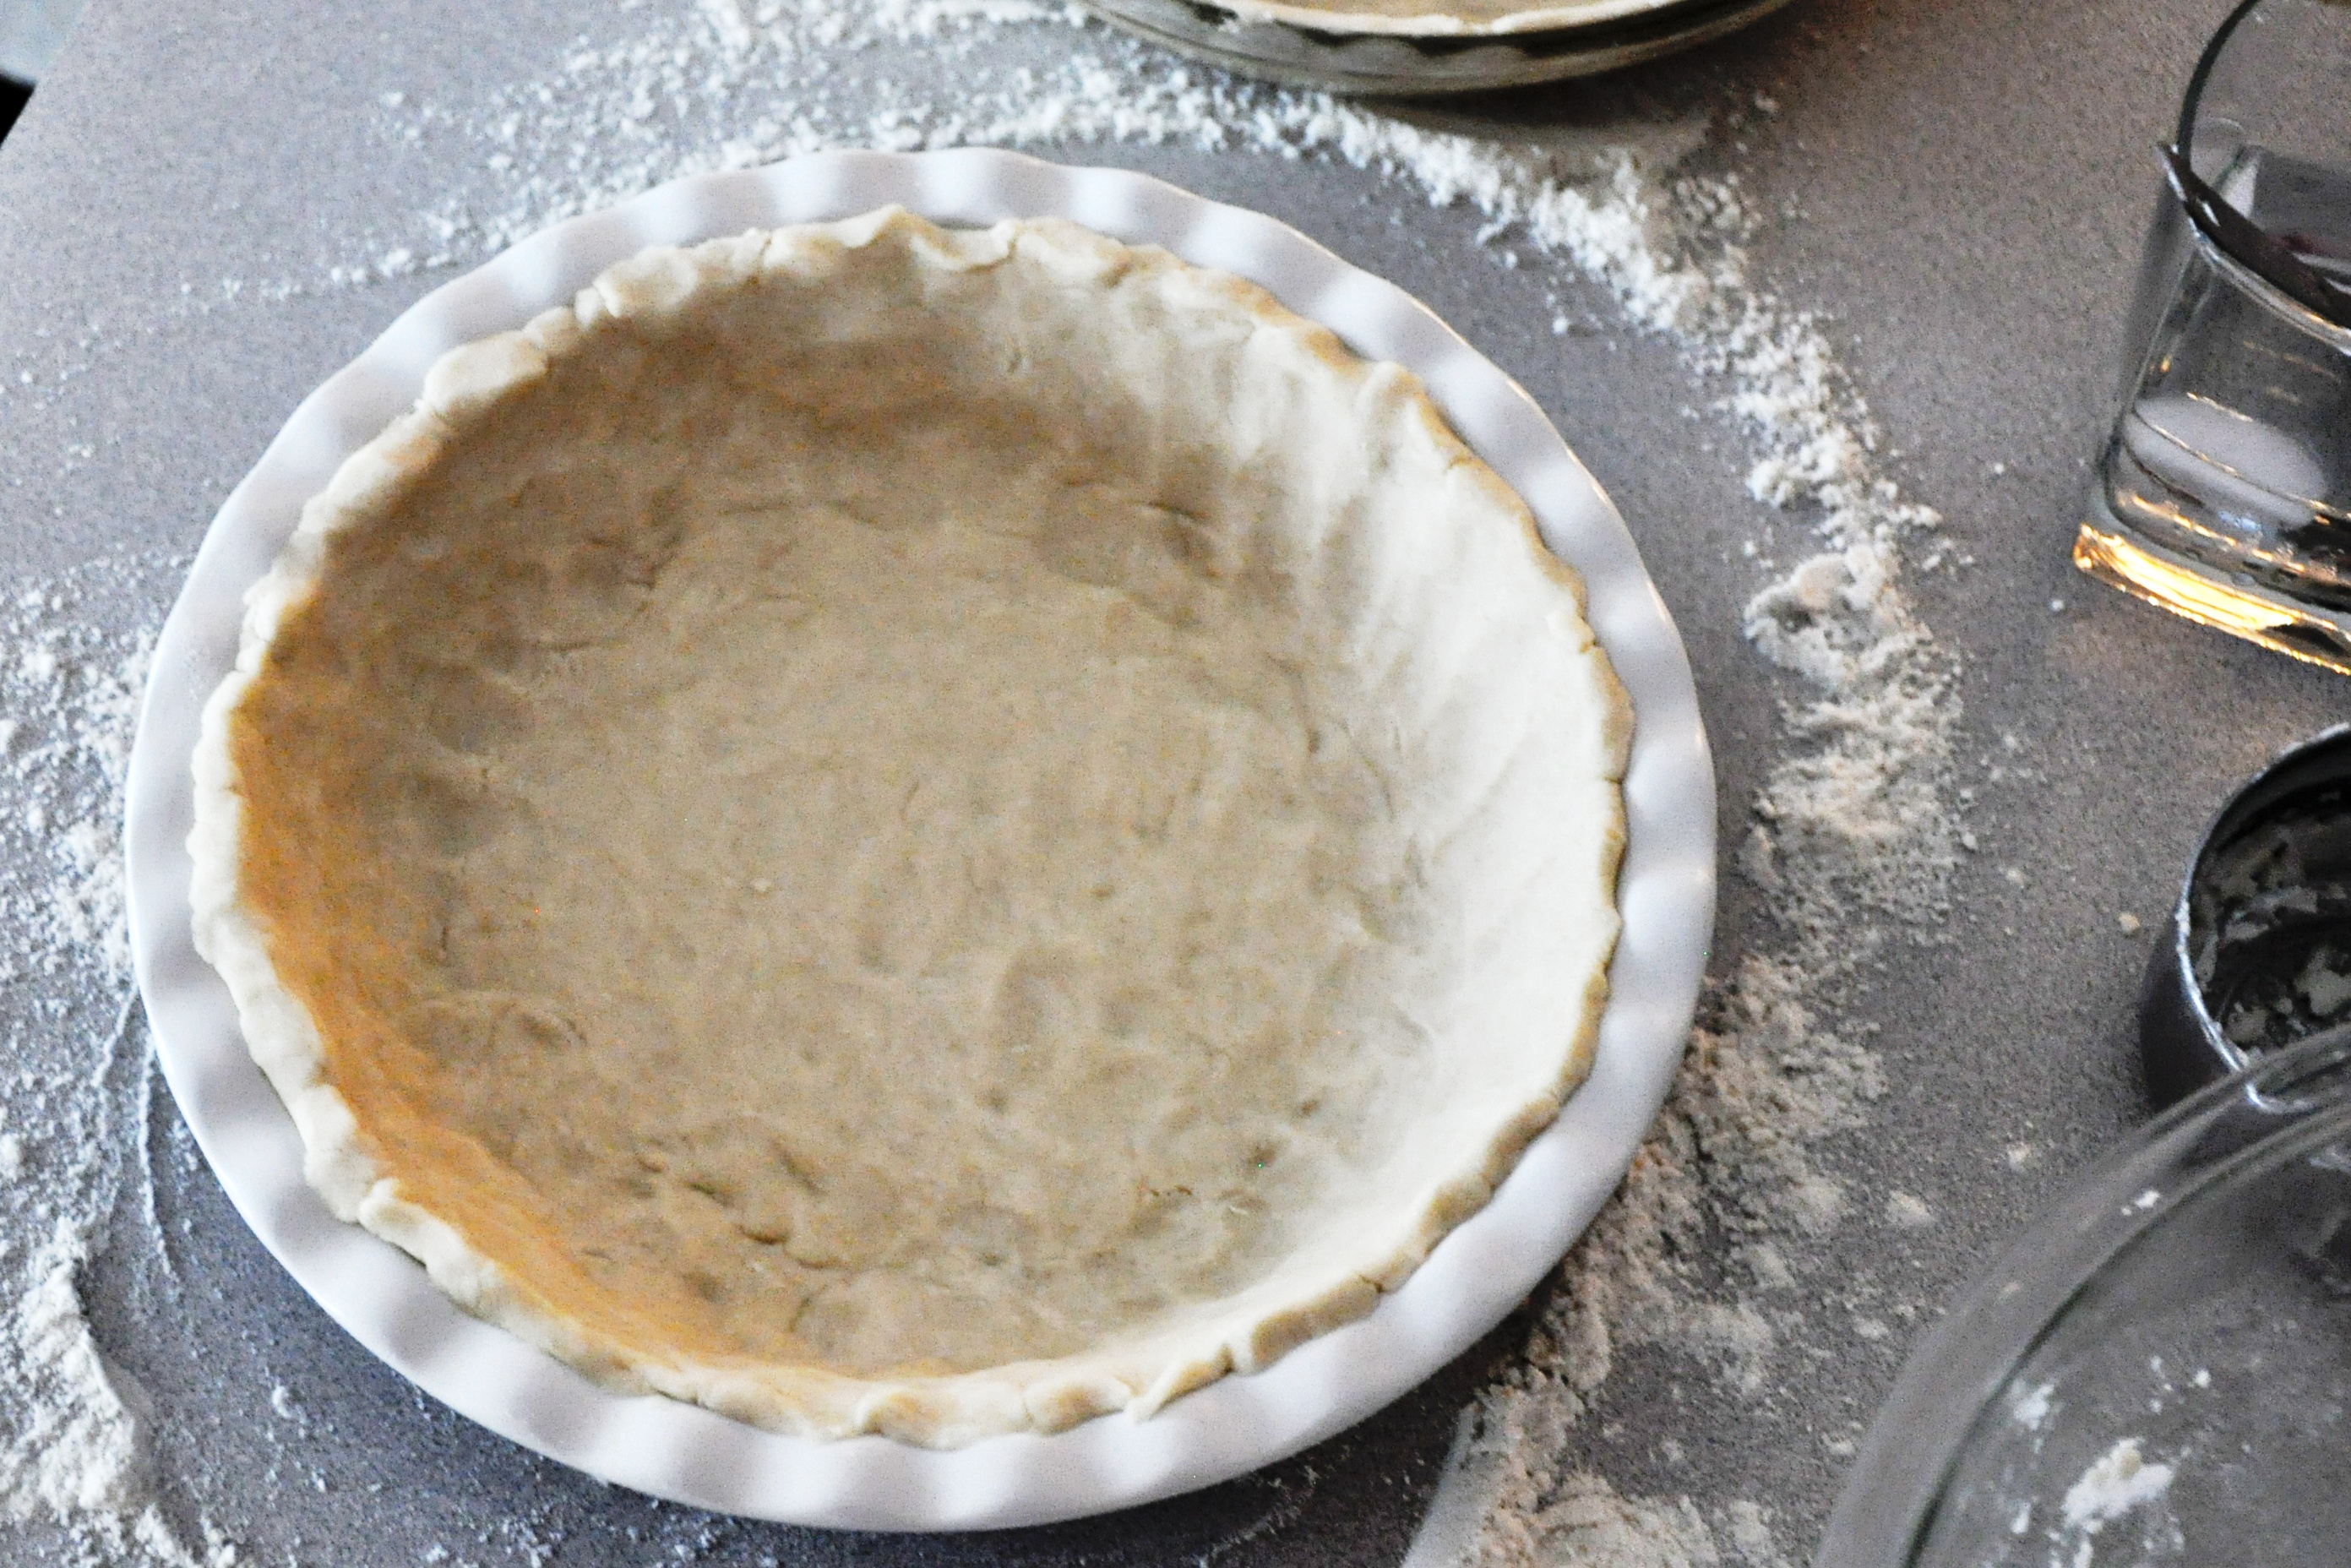
This pie crust will hold and carry your favorite pie filling just like the old gluten versions. The taste and texture is firm and what you’d expect for your pumpkin, apple and sweet potato pies. If you like your crust to have a touch of sweetness, such as for a cold banana cream pie, add two Tablespoons of sugar.
3/4 cup of Spectrum Organic non-hydrogentated shortening (or use soy-free Earth Balance*)
6-8 Tablespoons of ice water
Directions:
In a large bowl, stir together the dry ingredients.
Using a pastry cutter, cut in the shortening or Earth Balance until it resembles a sandy, course crumb texture.
Add the water until you have a thick dough. If you have added too much, work the dough on the counter until it is a firm, soft consistency and does not stick to your hands.
You can’t really roll this dough because there is no stringy gluten in it, so this will behave more like a shortbread cookie crust.
Spray or coat the pie dish with vegetable oil. This is an important step as gluten-free pie crust will want to adhere to the dish when it cools.
Shape into a large disk and set in the middle of the pie dish. Press firmly until it is coated.
If your recipe calls for pre-baking the pie shell, you will definitely want to cover with foil and add pie weights or beans to keep it from shrinking down.
I pre-baked mine according to my recipe without problem, and then I baked my regular pie in it. You will note that it is a bit firmer and does not brown as easily as traditional pie crust, but, in the world of pie-baking, these traits are actually desirable.
Enjoy!
*P.S. I have heard that the pea protein in Earth Balance is related to peanuts and therefore can cause an allergic reaction. I am not sure about this yet, but to be safe, use the shortening.
Make Thanksgiving a little more interesting this year by taking advantage of the fresh cranberries, apples and peppers that are available. This quick and easy chutney is allergy-friendly and a perfect accompaniment to provide that sweet zing to your main dish.
Cranberry-Apple and Poblano Chutney
1 12ounce bag (3 cups) of fresh cranberries
1 teaspoon fresh grated ginger
1 cup of sugar
1 green apple, peeled and cut into small pieces
2 large poblano peppers, cut into small pieces
1/3 cup raspberry jam (preferably and all-fruit spread made from real sugar)
1 teaspoon ground cinnamon
1/4 teaspoon ground cloves
1/2 cup raisins
1/2 cup sunflower seeds*
Directions:
Rinse the cranberries and remove any berries that look discolored and no longer good.
In a large saucepan, add the cranberries and enough water to almost cover them. Put the heat on medium high and add the remaining ingredients EXCEPT the raisins and sunflower seeds.
Bring to a boil, stirring occasionally. Once you hear the cranberries begin “popping,” lower the heat and simmer, uncovered, for about 15 to 20 minutes, stirring occasionally, until slightly thickened (it will get thicker when it cools down).
Remove from heat and stir in the raisins.
Transfer to a bowl to cool to room temperature.
Once it is cooled down (you may even want to wait until time to serve), add the sunflower seeds. This ensures that they don’t get cooked and stay crunchy. *You’ll note that the picture I took is a version that I made with pecans. It is NOT RECOMMENDED to use nuts in this recipe for larger gatherings. I am having a very small gathering where I am 100% positive that no one is allergic to nuts.
I have made this before with sunflower seeds and it was delightful. Stick with using sunflower seeds and everyone have a safe and happy Thanksgiving!
Whether you have or haven’t noticed lately, the world is getting a little more interesting for some of us. Job loss (in my own home, job losses for both of us at the beginning of the summer for which the joblessness has not yet ended), increasing cost of living, a government shutdown, the further separation of family and friends as we move in search of economic stability for our families. In fact, the number of blows that life seems to punch at us these days is enough to hack a large oak tree into an unrecognizable branch-less trunk.
Pruned a bit too far, it is easy to wonder about how much worse it can get, and if the next blow will leave you a withering twig in sand. You ride the emotional ups and downs with a strength that you never thought you had. A possible new opportunity gives a whole new branch of hope overnight, but then the “yes” you need doesn’t come. You remain strong. Your intellect knows that it’s just another “no” and one day your “yes” will come. But then, as my fiance’ says, the hopelessness hammer seems to come out of nowhere, to hack down your new branch of hope with a swift and painful blow. It’s not easy to remain strong when you don’t know how you are going to continue to live.
This is the best way I can describe the turning of a new direction for Safe Eats: It started as a fun blog of recipes for a little boy who wanted to have pizza again. It then evolved into developing recipes that included not just him and his allergies, but that of his friends.
As my family learned more and more about the life-threatening severity and prevalence of food allergies among so many children, our hearts went out to the members in our online groups that would report of their long nights in the ER and who found the very depths of emotional strength for which I have never imagined trying to pull from. Mothers and fathers holding the hand of their child, strapped to machines, struggling to breathe, struggling to live, and not knowing if they’ll go home to a room full of toys and space-themed blankets with no child to enjoy the rest of his innocent journey into life.
While my son has suffered intense reactions and pain, I’ve never had to watch him dance the edge of the cliff of death as other parents do nearly every two minutes in hospitals across the globe. We are very lucky. Our problems are not as big. But this is a pandemic that needs to be our problem.
When I wrote the article about my son wanting to help his friend with her peanut allergy, making sure we don’t even have it in our house so that he never has it on his clothes when he is in class with her, it warmed my heart. Now, just because my son is my kid, doesn’t mean I’m going to think he can do no wrong. He is human just like the rest of us, with some things he needs to work on. However, there is something that my fiance’ pointed out to me about him. He said, “Your son has a really strong moral compass. Have you ever noticed that he absolutely will not sell anyone out even if it gets him into trouble? He won’t tell me if you left the light on or if his friend left the toys upstairs. I never find out until you tell me. He is so protective.”
After he said that, I thought about other scenarios where my son took the heat for his friends. While I always thought it was sweet, I had never given him due credit. As my child goes with me everywhere and quickly runs with all his might to get ahead and open the door for me and for other people, and the way instantly and enthusiastically gets up to help me with anything, I wonder how this child came from me. As an adult, I am not as helpful as he is – and I should be. I think about what drives him and I watch him as he reads comic book after comic book. He wants to be a Hero.
Four years ago.
He’s not the only kid that wants to be a Hero, so do his friends. Have you noticed this about kids? They love Heroes! Secretly, so do grown-ups! (I’m still a sucker for Super Man movies to this day). My son, and his friends, are reminding me about the best part of human nature that resides within all of us: the Hero. It is the Hero inside of us that keeps wanting to be.
The more we have watched my son want to be a Hero, it has made us want to be a Hero with him.
One might say, isn’t the Hero theme a bit of a trope for something like an emerging nonprofit? Yeah, sure, it could seem to be an ego thing but if you reflect upon your own life and that of others, you realize that everything we do is based upon our need to be a Hero in some way. All emerging and ongoing nonprofits should look to emulate Heroes. And so should every business, organization and individual.
As for being Hero-driven, most people are already doing it – thinking about how to make life better for themselves and those they love. There is a Hero inside of you when you drive to work and think about how you are going to perform toward a hoped-for promotion and make a nice Christmas for your loved ones. There is a Hero inside of you when you go home and assess what you have accomplished and what you still want to accomplish. There is a Hero inside of you when you cook dinner for your family and try to give them the best nutrition. There is a Hero in you when think about how you can make it better. There is a Hero in you when you lie down at night and reflect on how you are going to solve your problems and that of those you care about. Whether you acknowledge it or not, you are constantly striving for a better future for you and your family. YOU are a Hero, every single day. So is the very environment that encourages us to dare. From the trees that offer a branch with which to climb to the stars the light the path in darkness; and so on it goes – Heroism – to the very diligent and hard-working worms that feed the soil that makes the food that sustains us.
As I write this long-winded prose to the dear souls that are still reading, I want you to know something, I just replaced every word ego in the previous paragraph with Hero .
I encourage you to look back up and see why I don’t like the misuse of the word ego anymore. And here is the explanation of why:
Ego became used quite frequently by the famous psychologist, Sigmund Freud. Ever Since he decided to attribute the word ego to the part of our brain that is cognizant only of itself and chose to define it as something that resides in total denial of what is outside of us, ego has been adopted in our modern cultural language as something that means only selfishness. It points the finger and makes a judgement about other’s egos. So, we all walk around with this ego that we’ve been told we have, along with the associative guilt that comes along with making sure that it does not get “out of control” with boastfulness and pride. If you think about it deeply, it does almost everything to our minds the way the word “sinner” does. Which is silly, really. There is nothing wrong with being proud of something GOOD that you do to benefit others.
If I ever start a linguistic trend in this world, it would be to ban the word ego altogether and call this thing inside of us, the one that helps us survive for our families and those we love: the Hero. I think this very word is what makes us Human.
Heroes are Humans, and Humans are Heroes. We are humble, kind, compassionate, giving and hard-working. We lift each other up and find ways to solve problems. That’s what we do.
If we are not solving problems, we are wasting our talent.
In my journey to create and share recipes for people with all kinds of severe food allergies, I have met families who have been met with sarcasm and spite as they ask others in the community to support their efforts to keep their child safe or from hurting. We have experienced it ourselves. We have met families whose children are suffering from symptoms but who cannot afford to have the non-allergenic foods that would allow their children to participate in social gatherings and avoid the emotional pain of exclusion. We have watched children with food allergies, including our our son, sit and watch as their classmates enjoy cupcakes. These children no longer go to pizza parties, birthday parties and restaurants because it is too painful. It is easier to staying home with an enthusiastic parent trying to recreate a favorite treat to make it all better. These children have to give away 90% of the candy they get in their trick-or-treat bag. They have to choose between saving their social standing among peers or saving their own life, a particularly hard thing for preteens and teens to do, especially when it is so important to learn the social nuances of life and work.
So, this brings me back to defining the direction of Safe Eats. With the help of caring people both near and far, we have teamed up to work on the following things:
Help our son and his friends participate in social gatherings, rituals, festivals, dinners out and holidays around the world.
Help those who have been suffering too long finally receive diagnosis and treatment.
Raise compassion among the communities that need to support those parents who have held their child’s hand in the ER and wondered if they were going to have to bury him or her because of a simple, accidental bite of the wrong cookie.
Contribute to other organizations that are seeking a cure and contributing to education.
Educate where we can and do everything we can to make the world a safer place.
As my family struggles to make it economically, we realize how lucky we are and we realize that we need to be stronger for those that could benefit from what we’ve learned. We must exercise the ideal of hope we cling to. We must make the world a place where food isn’t a death sentence for anyone. We MUST make it more affordable for a child to have a safe cupcake and enjoy life. This is what Safe Eats stands for. We must all be Heroes.
If I would ask any reader to do anything after reading this article, it would be to ask yourself one question: What you would you say to yourself if you were your own child? What do you stand for? What does the Hero in you want to do?
Can you ask both yourself and your real or inner child about the legacy are you going to leave here beyond your life? How will you hone the talents and strengths given and invested in you and make good use of them?
Lastly, How can we all inspire each other to add a new dimension to the Hero that already exists within all of us?
If you do nothing else, replace the word ego, with HERO. Inspire others to do the same.
This is reminiscent of the broccoli, cheese and rice casserole that is popular in Oklahoma and which was usually present at nearly every potluck I attended as a child. I looked forward to potlucks for this very dish. I loved the creamy combination of rice and cheese. If I could compare it to another delicious dish, I would say that this is a Southwest version of a delicious risotto. The version I made here does not have broccoli because I didn’t have any on hand, so I subbed red bell pepper and celery and it was a hit. You may decide on different veggies as the base of this is pretty versatile.
I made this in the skillet, but you could certainly bake this in a casserole dish after browning the meat and onions, and keep it warm until guests come over. Add some gluten-free breadcrumbs and put it under the broiler for a bit for browning. My family went back for seconds AND thirds, so I don’t think they missed the real cheese. 🙂
Make ahead notes for quicker weeknight dinner prep: Make large batches of rice on the weekend and freeze in 2 cup portions. You can also do the same for mashed or grated potatoes. For your protein, keep three packages of meat thawing in the refrigerator at all times. When you use one, get another package out to thaw and keep rotating. Use the one that has been thawing the longest. Fish usually thaws in one day, so you may want to plan differently for fish. Having rice handy and meat thawed out will make your dinner prep quicker and easier. Use canned beans for meatless nights (try to get the canned beans that do not have EDTA as a preservative. Ingredients should just be beans, water, salt.)
Ingredients:
1 lb. of ground chicken
1 small yellow onion or 1/2 of large white onion, chopped
Optional: 2 slices of allergen-free bread, toasted dark golden brown, crumbled
or 1/2 cup Mary’s Gone Crackers’ Herb Flavored Gluten-Free crackers, crumbled
Directions:
1. Brown ground chicken and onions in a large skillet over medium heat.
2. Put your frozen rice in the middle (if you made it in advance) and add some water. Cover and let boil and steam, stirring occasionally to break up the rice, add more water if needed.
3. When rice is hot and incorporated, remove lid and add spices and veggies. Let simmer until water is mostly evaporated.
4. Turn heat to low and add the vegan cheese. Taste and adjust seasoning and amount of cheese to your liking. If you do not have vegan cheese, try using a combination of vegan margarine and nutritional yeast.
5. (Optional) For a crunchy breadcrumb topping, process some Mary’s Gone Crackers Herb-Flavored gluten-free crackers in a small food processor and sprinkle over top. Or, you could toast a slice or two of gluten-free bread, process in a food processor or crumble over top.
Garnish with fresh parsley, basil or rosemary or add hot sauce if you like.
Many of us have wondered, “Is Root Beer gluten-free?”
Now, some of you may be wondering why one would even have to ask. It’s a beverage, not bread. However, most dark colas are made to look that way with an ingredient called caramel color.
Caramel color is tricky to know with certainty whether it is processed using wheat or not. Even with the 365 brand, it stated that the caramel color was made from cane sugar. But does that mean it’s only cane sugar? There was no gluten-free indicator on the bottle and I am wary when they don’t label something as gluten-free. So, my fiancee’ (who is quite the thorough food investigator) wrote an email to Whole Foods to ask about the processing of the caramel color from cane sugar in the 365 brand sodas.
I must say that given the bit of push-back that I usually encounter when I am calling or investigating food ingredients, I was quite pleased when he received this initial response:
“Thanks for contacting us. I have a four year old with life threatening food allergies as well, so I know exactly how hard this can all be, and especially how important it is to us as parents to make sure they can have as inclusive and “normal” a diet as possible. I will reach out to the soda vendor and see what information I can get about the sugar. I doubt I hear back from them today, but I will let you know as soon as I do.
Just for the future, if you have any other questions about our private label line, you can email me directly at customer.questions@wholefoods.com. It’s a little more direct than the web site, if that is easier for you.
I will be in touch as soon as I hear from the vendor on the sugar.”
That was a super friendly and helpful response!!! We were happy to wait a few days. When we heard back from the representative, this is what we received:
“I heard back from our vendor and there is no possibility of gluten in the caramel coloring; they even have a gluten free certification on file. I hope this helps – please let me know if you need anything else!
If you have any further questions please use our online response form.”
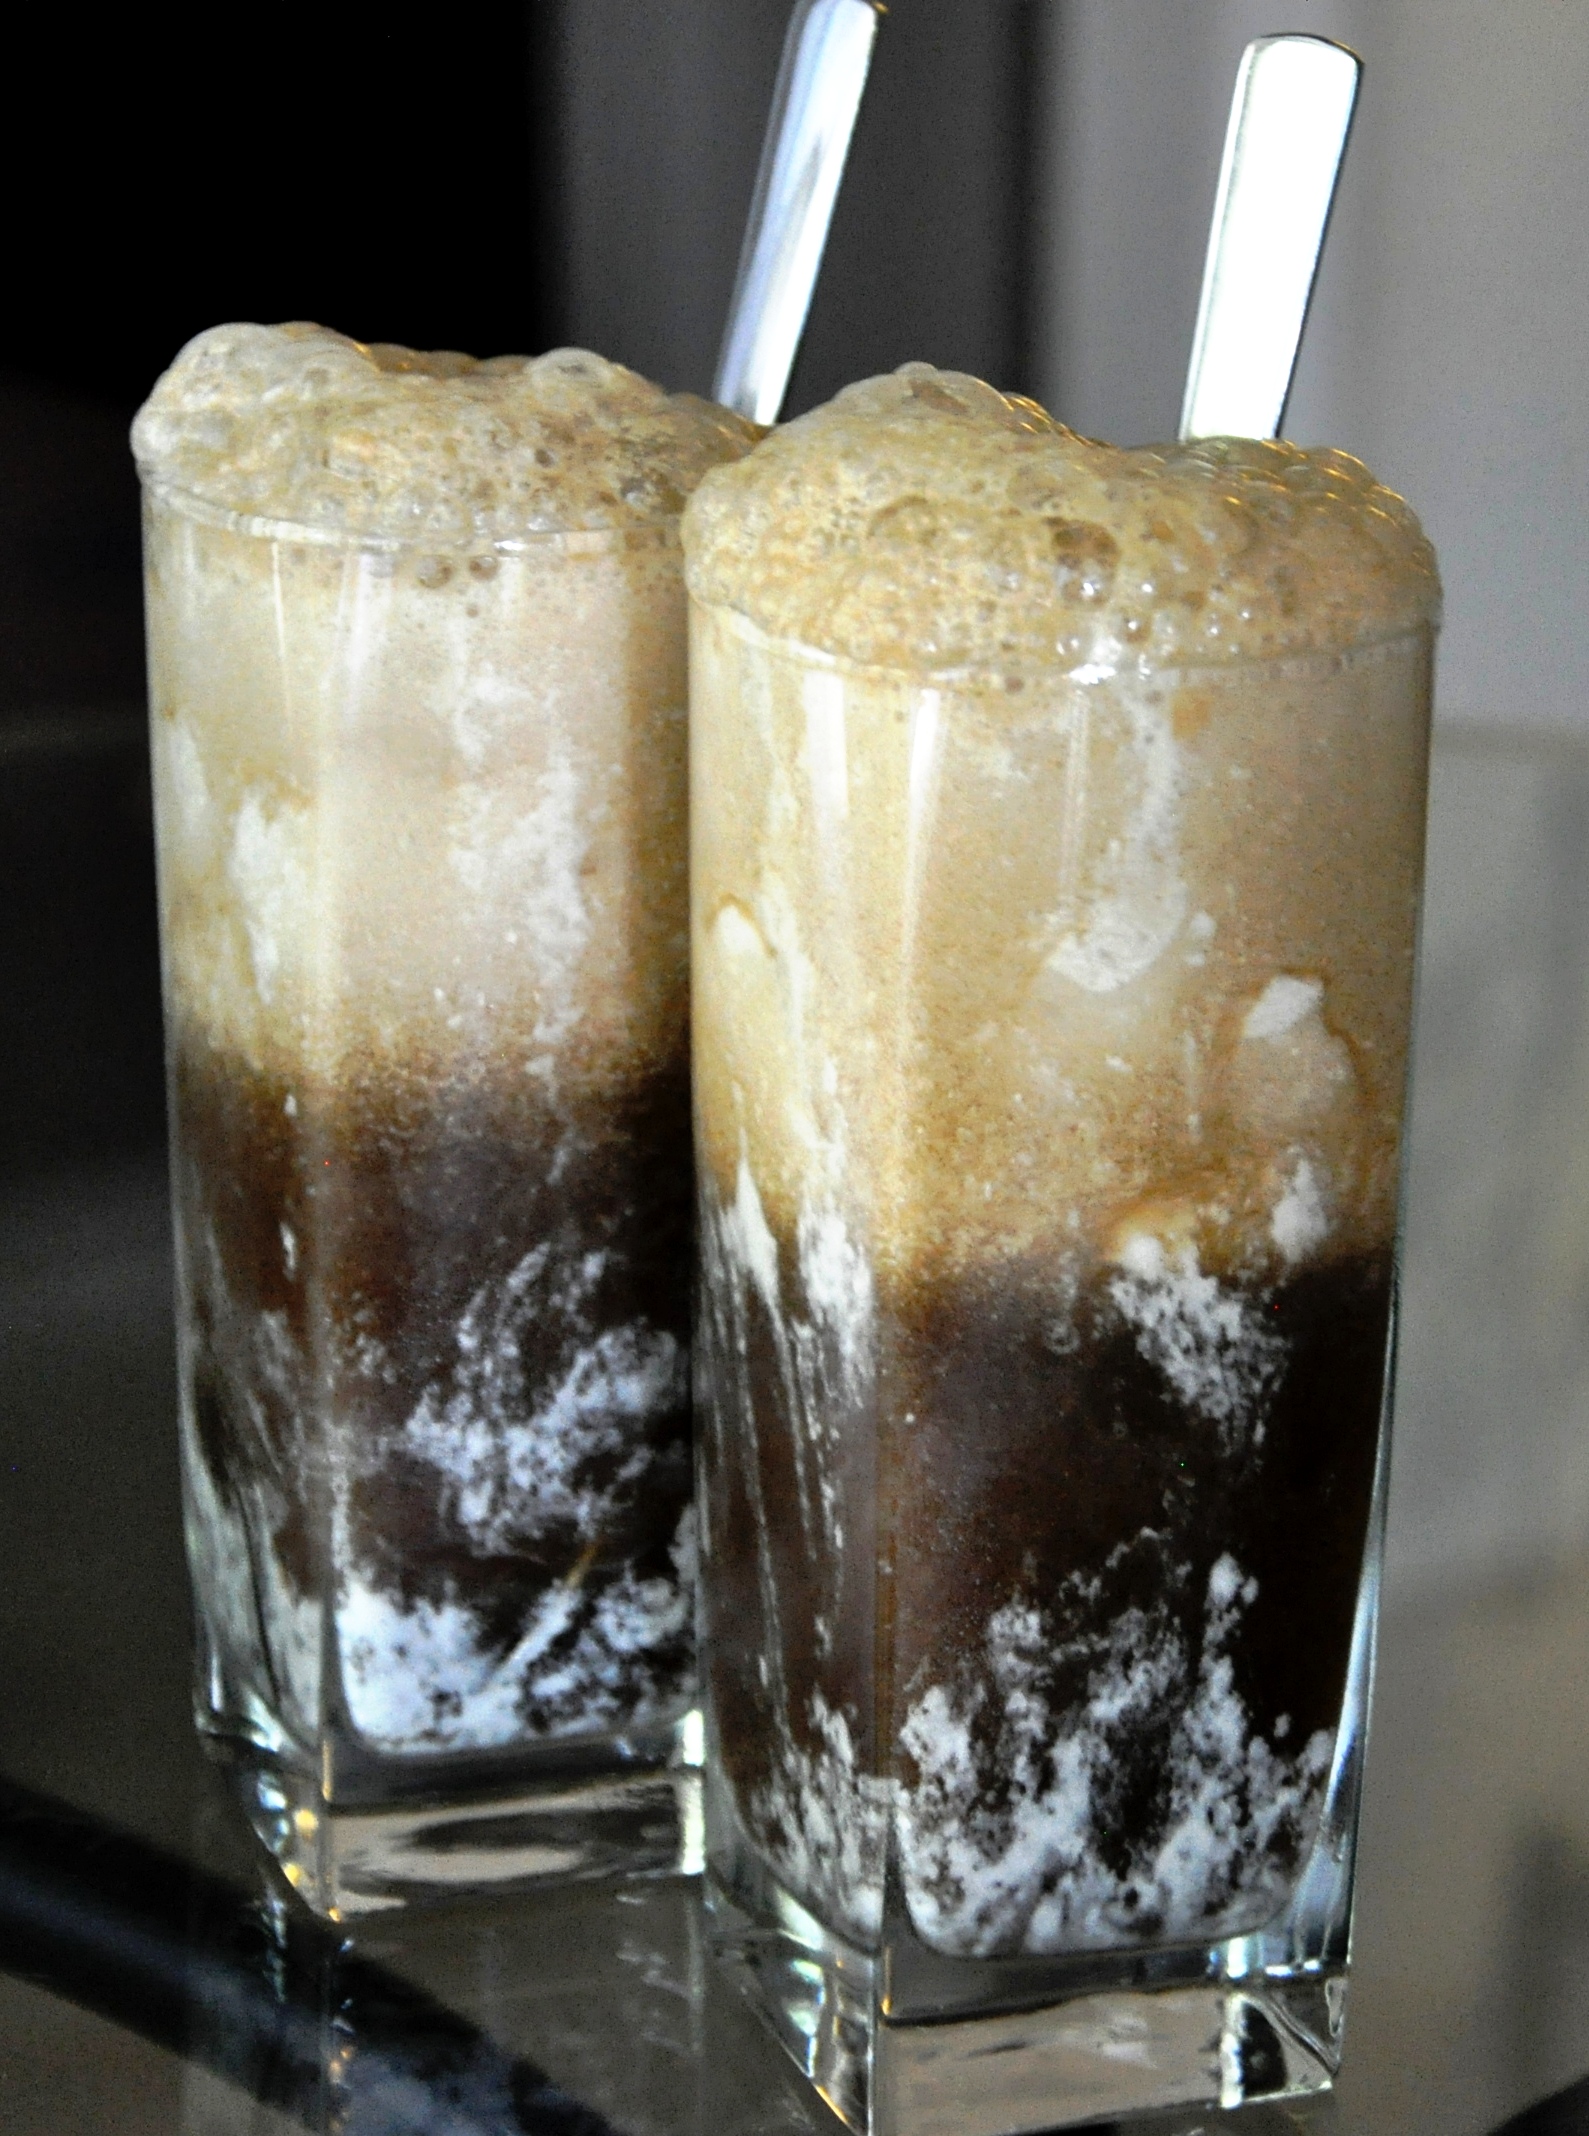
So, with that, we called in my son and told him the exciting news! Today, we paired it with our homemade coconut milk non-dairy ice cream and made a root beer float. He had never had one before. He absolutely loved it.
What a great way to celebrate the joy of safe eating!