Classic Fried Chicken, Gluten-Free, Easy

Take heart, dear Southern friends, you are not alone in your memories of picnics and dinners with family. Whether it was take-out from your favorite place, or something only your grandma seemed to know how to make, we have finally found a way for you to relive those memories and enjoy this classic food fare again.

DSC_0224 (2)

Classic Fried Chicken, Gluten-Free, Easy

8-12 chicken legs (and/or other parts)

1 cup of either basic gluten-free flour mix or rice-free gluten-free flour mix (see home page for these mixes)

1 cup of cornstarch

1 Tablespoon garlic powder

1.5 teaspoons salt

1 teaspoon fresh cracked pepper

1 teaspoon paprika

3 eggs mixed with 1/2 cup water

Directions:

In a large bowl, combine gluten-free flour, cornstarch, and seasonings.

I a medium bowl, combine the eggs and water.

In a heavy-bottom deep skillet, over medium heat, slowly bring about 2 cups (halfway up the sides of skillet) of canola oil or other similar oil that can get up to 350 degrees. Use a thermometer and carefully watch the temperature of your oil throughout the cooking process.

Do not use peanut oil or a vegetable oil that has soy oil in it if you are making this for the allergy crowd. Don’t use corn oil if you have guests with corn allergies. Canola oil seems to be safe for many, but always check.

Wear an apron to protect your clothes.

Do not get distracted with other things, a few minutes of cooking without monitoring can lead to burnt chicken really quickly.

Dredge chicken in egg wash and then in flour and drop into oil.

Cook chicken for 13-15 minutes or until thermometer inserted into cooked chicken registers 180 degrees.

Enjoy!

Chickpea Chocolate Chip Cookies

Chickpea Choc Chip Cookies

These cookies are totally free of peanuts, nuts, eggs, gluten, wheat, and dairy.

Why the chickpeas? I ran out of shortening and earth balance but had everything else to make chocolate chip cookies. I really wanted to experiment with an egg-free cookie recipe. But without the fat, I was a little stumped. Could I still do it? Most recipes call for so much of said fat, really, the fat only does two things: add volume and softness. I remembered seeing some posts in my Facebook feed from raw food pages about making chocolate chip cookies using chickpeas. So, I thought I’d try pureed chickpeas and canola oil to replace the fat and 1/4 cup of applesauce to replace the eggs.

After deciding on these replacements, and consulting volume of ingredients from two cookbooks, this is what I came up with: a thick, cake-like chocolate chip cookie that, when paired with a tall glass of non-dairy milk, makes for a very comforting treat. The family raved.

I made these very large because I knew my son would get a kick out it. But you can use this recipe for any size and thickness that you want since these don’t spread out at all like the traditional wheat and butter cookie.

Ultimately, there are five really great things about this recipe: 1. They taste great, just like traditional chocolate chip cookies (my fiance did not know I used chickpeas until I told him). 2. They are totally free of the eight most common food allergens. If there is a legume allergy, use silken tofu instead of chickpeas (do not use tofu if there is a soy allergy) 3. You can eat this raw without worry of salmonella poisoning from eggs. Idea: Stir the dough into your favorite ice cream! (Oh yum) 4. You have the benefit of having total control over the size, shape and thickness of these cookies. 5. You don’t have to buy  expensive fats such as shortening, earth balance or peanut butter, and thus a bit more economical.

So, here is the recipe. Enjoy!

Chickpea Chocolate Chip Cookies

Preheat your oven to 350 degrees Fahrenheit and grease two large cookie sheets.

In a small food processor, add:

1 15-oz can of chickpeas (garbanzo beans), rinsed and drained.

1/4 cup of unsweetened applesauce

1/4 cup of canola oil

2 teaspoons of vanilla

Blend until mixture is very smooth and set aside.

In a large bowl, mix together these dry ingredients:

2 cups of your favorite gluten-free flour blend

1/2 teaspoon xanthan gum (if your flour blend does not have it)

1/2 teaspoon of salt

1 teaspoon of baking soda

1/2 cup of dark brown sugar

1/2 cup of granulated sugar

Stir together the dry ingredients and then add the chickpea puree. Stir and then you may have to use your very clean hands to squeeze and mix the dough until it all comes together.

Add 1 cup of Enjoy Life or other non-dairy chocolate chips and mix.

Shape cookies and flatten to about 1/4 inch thick. Bake on a rack that is closer to the top as these cookies brown quickly on the bottom. Bake for 11-15 minutes depending on the size and thickness of the cookie. They are done when the edges are golden brown. If you want the tops of the cookies a deeper brown color, finish them under the broiler for just one minute.

Serve warm with a tall glass of cold rice, hemp, soy or other favorite non-dairy milk.

Chicken Shepherd’s Pie

Image

I hope this savory shepherd’s pie, free of the eight common food allergens, is something you find delicious, comforting and satisfying. I want to tell you a secret about the mashed potatoes: keep the colander in the cabinet and don’t pour out all of the potato water. Leave about an inch of the potato water in the bottom of your stockpot as your liquid for mashing. There is a lot of flavor in that water (and also nutrients). Also, it’s easier and less expensive than using a milk substitute. As you know, I’m a fan of spending as little of my money on special ingredients as I can, so I used olive oil instead of earth balance, at least for the potatoes. Many of these ingredients are from ALDI. I shop there for many things so that I can save my money for things like the special ingredients I can’t do without. Okay, enough chit-chat, here is the recipe:

Peel, wash and put your potatoes in a large stock pot with boiling water. You only need about 6-8 potatoes but I make a whole bunch to save for leftovers. Start boiling your potatoes (Idaho potatoes work best for mashing but feel free to use what you have on hand). While those are cooking, prepare your chicken filling.

Image

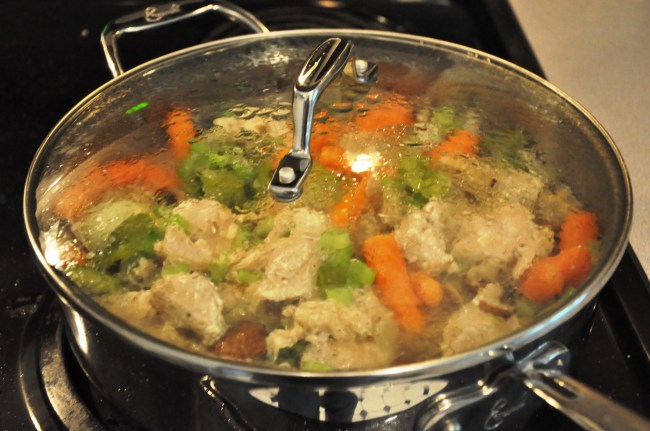
In a deep skillet add:

One package of chicken tenders (about 2 pounds) – you can even put them in frozen, they’ll just have to cook longer until done. I do this all the time since I’m not a fan of using the microwave. If you have only chicken thighs or legs, or you’d rather do this with beef, lamb or pork, go for it!

1 yellow or white onion, medium diced

1 green bell pepper, medium diced

8 fresh mushrooms, sliced

4 stalks celery, small diced

10-15 baby carrots

water for simmering (the water will pick up flavor of everything, no need for broth)

1 tsp dried sage

1 Tbsp garlic powder

1 Tbsp onion powder

1-2 tsp salt

fresh cracked pepper to taste

Cover and simmer over medium heat until your chicken is cooked all the way through and your carrots and celery are tender. Watch and add more water if needed as you don’t want it to burn. When done, lower temperature and add:

1/4 cup of earth balance or olive oil

1/4 cup nutritional yeast

1/2 tsp yellow or dijon mustard

If you don’t have the earth balance or nutritional yeast, don’t fret, this will still taste good!

Stir and keep warm while you prepare the potatoes as follows:

Image

Drain the potato water until you are left with about 1 inch of water at the bottom. Keep the water in there. Add 1/3 cup olive oil, 1 Tbsp onion powder, 1-2 tsp salt and cracked pepper to taste. Always taste and be sure you like it.

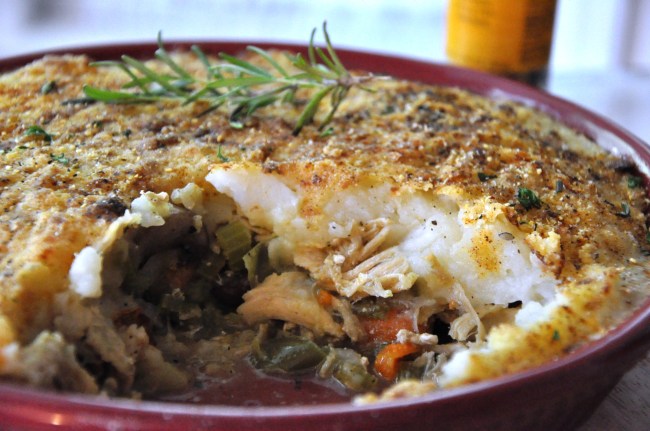
Set your oven to broil (or 500 degrees Fahrenheit) and then assemble the pie. Add the filling to an 8-inch or 9-inch pie dish, top with enough mashed potatoes to cover and then sprinkle 1/4 cup rice flour or your favorite gluten free flour blend on top. Using a pastry brush, lightly drizzle 1/8 cup of olive or vegetable oil over the the flour, getting as much of the flour oiled up as you can. Dust with paprika, salt, pepper, and ground mustard. I found a spice grinder at ALDI for poultry and I love it for this application (it has all of the spices I just mentioned and no bad additives).

Put your oven rack to the top of your oven, put in your pie and broil for 5-15 minutes or until golden brown on top. Depending on the type of oil and flour you use for your topping, this time can vary so keep a close watch on it to make sure it doesn’t burn.

Serve with chopped fresh rosemary. If you don’t have fresh rosemary, dried rosemary or dried Italian seasoning would also work.

If you have any questions, let me know. Happy Eating!